Deploying a database using Bamboo
Published 05 January 2016
This example shows you how to automate the deployment of your database changes to a preproduction environment before releasing to a production environment, using SQL Release and Atlassian Bamboo.
Overview
Your preproduction environment should contain a database that can be used for testing deployments. Your production environment should contain the live database you want to release to.
You'll use a Bamboo deployment project to deploy a database to preproduction and then to production. The stages are:
- Update the preproduction database so that its schema is identical to the production database.
- Create a deployment script to update the preproduction database.
- Apply the deployment script to the preproduction database.
- Review the deployment resources to check the preproduction database has been updated correctly.
- Promote the release to production by applying the same deployment script to production. Before doing this, SQL Release checks the production schema has not drifted since the script was generated.
Before you start
Install Bamboo
Bamboo Cloud
If you're using Bamboo Cloud with remote agents, you should still be able to use these instructions, with minor modifications. If you're using Bamboo Cloud with elastic agents, you'll need to install the DLM Automation Suite on each elastic agent.
- Install the DLM Automation Suite, which also installs SQL Release, on the machine running the Bamboo agent. For more information, see Installing (DLM Automation Suite documentation).
1. Set up the SQL CI Build
In Bamboo, create a build job that builds your database to a NuGet package. This can be done using command-line tasks, or using the SQL CI Build Plugin.
The deployment project will need access to the build job's output, so you'll need to create an artifact definition for the NuGet package. To do this:
- Go to the build job.
- From the Artifact tab, click Create Definition.
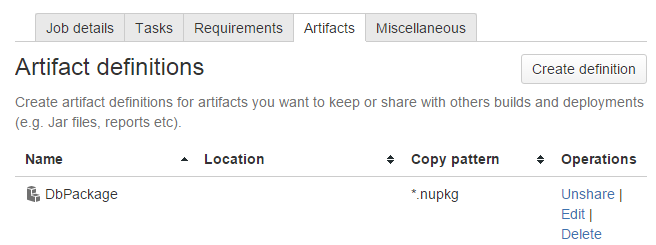
- Enter a name, such as DbPackage, and use the copy pattern *.nupkg.
2. Create a deployment project
- Create a deployment project, and link it to the build plan.
- Add the preproduction environment. Name this Preproduction.
- Add the production environment. Name this Production.
Notice that Bamboo automatically adds two tasks to the build plan: Clean working directory task and Aritfact download. Artifact download downloads the NuGet package from the SQL CI build, ready for use by the deployment.
3. Add the preproduction variables
- Go to your deployment project.
- In the preproduction environment, click Variables and add these variables:
PreProductionDatabaseName | <NameOfYourPreProductionDatabase> |
ProductionDatabaseName | <NameOfYourProductionDatabase> |
DatabaseServer | <YourSQLServerInstance> |
SQLServerUsername | <YourSQLServerUsername> |
SQLServerPassword | <YourSQLServerPassword> |
If your preproduction and production databases are on different servers, add more variables and add these into the script in the next section.
4. Add the "Overwrite preproduction with production" task
The first task you'll add to your deployment project overwrites the preproduction database with production.
Preproduction should be identical to production (or as close to identical as possible) so you can:
- test exactly what'll happen when you deploy to production, without running the risks associated with updating a live database
- test server configuration and environmental settings
- detect bugs and prevent them going into production
There are several ways to make sure both environments are identical, including restoring from a backup of production. For more details, see Managing Test Data as a Database CI Component (Simple Talk article).
In this example, you'll use the New-DlmDatabaseRelease cmdlet to deploy the production schema to the preproduction database.
- In your deployment project, in the preproduction environment, click Edit tasks.
- Click Add Task, and select Script.
- In Task Description, enter Overwrite preproduction with production.
- Select the Run as Powershell script checkbox.
In the Script field, copy and paste the script below. This uses the variables that we set up in the previous step:
$ErrorActionPreference = "Stop"
# This step makes sure that the preproduction database and the production database
# are identical, by deploying the production schema to the preproduction database.
$preproductionDatabase = "Data Source=${bamboo.DatabaseServer}; `
Initial Catalog=${bamboo.PreproductionDatabaseName}; `
User ID=${bamboo.SQLServerUsername};Password=${bamboo.SQLServerPassword}"

$productionDatabase = "Data Source=${bamboo.DatabaseServer}; `
Initial Catalog=${bamboo.ProductionDatabaseName}; `
User ID=${bamboo.SQLServerUsername};Password=${bamboo.SQLServerPassword}"

$release = New-DlmDatabaseRelease -Target $preproductionDatabase -Source $productionDatabase
Use-DlmDatabaseRelease $release -DeployTo $preproductionDatabase -SkipPreUpdateSchemaCheck –SkipPostUpdateSchemaCheck
Click Save.
5. Add the "Create database update resources" task
- In your deployment project, in the preproduction environment, click Edit tasks.
- Click Add Task, and select Script.
- In the Task Description, enter Create database update resources.
- Select the Run as Powershell script checkbox.
In the Script field, copy and paste the script below:
# This step uses SQL Release to create a directory containing the # Database Update Resources: all the artifacts relating to the deployment. $databaseUpdateResourcesDirectory = "d:\DatabaseUpdateResources\${bamboo.deploy.project}\${bamboo.deploy.version}\" # Makes sure the directory we're about to create doesn't already exist. If (Test-Path $$databaseUpdateResourcesDirectory) { rmdir $$databaseUpdateResourcesDirectory -Recurse -Force } # Sets up connection string for the production database. $productionDatabase = "Data Source=${bamboo.DatabaseServer}; ` Initial Catalog=${bamboo.ProductionDatabaseName}; ` User ID=${bamboo.SQLServerUsername};Password=${bamboo.SQLServerPassword}" # Sets up connection string for the preproduction database. $preproductionDatabase = "Data Source=${bamboo.DatabaseServer}; ` Initial Catalog=${bamboo.PreProductionDatabaseName}; ` User ID=${bamboo.SQLServerUsername};Password=${bamboo.SQLServerPassword}" # Creates the DatabaseUpdateResources directory. $release = New-DlmDatabaseRelease -Source WidgetDev.1.0.nupkg -Target $($productionDatabase, $preproductionDatabase) -Verbose Export-DlmDatabaseRelease $release -Path $databaseUpdateResourcesDirectory- In line 22 on the script, replace
WidgetDev.1.0.nupkgwith the name of your NuGet package. You may need to use an environment variable in the name, such asWidgetDev.1.${bamboo.buildNumber}.nupkg. - Click Save.
6. Add the "Run the update script" task
This task runs the update script created in the previous task on the preproduction database.
- In your deployment project, in the preproduction environment, click Edit tasks.
- Click Add Task, and select Script.
- In the Task Description, enter Run the update script.
- Select the Run as Powershell script checkbox.
In the Script field, copy and paste the script below. It uses variables that we will set up in the next section:
$ErrorActionPreference = "Stop"
$databaseUpdateResourcesDirectory = "d:\DatabaseUpdateResources\${bamboo.deploy.project}\${bamboo.deploy.version}\"

# This step deploys the update we previously generated and wrote to disk.
$targetDatabase = "Data Source=${bamboo.DatabaseServer}; `
Initial Catalog=${bamboo.PreProductionDatabaseName}; `
User ID=${bamboo.SQLServerUsername};Password=${bamboo.SQLServerPassword}"
Import-DlmDatabaseRelease $databaseUpdateResourcesDirectory | Use-DlmDatabaseRelease -DeployTo $targetDatabase
Click Save.
Your deployment project should now look like this: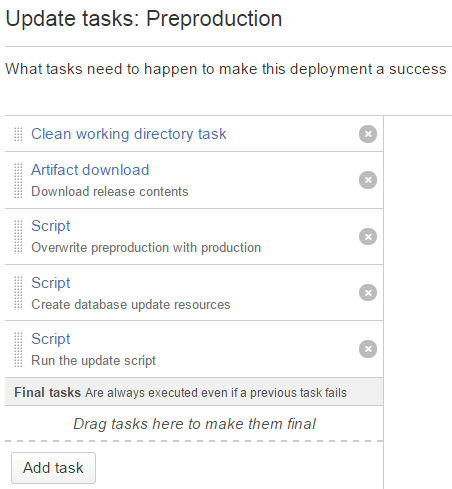
7. Add the production variables
In the production environment, click Variables and add these variables. These are the details of your production database environment:
DatabaseName | <NameOfYourProductionDatabase> |
DatabaseServer | <YourProductionSQLServerInstance> |
SQLServerUsername | <YourProductionSQLServerUsername> |
SQLServerPassword | <YourProductionSQLServerPassword> |
8. Add the "Run the update script" task to the production environment
This task applies the same update script previously applied to preproduction to production.
- In your deployment project, in the preproduction environment, click Edit tasks.
- Click Add Task, and select Script.
- In the Task Description, enter Run the update script.
- Select the Run as Powershell script checkbox.
In the Script field, copy and paste the script below:
$ErrorActionPreference = "Stop" $databaseUpdateResourcesDirectory = "d:\DatabaseUpdateResources\${bamboo.deploy.project}\${bamboo.deploy.version}\" # This step deploys the update we previously generated and wrote to disk. $targetDatabase = "Data Source=${bamboo.DatabaseServer}; ` Initial Catalog=${bamboo.DatabaseName}; ` User ID=${bamboo.SQLServerUsername};Password=${bamboo.SQLServerPassword}" Import-DlmDatabaseRelease $DatabaseUpdateResourcesDirectory | Use-DlmDatabaseRelease -DeployTo $targetDatabase- Click Save.
You've finished adding the tasks for your deployment project. You can now try running the deployment.
9. Run a deployment
- Go to your deployment project and click Deploy > Preproduction.
- Choose Create new release from build result, and select the Build result you want to deploy.
- Click Start Deployment.
- Watch the build complete. If it fails, view the deployment log. The most common causes of errors are mistyped variables.
- Review the deployment resources in D:\DatabaseUpdateResources\[Project Name]\[Release number]. This includes:
- The update script, Update.sql.
- \Reports\Changes.html. This shows the changes that the script will make. Check the Warnings tab for potentially dangerous changes such as column drops.
- To start the deployment to production, click Deploy > PROMOTE TO Production.
- Click Start Deployment.


