Deploying to a single environment using Octopus Deploy
Published 04 December 2014
This example shows you how to set up a simple database deployment using SQL Release and Octopus Deploy. It uses SQL Server authentication.
In this example, you'll be deploying from a development database to a target database.
To deploy a new database release from a NuGet package, see Deploying a database package using Octopus Deploy
1. Install Octopus Deploy and create a new environment
Install Octopus Deploy and in the Octopus web portal (typically accessed at localhost/) add a new environment called Production.
An environment is a group of machines that you can deploy to at the same time. For more information, see Environments.
In this example, we're only deploying to one machine, but we still need an environment before we can set up a target machine.
On this page
2. Install an Octopus Tentacle
A Tentacle is an agent listening service that is required on all machines you deploy to.
- Install a Tentacle on the same machine as the Octopus Server. This is also the machine where you will install SQL Release.
See Installing Tentacles - In the Production environment, click Add machine, set the Hostname as localhost and click Discover.
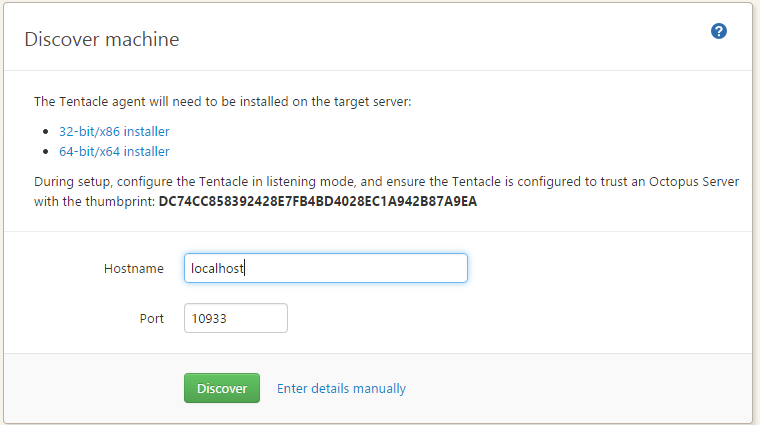
- The Tentacle is on the same machine as the Octopus Server, so it doesn't need any further configuration to establish a connection.
- Change the Display name to Prod01 and in the Roles box, type db-server and press enter:
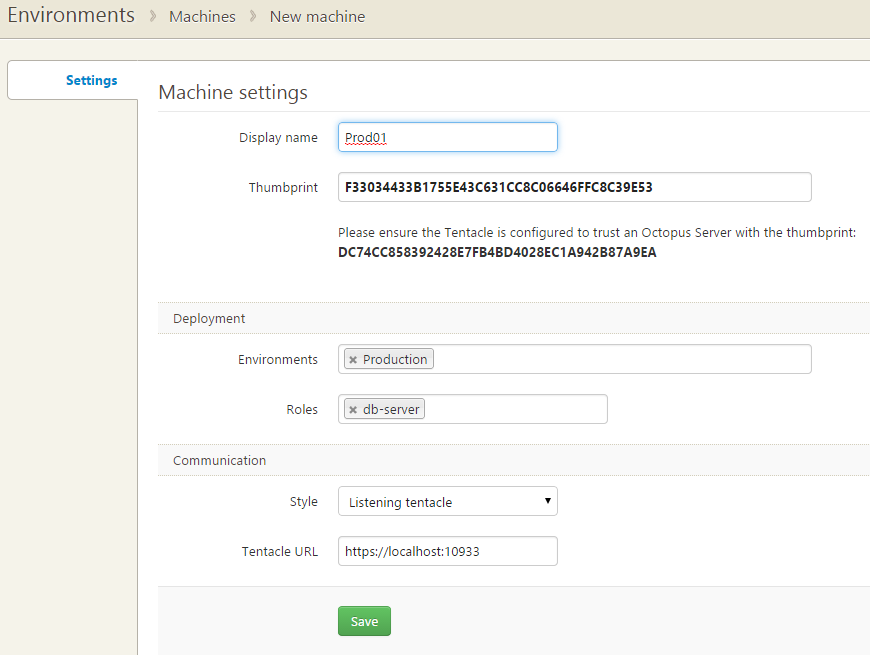
Roles are used by Octopus to define which machines to deploy to. For database deployments, the role is used to specify the machine where SQL Release is running. You'll reference the db-server role when you add a step to create the database deployment resources. - Click Save.
3. Install the DLM Automation Suite
You need to install the DLM Automation Suite, which also installs SQL Release, on the machine running the Octopus Tentacle. For more information, see Installing (DLM Automation Suite documentation).
4. Create a new Octopus Deploy project
Create a new Octopus project, accept the default setting and give it a name. See Projects (Octopus Deploy documentation).
The project consists of a series of steps which manage the process of deploying the schema:
- step 1: SQL Release compares the source and target database schemas to create the Database Update Resources. The Database Update Resources includes the SQL update script that'll be used to update the target database.
- step 2: Octopus pauses the deployment while the user reviews the update script and approves the changes.
- step 3: SQL Release runs the update script against the target database to deploy the required changes.
If you don't specify an environment, the project will deploy to all environments. That's fine in this example, as there's only a single Production environment.
5. Set up the project variables
Variables let you reuse scripts in other deployments, which you couldn't do if you used hardcoded values. For more information, see Variables (Octopus Deploy documentation).
On the project's Variables tab, copy and paste the following variables. Variable values surrounded by <angle brackets> need to be replaced with values specific to your environment:
| Variable name | Value |
|---|---|
| BaseDirectory | #{Octopus.Tentacle.Agent.ApplicationDirectoryPath}\#{Octopus.Environment.Name}\#{Octopus.Project.Name}\#{Octopus.Release.Number} |
| DatabaseUpdateResourcesDirectory | #{BaseDirectory}\DatabaseUpdateResources |
| DevelopmentDatabaseName | <NameOfYourDevelopmentDatabase> |
| DevelopmentDatabaseServer | <YourDevelopmentSQLServerInstance> |
| DevelopmentSQLServerUsername | <YourDevelopmentSQLServerUsername> |
| DevelopmentSQLServerPassword | <YourDevelopmentSQLServerPassword> |
| ProductionDatabaseName | <NameOfYourProductionDatabase> |
| ProductionDatabaseServer | <YourProductionSQLServerInstance> |
| ProductionSQLServerUsername | <YourProductionSQLServerUsername> |
| ProductionSQLServerPassword | <YourProductionSQLServerPassword> |
If you need to specify a different server or different credentials for another target database, add duplicate variables and set the scope accordingly.
6. Add the "Make database update resources" step
This step creates the deployment SQL script, and the other deployment resources.
- On the project Process tab, select Add step and select Run a script.
- Enter these details:
- Step name: Make database update resources
- Runs on targets in roles: type db-server and press Enter
This is the role you created when you installed an Octopus Tentacle. Script: Copy and paste this script. It uses a the project variables that you set up earlier:
Make Database Update Resources
# This step uses SQL Release to create a directory containing the
# Database Update Resources: all the artifacts relating to the deployment.

# Makes sure the directory we're about to create doesn't already exist.
If (Test-Path $DatabaseUpdateResourcesDirectory) {
    rmdir $DatabaseUpdateResourcesDirectory -Recurse -Force
}
# Sets up connection string for the target database.
$developmentDatabase = "Data Source=$DevelopmentDatabaseServer; `
                        Initial Catalog=$DevelopmentDatabaseName; `
                        User ID=$DevelopmentSQLServerUsername;Password=$DevelopmentSQLServerPassword"
$productionDatabase =  "Data Source=$ProductionDatabaseServer; `
                        Initial Catalog=$ProductionDatabaseName; `
                        User ID=$ProductionSQLServerUsername;Password=$ProductionSQLServerPassword"
# Creates the DatabaseUpdateResources directory.
New-DlmDatabaseRelease -Target $productionDatabase `
                    -Source $developmentDatabase `
                    -Verbose `
| Export-DlmDatabaseRelease -Path $DatabaseUpdateResourcesDirectory
# Creates the changes report, deployment warnings, and update script
# as Octopus artifacts, so you can review them in Octopus.
New-OctopusArtifact "$DatabaseUpdateResourcesDirectory\Reports\Changes.html"
New-OctopusArtifact "$DatabaseUpdateResourcesDirectory\Update.sql"
Click Save.
7. Add the "Review database update resources" step
This step tells Octopus to pause the deployment for you to review the Database Update Resources created in the previous step (the SQL update script and other resources). You can look at an HTML report to see what'll be added, removed or modified if you go ahead with deployment, and check for warnings. If you're not happy with the changes, you can stop the deployment at this point.
- On the project Process tab, click Add step and select Manual intervention required.
- Enter these details in the fields:
- Step name: Review database update resources
Instructions: Copy and paste this script:
Please review the schema and static data changes, warnings and SQL change script in 'Changes.html'.
In the other fields, leave the default settings unchanged.
- Click Save.
8. Add the "Run the update script" step
Run the script you reviewed in the previous step:
- On the project Process tab, click Add step and select Run a script. This is the deployment step.
Enter these details in the fields:- Step name: Run the update script
- Runs on targets in roles: type db-server and press Enter
This is the role you created when you installed an Octopus Tentacle. Script: Copy and paste this script:
Run the update script
# This step uses SQL Release to deploy the database update we previously generated and wrote to disk.
$targetDatabase = "Data Source=$ProductionDatabaseServer; `
                   Initial Catalog=$ProductionDatabaseName; `
                   User ID=$ProductionSQLServerUsername;Password=$ProductionSQLServerPassword"

Import-DlmDatabaseRelease $DatabaseUpdateResourcesDirectory | Use-DlmDatabaseRelease -DeployTo $targetDatabase
In the other fields, leave the default settings unchanged.
- Click Save.
What next?
You're ready to deploy a database update in Octopus. Deploying a database update is now the same process as deploying a normal update in Octopus Deploy.
If the deployment fails, click the Task log tab to check the details.
For instructions, see Create a release and deploy it.


