Deploying to multiple environments using Octopus Deploy
Published 27 November 2014
This example shows you how to automate the deployment of your database changes to a Preproduction environment before releasing to Production, using SQL Release and Octopus Deploy.
If you're not familiar with installing and setting up SQL Release or Octopus Deploy, we recommend that you follow the Deploying to a single environment using Octopus Deploy example before working through this one.
Once you've completed that example, you'll have installed most of the tools required for this one.
Before you start
- Create a NuGet package containing a Redgate database scripts folder.
If you've set up continuous integration for your databases using Redgate SQL CI, your build server will automatically build a package on every commit. For examples of how to do this using TeamCity or TFS, see Worked examples (SQL CI documentation). - Install the DLM Automation Suite, which also installs SQL Release. Click here for more details.
- On the same machine, install Octopus Deploy. Click here for more details.
- Install an Octopus Tentacle and assign the db-server role. Click here for more details.
- Create two environments - Preproduction and Production - and add the machine running the Tentacle agent to both.
- Create an Octopus project called Widget Deployment.
For more details on managing projects, see Projects (Octopus Deploy documentation). - Set up your NuGet package feed by doing one of the following:
- register your existing external NuGet package feed with Octopus. For more details, see Adding external package feeds.
- configure your build server to push packages to the Octopus built-in repository. For more details, see Using the built-in repository.
On this page
1. Set up project variables
Set variables for the parameter values used in the update script.
Variables let you reuse scripts in other deployments, which you couldn't do if you used hardcoded values. For more information, see Variables (Octopus Deploy documentation).
In the project Variables tab, copy and paste the following variables. Replace variables surrounded by <angle brackets> with values specific to your environment:
| Variable name | Value | Scope |
|---|---|---|
| BaseDirectory | #{Octopus.Tentacle.Agent.ApplicationDirectoryPath}\#{Octopus.Project.Name}\#{Octopus.Release.Number} | |
| DatabaseName | #{ProductionDatabaseName} | Production |
| DatabaseName | #{PreproductionDatabaseName} | Preproduction |
| DatabaseServer | <YourSQLServerInstance> | |
| DatabaseUpdateResourcesDirectory | #{BaseDirectory}\DatabaseUpdateResources | |
| Octopus.Action.Package.CustomInstallationDirectory | #{PackageExtractDirectory} | |
| PackageExtractDirectory | #{BaseDirectory}\DatabasePackage | |
| SQLServerUsername | <YourSQLServerUsername> | |
| SQLServerPassword | <YourSQLServerPassword> | |
| ProductionDatabaseName | <YourProductionDatabaseName> | |
| PreproductionDatabaseName | <YourPreproductionDatabaseName> |
2. Add the "Overwrite preproduction with production" step
The first step you'll add to your Widget Development Octopus project overwrites your preproduction database with production.
Preproduction should be identical to production (or as close to identical as you can manage in your environment) so you can:
test exactly what'll happen when you deploy to production without the risks associated with updating a live database
test server configuration and environmental settings
- detect bugs and prevent them going into production
There are several ways to make sure both environments are identical, including restoring from a backup of production. For more details, see Managing Test Data as a Database CI Component (Simple Talk article).
In this example, we're using the New-DlmDatabaseRelease cmdlet to deploy the production schema to the preproduction database. Using the cmdlet in this way - with preproduction as the target and production as the source - will keep the example simple and still create the exact copy of production we need.
- In the project Process tab, click Add step and select Run a PowerShell script.
- In the Step name field, enter Overwrite preproduction with production.
- In the Machine roles field, enter db-server and press Enter.
This must match the role you assigned to the Tentacle. In the Script field, copy and paste this script:
Deploy Production to Preproduction
# This step makes sure that the preproduction database and the production database
# are identical, by deploying the production schema to the preproduction database.
$preproductionDatabase = "Data Source=$DatabaseServer; `
                          Initial Catalog=$PreproductionDatabaseName; `
                          User ID=$SQLServerUsername;Password=$SQLServerPassword"

$productionDatabase = "Data Source=$DatabaseServer; `
                       Initial Catalog=$ProductionDatabaseName; `
                       User ID=$SQLServerUsername;Password=$SQLServerPassword"

$release = New-DlmDatabaseRelease -Target $preproductionDatabase -Source $productionDatabase
Use-DlmDatabaseRelease $release -DeployTo $preproductionDatabase -SkipPreUpdateSchemaCheck -SkipPostUpdateSchemaCheck
In the Environments field, enter Preproduction.
Click Save.
3. Add the "Download and extract database package" step
This step picks up the NuGet package of the database schema you're going to deploy.
- In the Widget Deployment project, on the Process tab, click Add step and select Deploy a NuGet package.
- In the Step name field, enter Download and extract database package.
- In the Machine roles field, enter db-server and press Enter.
This must match the role you assigned to the Tentacle. - In the NuGet feed field, select either the name of the external feed you registered when you set up your NuGet feed, or the Octopus Server (built-in) repository.
- In the NuGet package ID field, enter the name of the package without the version number. For example, if the package was called Widget.0.1.nupkg, you'd only enter Widget.
When the package is generated, NuGet package manager automatically adds a number. If we included it here, Octopus would only deploy the package that matched that name and version number. By removing the number, we're telling Octopus to always look for the latest package with that name. - In the Environments field, select Preproduction.
- Click Save.
4. Add the "Create database update resources" step
This step creates the database deployment resources, including the Update.sql script.
You'll specify two databases: Preproduction and Production (-Target $productionDatabase, $preproductionDatabase). This makes sure the Production and Preproduction database schemas are the same before creating the update script. If they're different, the deployment will fail at this point.
- On the project Process tab, select Add step and select Run a PowerShell script.
- In the Name field, enter Create database update resources.
- In the Machine roles field, enter db-server and press Enter.
This must match the role you assigned to the Tentacle. In the Script field, copy and paste this script. It uses the project variables that you set up earlier:
Make Database Update Resources
# This step uses SQL Release to create a directory containing the # Database Update Resources: all the artifacts relating to the deployment. # Makes sure the directory we're about to create doesn't already exist. If (Test-Path $DatabaseUpdateResourcesDirectory) { rmdir $DatabaseUpdateResourcesDirectory -Recurse -Force } # Sets up connection string for the production database. $productionDatabase = "Data Source=$DatabaseServer; ` Initial Catalog=$ProductionDatabaseName; ` User ID=$SQLServerUsername;Password=$SQLServerPassword" # Sets up connection string for the preproduction database. $preproductionDatabase = "Data Source=$DatabaseServer; ` Initial Catalog=$PreproductionDatabaseName; ` User ID=$SQLServerUsername;Password=$SQLServerPassword" # Creates the DatabaseUpdateResources directory. $release = New-DlmDatabaseRelease -Source "$PackageExtractDirectory\db\state" -Target $($productionDatabase, $preproductionDatabase) -Verbose Export-DlmDatabaseRelease $release -Path $DatabaseUpdateResourcesDirectory # Imports the changes report, deployment warnings, and update script # as Octopus artifacts, so you can review them in Octopus. New-OctopusArtifact "$DatabaseUpdateResourcesDirectory\Reports\Changes.html" New-OctopusArtifact "$DatabaseUpdateResourcesDirectory\Update.sql"- In the Environments field, enter Preproduction.
- Click Save.
5. Add the "Review database update resources" step
This step pauses deployment to let you review the database deployment resources, including the Changes.html report, before allowing deployment to go ahead.
- On the project Process tab, click Add step and select Manual intervention required.
- In the Step name field, enter Review database deployment resources.
In the Instructions field, copy and paste this text:
Please review the schema and static data changes, warnings and SQL change script in 'Changes.html'.
In the Environments field, select Preproduction.
Click Save.
6. Add the "Run the update script" step
This step runs the update script once you've reviewed it.
- On the project Process tab, click Add step and select Run a PowerShell script.
- In the Name field, enter Run the update script.
- In the Machine roles field, enter db-server and press Enter.
This must match the role you assigned to the Tentacle. In the Script field, copy and paste this script:
# This step deploys the update we previously generated and wrote to disk. $targetDatabase = "Data Source=$DatabaseServer; ` Initial Catalog=$DatabaseName; ` User ID=$SQLServerUsername;Password=$SQLServerPassword" Import-DlmDatabaseRelease $DatabaseUpdateResourcesDirectory | Use-DlmDatabaseRelease -DeployTo $targetDatabase- In the Environments field, select Production, and Preproduction.
- Click Save.
You've finished setting up the project steps. The Process tab should look like this:

7. Create a release and deploy
Deploy to Preproduction to validate the update script before you deploy to Production:
- Click the Create release button.
This page lets you add a release note if necessary. - Click Save.
- From the Deploy dropdown, select Preproduction.
- Click Deploy.
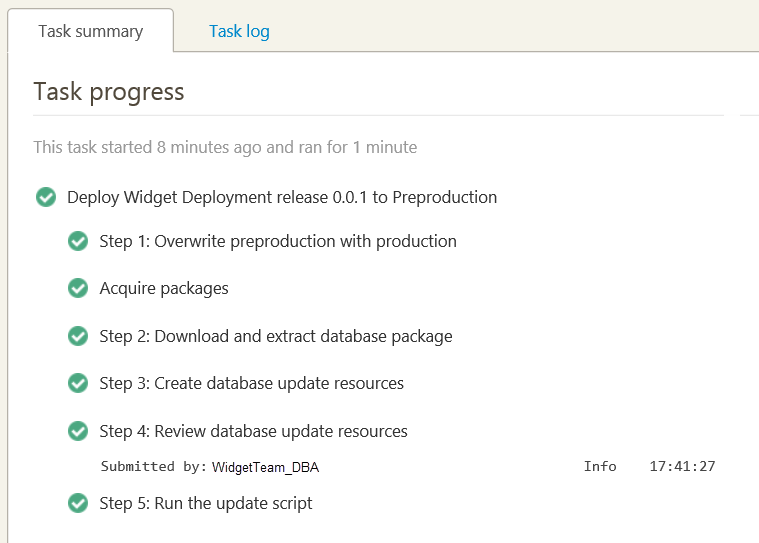
SQL Release checks that Preproduction matches the state of the Production database, then creates the update script. It pauses at Step 4 so you can review the database update resources: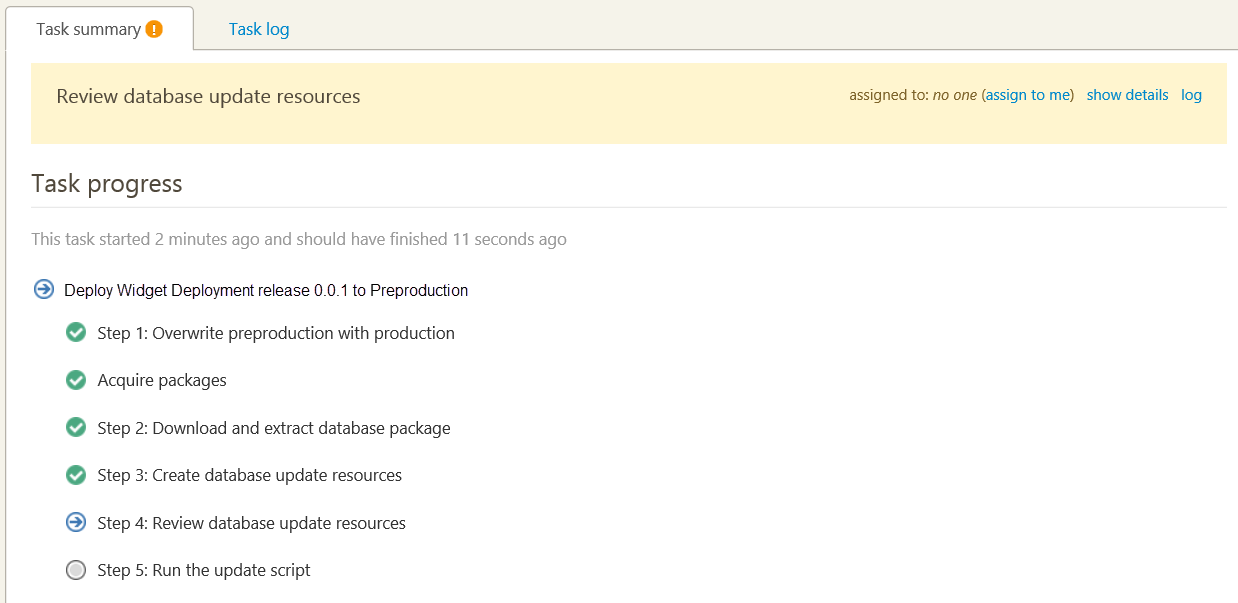
- Under Artifacts, click Changes.html. This opens a report you can use to check for warnings, look at the update script, and see what'll be added, removed or modified if you go ahead with deployment.
- Close the report.
- Click assign to me and, in Notes, enter a comment to say you've reviewed the database deployment resources.
- To continue deploying to Preproduction, click Proceed.
If deployment to Preproduction is successful, you can deploy to Production. - From the Deploy to dropdown, select Production.
Once deployment is successful, the Task progress page looks like this: