The New Table-Internal Synchronization Rule Form
Published 23 March 2018
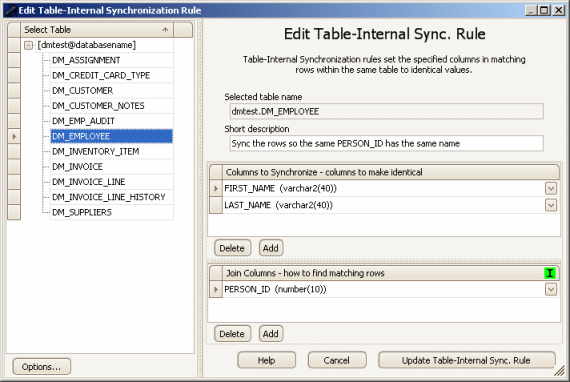
The Data Masker Create/Edit Table-Internal Synchronization Rule Form
This form is used to create and edit Data Masker Table-Internal Synchronization rules. Table-Internal Synchronization rules are used in a situation where multiple rows within the same table are required to have synchronized column values. The title text and button label on the form will change as is appropriate to the create or edit mode. In the example screen shot above, the form is editing an existing Table-Internal Synchronization rule.
A Table-Internal Synchronization rule must be configured to operate on a target table. Table-Internal Synchronization rules also require information regarding the columns in each row which must be synchronized (there can be more than one) and a method of identifying a similar column (called the Join condition). The About Table-Internal Synchronization rules help file contains a detailed discussion of these topics.
Configuring the target table is a straightforward process. Use the mouse to select the table name from the Select Table panel. The choice of available tables is entirely determined by the Rule Controller with which the Table-Internal Synchronization rule is associated. Only tables from within the schema for which the Rule Controller is configured will be visible. If you do not see the tables you require, the schema structure can be refreshed using the Refresh Schema and Indexes button on Options tab of the edit Rule Controller form.
The columns to be synchronized are entered in the Synchronization Columns panel located on the top right hand side of the form. Once a table has been selected, the items in the Synchronization Columns panel will contain the column information for that table. Select the columns in the target table that require the same values. If there is more than one, press the Add button to generate a new placeholder and then select the column name from it.
The collection of rows which receive the same values in the synchronization columns is determined by the Join condition. This panel is located on the lower right hand side of the form and it operates in a similar way to the Synchronization Columns panel. Select the columns by which the rows should be grouped - if there is more than one, press the Add button to generate another placeholder. Note the I icon located in the header the Join Columns in the Join Panel. A green icon here indicates that the specified columns are indexed. If the target table is large it is very important that the columns of the join condition are indexed. Otherwise, the rule will be extremely slow.
When the rule is executed, the rows from the target table will be selected in collections which have identical join values. The specified synchronization columns in each group will receive the same value. In practice, the synchronization value used for the entire group is the value from the first row in that group found by the Data Masker software. The About Table-Internal Synchronization rules help file contains a useful example illustrating how Table-Internal Synchronization rules operate.
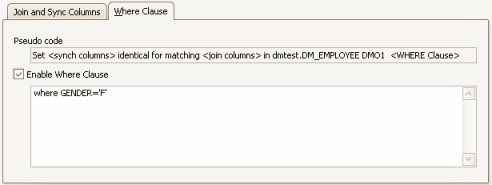
The Table-Internal Synchronization Rule Where Clause Tab
Where Clause options are used when the choice of rows affected by the operation is to be based on a specific criteria. Where Clause options are configured on the Where Clause tab. In the example above, the rule is configured to operate using a where clause of WHERE GENDER='F'. This has the effect of synchronizing all of the first name values among the rows containing female names.
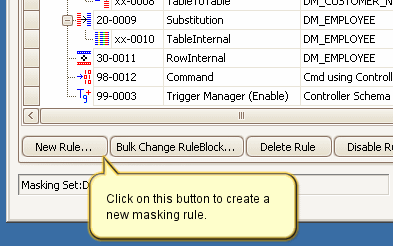
Existing Table-Internal Synchronization rules can be edited by double clicking on them with the mouse. Table-Internal Synchronization rules are created by launching the New Table-Internal Synchronization rule form using the New Rule button located on the bottom of the Rules in Set tab.
How to Create a New Table-Internal Synchronization Rule
This documentation contains proprietary information and is protected by copyright law.
Copyright © 2026 Red Gate Software Limited. All rights reserved


