The Quick Start Guide
Published 06 January 2020
If you'd prefer to have one of our engineers walk you through this process, watch the video tutorial Getting started with Data Masker for SQL Server from Redgate University.
This guide is designed to help you get started with Data Masker including the creation of your first set of masking rules. The objective is also to help you develop good practices in using Data Masker by understanding the way that the tool works and how to work best with it to achieve sets of masking rules which perform well, don’t conflict from a data logic perspective and avoid deadlocks or resource contention.
In truth, though, the first step in any successful data masking project is the understanding of the database estate. Which databases contain PII (Personally Identifiable Information) or PHI (Protected Health Information)? This discovery process can often be an “eye-opener” when the proliferation of SQL Server instances is exposed.
The next step is to build your Masking Plan. This identifies:
- The instances / servers
- The databases / schemas within each which contain the data to be masked
- The tables and columns along with their data types and the decision on what actions to take against them. These actions may include:
- Simple substitution / replacement of the item – in which case replace from which dataset?
- Recreate a column content based upon newly masked columns at the row level.
- Synchronize changes between tables where the data content may be de-normalized:
- In the same database or schema
- A different database or schema in the same instance or server
- Tables in other instances or servers
There’s no set format for this plan but this outline description will give you the key items to consider.
What is the most succinct guideline which you can follow in identifying this data? It’s anything which can be used to identify a living person including but not limited to:
- Name
- DOB
- National Identification Number
- Address details
- Contact details such as phone numbers or email addresses
- Disabilities
- Gender Identity or Sexual Orientation (note that Gender is not PII)
- Court orders or salary attachments
- Union affiliations
- Biometric and/or distinguishing feature information
- Device reference or serial numbers associated with, or assigned to, a person
There’s also another concept which you need to grasp when reviewing your data and that is items which “put a person at a particular place at a point in time”. For instance:
- The day and time of an appointment
- The address of the appointment location
- The reason for the appointment
- Who it was with
- … and any follow-on booking
Such data can conspire to identify a person through triangulation and you’ll find loads of discussions about this with a simple Google search.
This is by no means a definitive list but more guidance on setting your mindset. You will be further guided by National legislation such as SOX or HIPAA in the U.S., GDPR in Europe, POPI in South Africa and so on. You’ll also find a white paper on HIPAA compliance on our website which covers most of the items which need to be considered from both a healthcare and commercial perspective.
Evaluate and choose the replacement datasets for your PII / PHI data. You’ll find these in the Data Masker DataSets Tab located in the Misc. Setup Tab where you can review each set. Use the Sample button and you’ll be able to see what options are available for each. Some are clearly more complex than others and options will be determined based upon the nature of the replacement dataset. Some will be simple character values, perhaps numeric, some dates and others algorithmic (such as National Identification numbers or Credit Card Numbers).
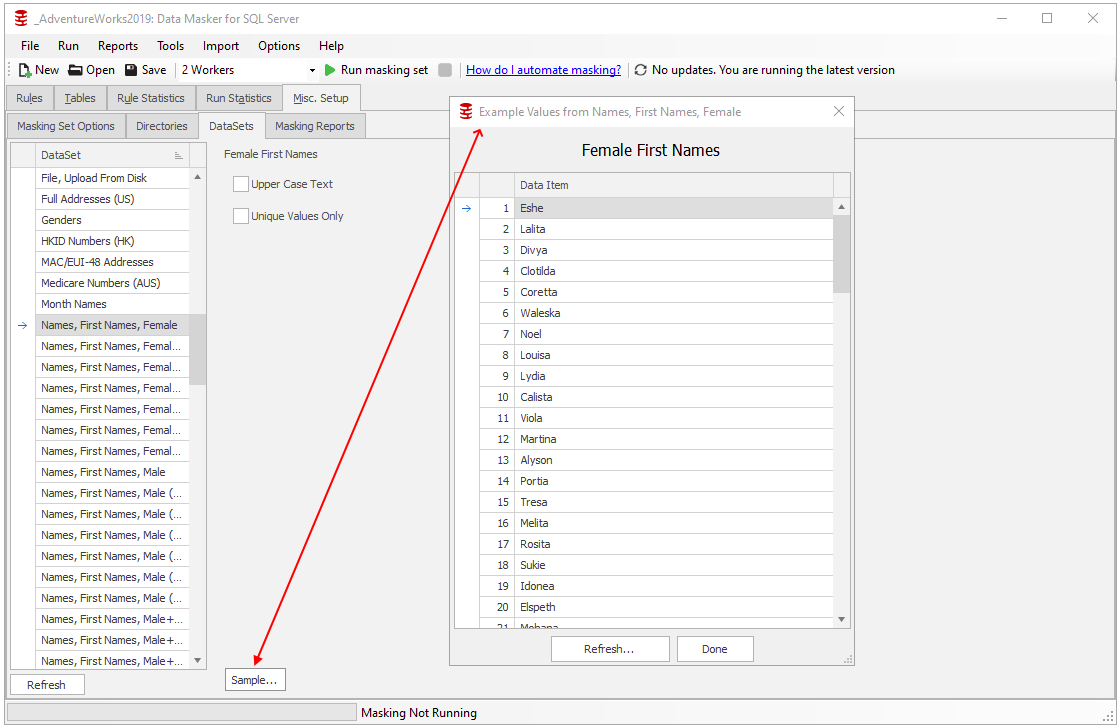
Take a little time at this stage and then note your choices in your Masking Plan.
If you need to consider building datasets which are not already pre-provided with Data Masker you’ll find another Tech Tip alongside this one which covers that topic called About User Defined Datasets.
Before you build your first masking set, stop and have a look at the Run Statistics tab.
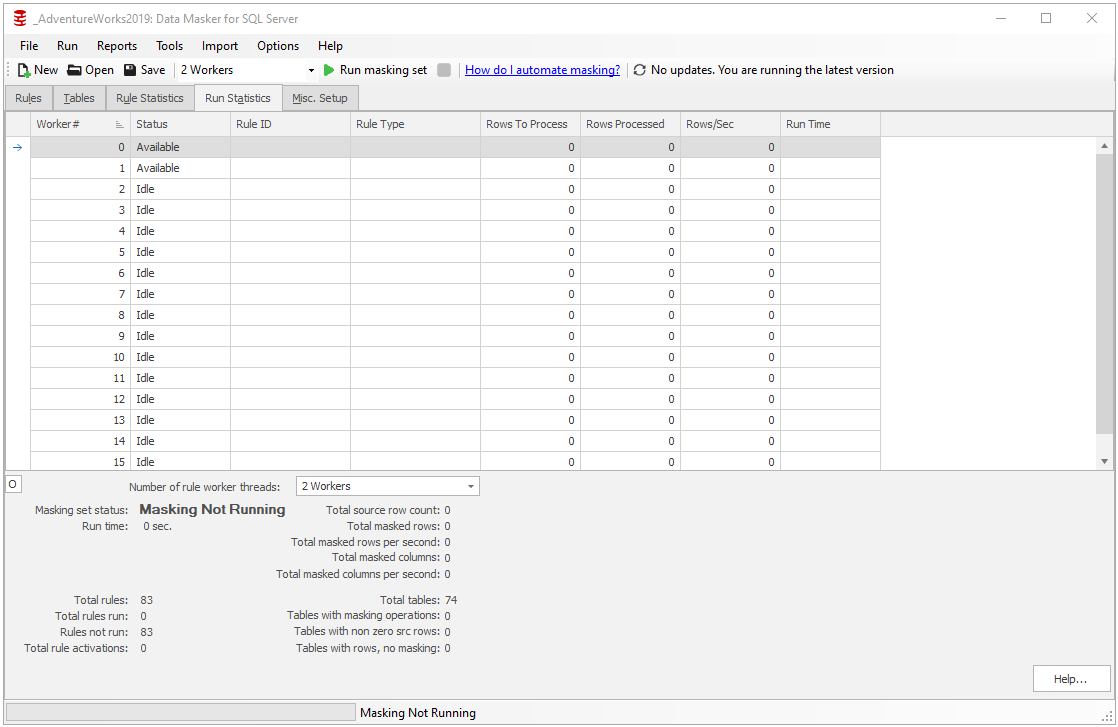
You can tune Data Masker to scale to the environment which it is masking and one way this is done is using multiple database connections which are managed by a Scheduler, executing rules in an order which you define.
The general “rule of thumb” is to enable 4 workers per CPU of the target server being masked and you can dial this up, or down, during the masking set execution process. Please note, however, that Data Masker does not load balance its work over the available CPU cores. It simply schedules work onto the first available CPU with free capacity. Because of this initial configuration that we need to be aware of deadlocks and logic conflicts. You “could” simply dial this value down to 1 worker but you may then encounter extended runtimes which the parallelism may have overcome. Leave it at 2 for now.
Now you’re ready to start building your masking set!
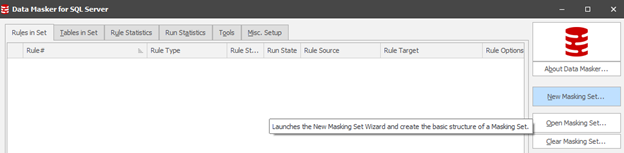
Select the Rules in Set tab which is, at this point, a blank canvas. Choose New Masking Set:
Follow the wizard to connect to your server/database and gather the schema structure. Remember, this must be a copy of the production database and NOT the production database itself. This may seem a statement of the obvious, but the idea is that you cross-check yourself at this point.
As you go along you will be presented with an option to gather the row counts. This is a good thing to do since when you are building your masking rules and testing them you need to be able to demonstrate that all rows are being evaluated and masked where appropriate. This is, in fact, the first stage of the due diligence which you must demonstrate to protect yourself as well as your Management and Executive team.
Save As the masking set with a naming convention of your choice.
You are now left with the core rule structure containing the Rule Controller (Connect details and Object refresh mechanisms) as well as two rules which disable and enable all triggers found to be active at the time of the masking set creation. Notice the Rule Block numbers highlighted – 00 (low order, pre-processor, runs first) and 99 (high order, post-processor, runs last).

Every rule in Data Masker can be edited using either a double-click or right mouse button action to present options including Edit Rule.
Notice that the Rule Controller is current selection. It’s important that when you build any rule you place it in your selected rule block. By retaining the controller in focus when you choose the “New Rule” button you will create the rule in rule block 01 – in between the pre- and post- processors. That’s exactly where we want it to be.
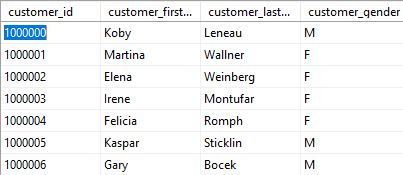
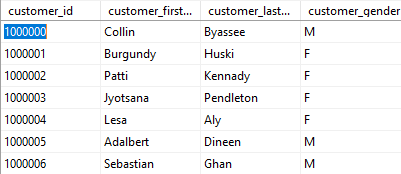
Usually you’ll start the masking process with a substitution action on a key table. In this case we’re going to change the first and last names of our clients. Our starting data point looks like:
To get started, press the New Rule button in the lower section of this window and choose New Substitution Rule.

The Substitution Rule dialogue is intuitive, choosing the table, the column and the replacement dataset. What you may not readily realise, however, is that you can set multiple column replacements in the same rule:
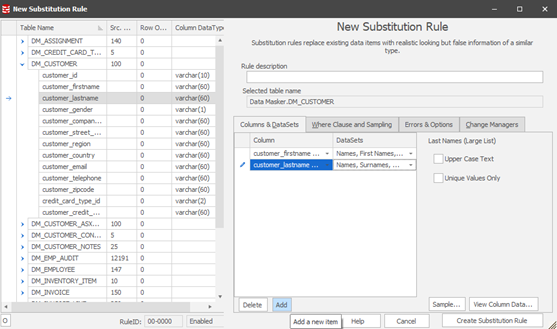
Think of this as a circular action, adding for each item, choosing the item and then selecting the replacement value. You can Sample to confirm the replacement content and you can use the Data Viewer to review the data itself. This is often useful in securing a view of the data prior to the rule being executed so that you have ready access to before and after snapshots of the data.
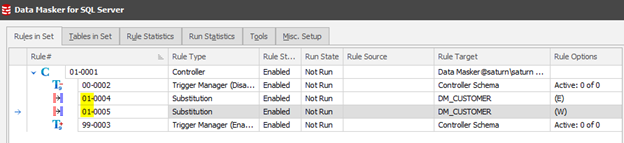
Once you create the Substitution Rule you’ll see it appear between the Trigger Managers:
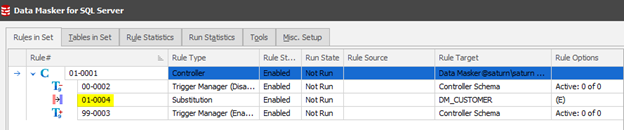
In this rule the FIRST_NAME was changed to a Female name to ensure that any gender anomalies are discounted from the outset. A second rule would therefore need to be created to provide new Male names where the Gender = ‘M’ using the “Where Clause and Sampling” tab. Locate over the 01-004 rule and then New Rule followed by New Substitution Rule.
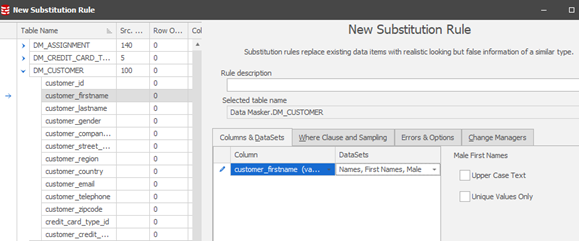
Set the first name to be replaced with a new Male First Name and set the Where clause to:
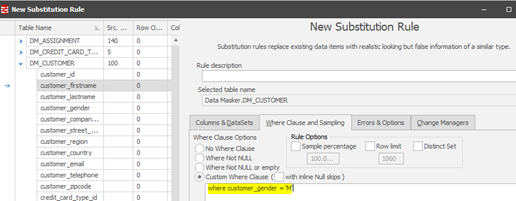
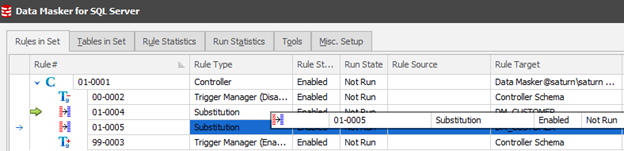
Once created the rule will appear in the running order:
Notice that the two rules are side-by-side? Remember the earlier review of the Run Statistics tab where we have two worker threads available? This will lead to deadlock and logic conflicts, so we need to be aware of it from the outset and instrument around it at rule creation time. To do this we click on rule 01-0005 and drag it over 01-0004 creating a dependency.
This will create the rule running order:

The concept of Rule Blocks and Dependencies is further explored in another Tech Tip available on the Redgate Learning Hub.
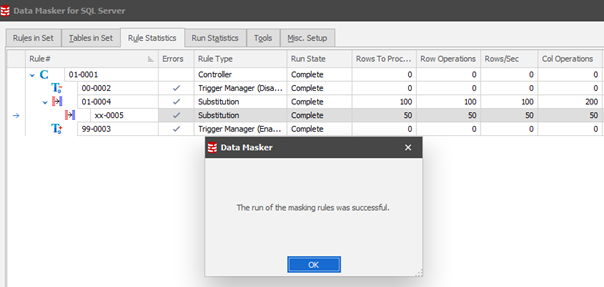
Let’s run the masking set!

While it is running you can review throughput/performance using the Rule Statistics tab:
…and check the data result:
Before:
After:
In summary, the key “take-away” points are:
- Be aware of the multiple workers
- Always locate over the last rule in the rule block which you want to create your new rule in
- Whenever building a new rule ask yourself “Can this run at the same time as any other?“
- If not, “What’s the last rule which must run before this one can run?”
- Make the rules dependent upon each other
- If not, “What’s the last rule which must run before this one can run?”
Additional resources for Data Masker for SQL Server
In addition to this documentation, the Redgate Hub offers the following resources to help you learn how to use Data Masker for SQL Server.
Redgate University training videos:
Getting Started with Data Masker for SQL Server
Setting up masking sets in Data Masker
How to create and maintain masking sets with Data Masker
Product learning technical 'how-to' articles:
Getting Started with SQL Data Masker: I need to mask some columns
Getting Started with Data Masker for SQL Server: I want to mask a database
This documentation contains proprietary information and is protected by copyright law.
Copyright © 2026 Red Gate Software Limited. All rights reserved


