Azure DevOps - Classic Editor - Simple Build and Release Pipeline Setup Guide
Published 08 April 2024
A working example of how-to setup a flyway pipeline within Azure DevOps, using the classic pipeline methodology.
Section 1 - Introduction
Utilizing Flyway and its migrations model within a CI/CD pipeline is a valuable approach for managing database changes efficiently. However, amidst the plethora of CI/CD tools available, getting started can be daunting. This article aims to address two common questions:
- How to execute Flyway commands within a pipeline?
- How to set up a basic Azure DevOps pipeline integrating Flyway?
Note: This article provides a straightforward pipeline setup using Azure DevOps, incorporating basic Flyway command-line actions. For further details on Flyway and its parameters, refer to the Flyway documentation HERE
Section 2 - Redgate Documentation
Before proceeding, it's worth noting that much of the content covered here is also available in various Redgate Documentation resources. Check out the following links for additional insights:
- https://documentation.red-gate.com/fd/quickstart-how-flyway-works-184127223.html
- https://www.red-gate.com/hub/university/courses/flyway
For in-depth knowledge on the topics discussed, it's recommended to explore the provided guides
Section 3 - Getting Started
This article references example JSON pipelines that come pre-configured with Flyway CLI commands, facilitating the setup of CI Build and CD Release pipelines. Download these by selecting the two files below.
 Flyway-Build-Pipeline-CI.jsonFlyway-Release-Pipeline-CD.json
Note: These pipelines serve as examples and require review and testing before execution in any environment.
Section 4 - Flyway TOML Project Setup
In the pipelines to be set up, leveraging Environments within the Flyway TOML file is the simplest way to deploy using the Flyway CLI. By storing environmental information in the project's TOML file, CLI commands become more straightforward, and maintaining connection details becomes easier. See this article for further details.
There are two methods to set up these Environments:
1) Edit the Flyway.toml file directly
At the root of your Flyway Projects directory, you will find the 'Flyway.toml' file. This file contains all the crucial configuration information about your projects setup. Therefore, to add to this, simply edit this file in your preferred text editor. At the bottom of the file, create an environment for test & production by using code similar to below. Ensuring that details such as the JDBC strings are changed as required.
Environment Example
[environments.production]
url = "jdbc:sqlserver://localhost;databaseName=newworlddb_production;encrypt=true;integratedSecurity=true;trustServerCertificate=true"
displayName = "Production"

[environments.test]
url = "jdbc:sqlserver://localhost;databaseName=newworlddb_test;encrypt=true;integratedSecurity=true;trustServerCertificate=true"
displayName = "Test"
2) Use Flyway Desktop to create additional Environments
With your Flyway project loaded in Flyway Desktop, navigate to the 'Migration Scripts' tab. Using the right-hand side pane, select 'Manage Target Databases'.

Each target database added through this pop-up, will become a new environment saved into the corresponding projects 'flyway.toml'. For this guides pipelines to function, we need to create a 'test' and 'production' environment.
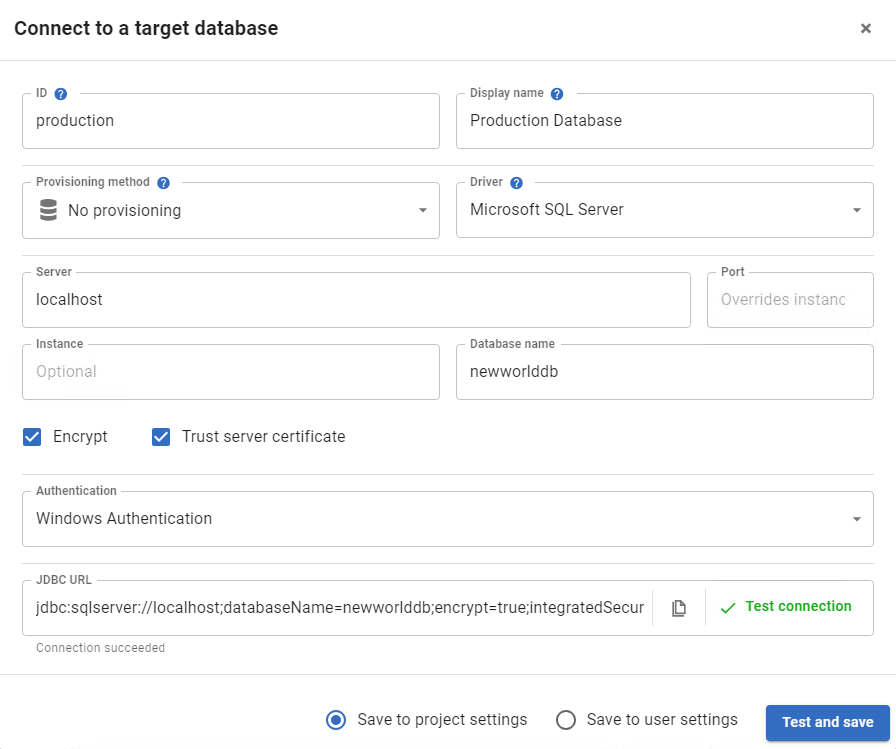
*If your Flyway Desktop does not have connectivity to the target environments, then it is necessary to add these to the .toml manually, as outlined in the above step.
Once the environments are added to the .toml file, ensure these changes are committed and pushed to your repository.
By adding these Environments, Flyway CLI commands like Migrate become as easy as 'flyway migrate -environment="test"'.
Section 5 - Azure DevOps Agents
Azure DevOps utilizes agents to execute pipeline actions, with Microsoft-Hosted and Self-Hosted agents being the most common choices..
- Microsoft-Hosted
- Automatically maintained and upgraded by Microsoft, but each job runs on a fresh virtual machine, which may affect job continuity.
- Self-Hosted
- These agents are setup and managed by yourselves and is used to run jobs within the pipeline. Self-Hosted agents provide more flexibility and control around dependent software that may be required for builds and deployments. Something that is extremely valuable within a Flyway pipeline.
- More information
For the remainder of this article, I will be presuming Self-Hosted agents are in use, with the following Redgate software installed and functional on the agent machine:
- Flyway CLI
- https://documentation.red-gate.com/flyway/reference/usage/command-line
- Ensure it is added to each agents PATH environment variable, so that Flyway can be easily called from the pipeline.
- https://documentation.red-gate.com/flyway/reference/usage/command-line
Section 6 - Setting up the CI (Build) Pipeline
Step 1 - Navigate to the 'Pipelines' section of your project and choose 'Import Pipeline'
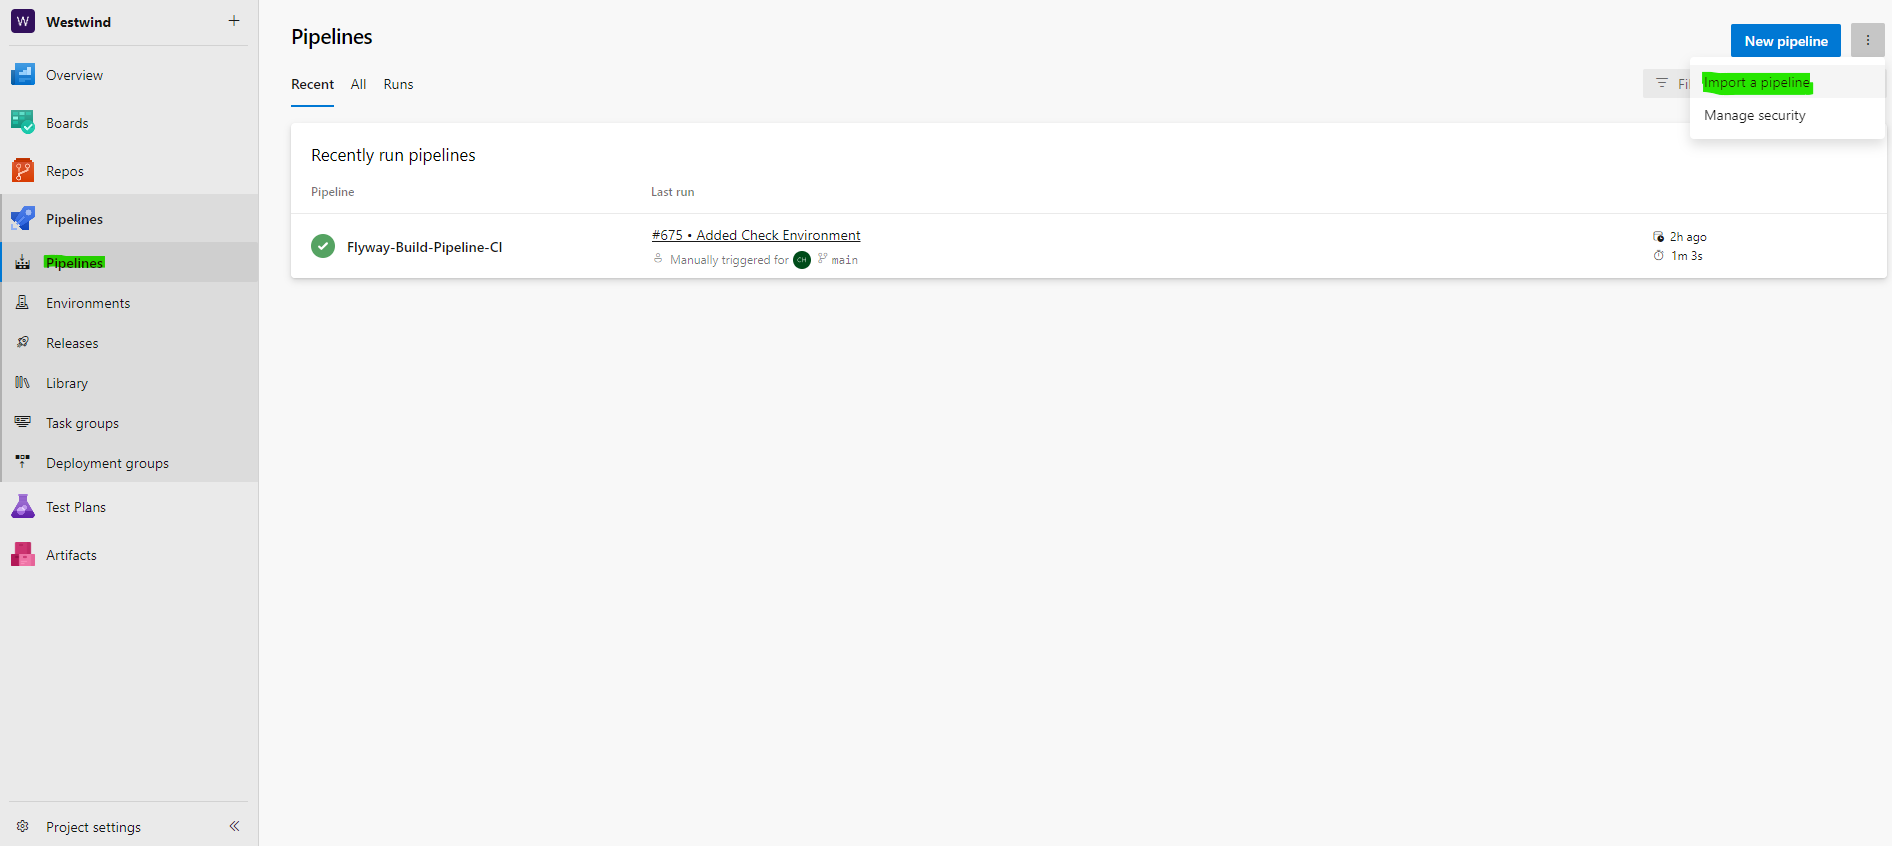
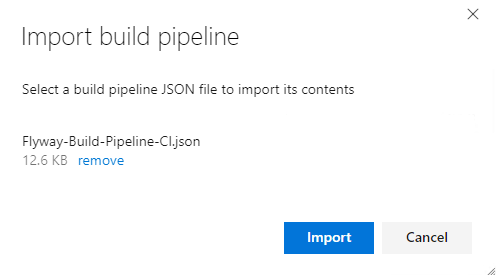
In the pop-up that follows, simply select 'Flyway-Build-Pipeline-CI.json' from the location downloaded on your machine and choose 'Import':
Step 2 - Configure the Build Pipeline
Once imported, it's necessary to configure a few settings to make the pipeline relevant to your Azure DevOps setup. The first is to select the Agent Pool the pipeline will use when processes. To do this, if not already selected by default, click 'Pipeline' and then on the right hand side choose your preferred agent pool from the drop down list.
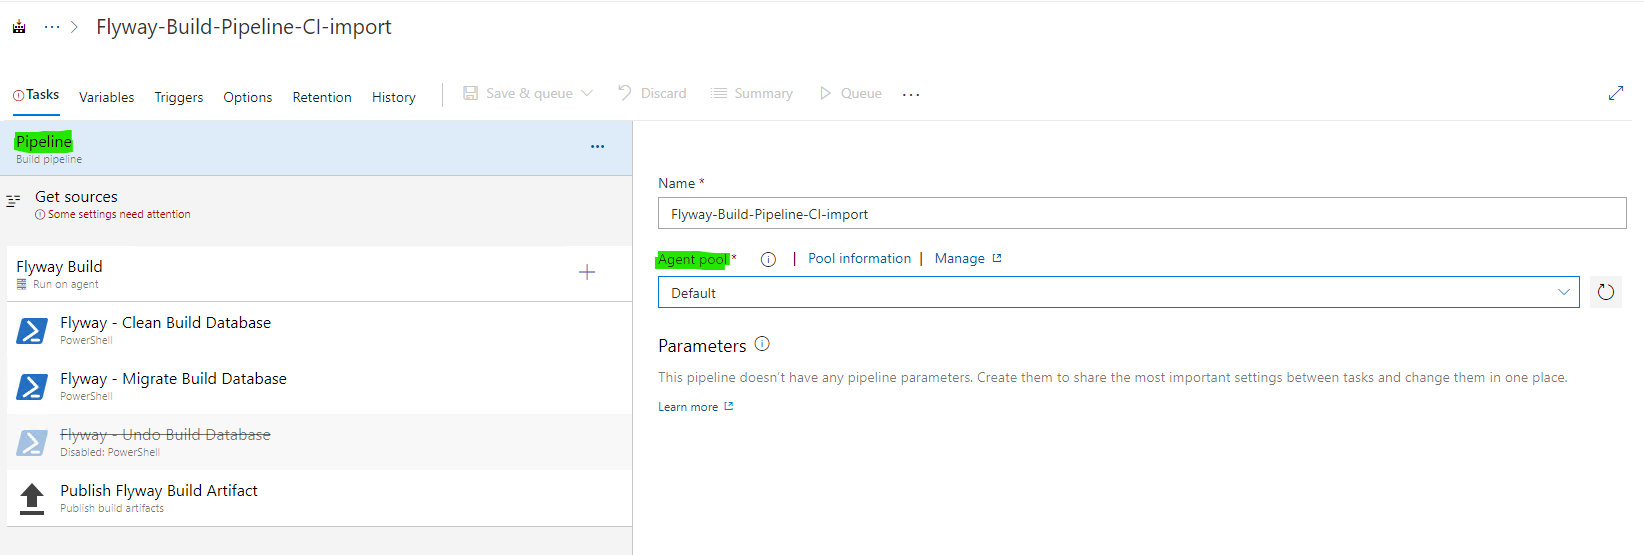
Note - If your preferred pipeline is not available in this list, it might be necessary to first setup your projects Agent Pool permissions. Consult your internal Azure DevOps expert if you're unsure.
With this complete, the next step is to setup the link between the pipeline and the source repository. Therefore, click 'Get Sources' and then select the Repository name and default branch as appropriate.
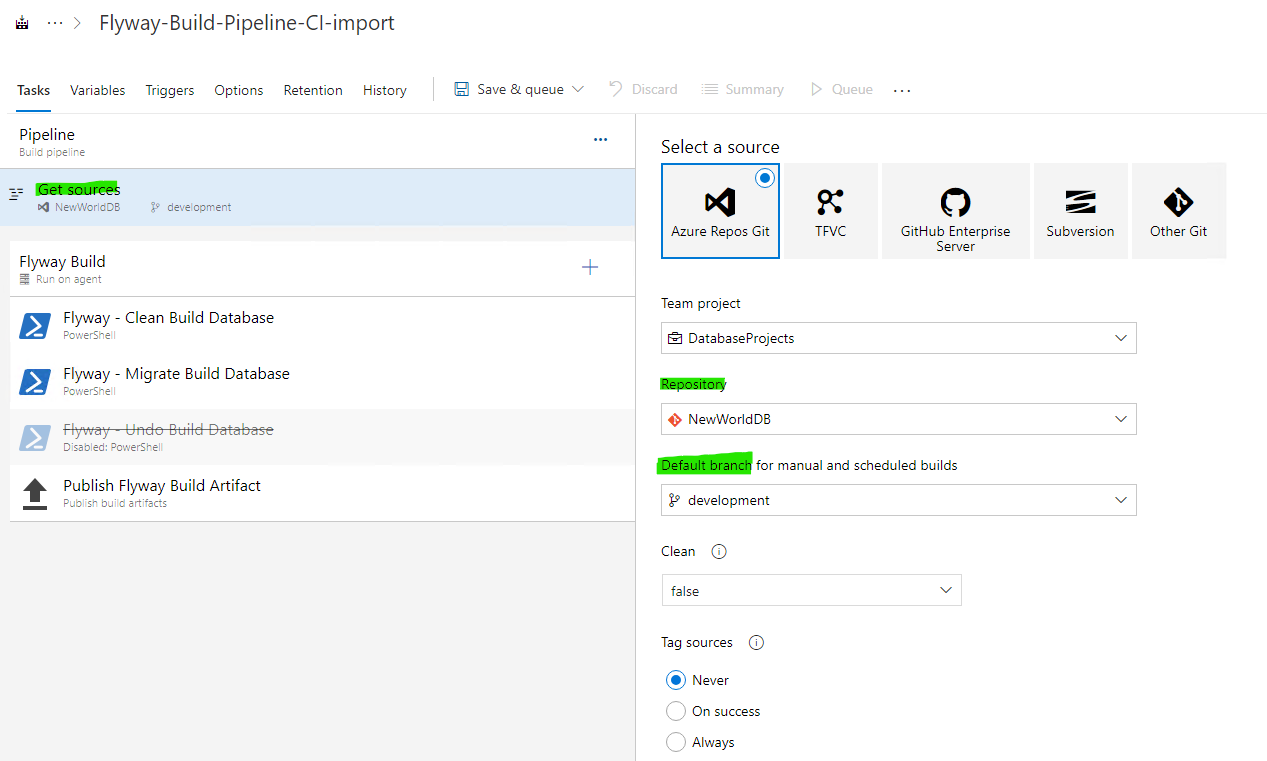
Step 3 - Configure the pipeline variables
In order for the pipeline to carry out the Flyway commands successfully, there are a few variables that need to be set first. These can be found by selected the 'Variables' tab at the top of the page.
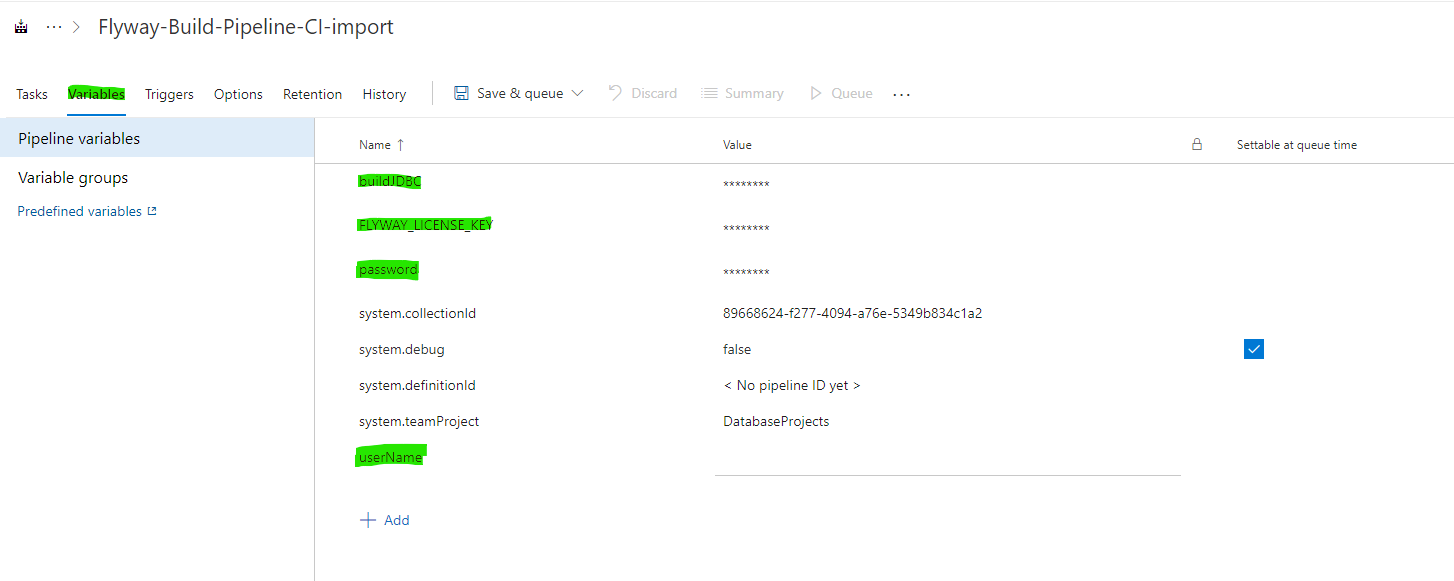
See below for a breakdown on each variable:
- buildJDBC
- This needs to be a valid JDBC connection string, which will be provided to the Flyway CLI and used as the target database for this build activity.
- As this is a Build pipeline, ensure the selected database is an empty database designed purely for compiling the project code. The database will be WIPED on each run.
- FLYWAY_LICENSE_KEY
- This is the 516 character Flyway CLI license key, used to ensure that either Flyway Teams or Flyway Enterprise functionality is available within the pipeline.
- userName
- A valid username for authentication with the target RDBMS, to connect to the buildJDBC database (Not required for Windows Auth, simply leave the value blank)
- password
- A valid password for authentication with the target RDBMS, to connect to the buildJDBC database (Not required for Windows Auth, simply leave the value blank)
Tip - Setting variables to secret, helps to keep sensitive information secure within the pipeline. To do this, simply toggle on/off the padlock icon to the right of each variables value as required.
Step 4 - Save & Queue
After setting up the pipeline, it's time to initiate the first run by selecting 'Save & Queue.'
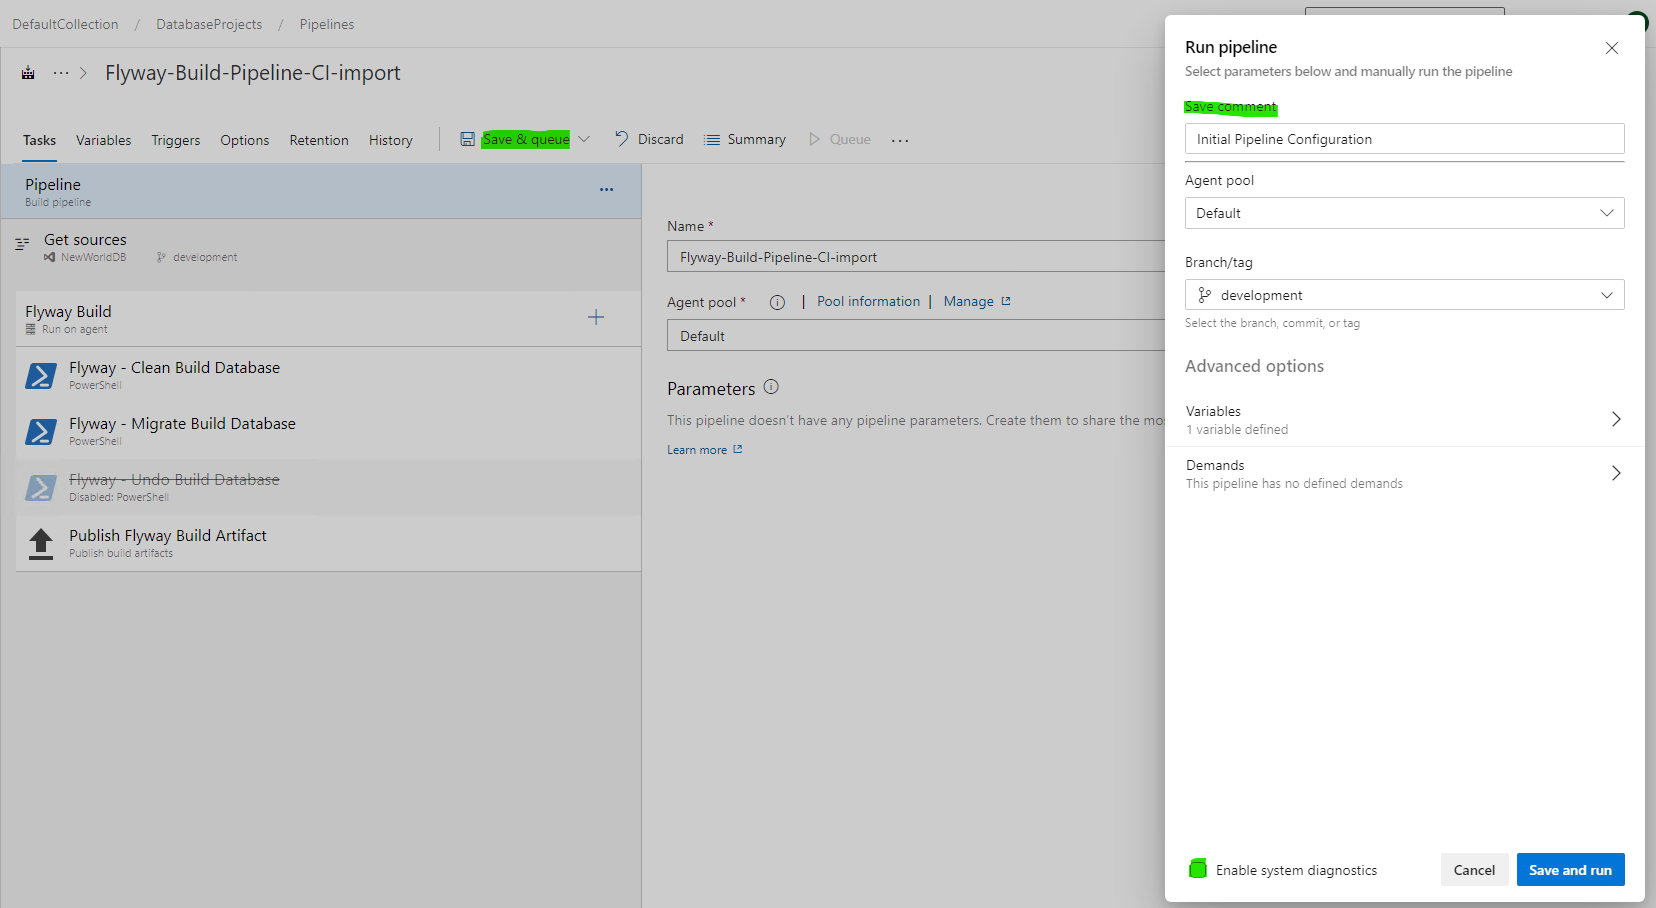
When the right-hand side pop-up appears, provide a brief description of the latest changes, such as 'Initial Pipeline Configuration'. Then choose 'Save and Run' in the bottom right hand corner to start the pipeline.
Tip - For extra help diagnosing potential issues, selecting the 'Enable system diagnostics' button in the bottom right-hand corner can help.
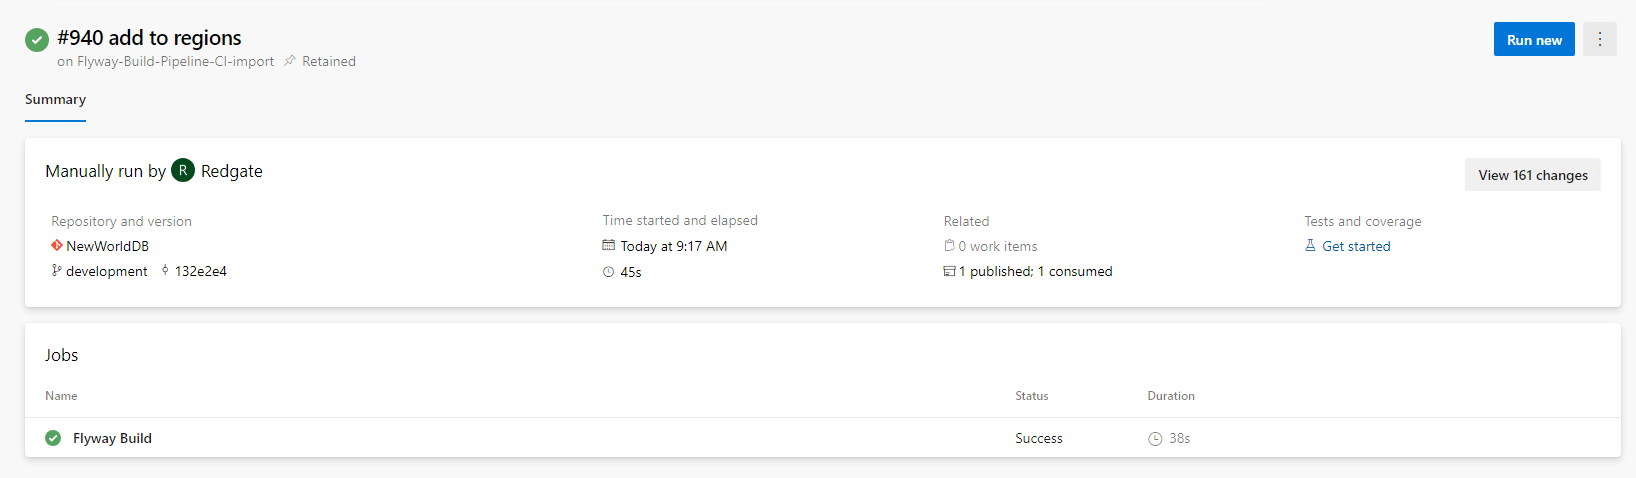
If everything completes successfully, as shown above, that means the below steps have taken place:
- Build Database Emptied
- All migration scripts from the repository executed against Build database
- Should a failure occur, this will be referenced.
- Creation of a CI Artifact
Section 7 - Setting up the CD (Release) Pipeline
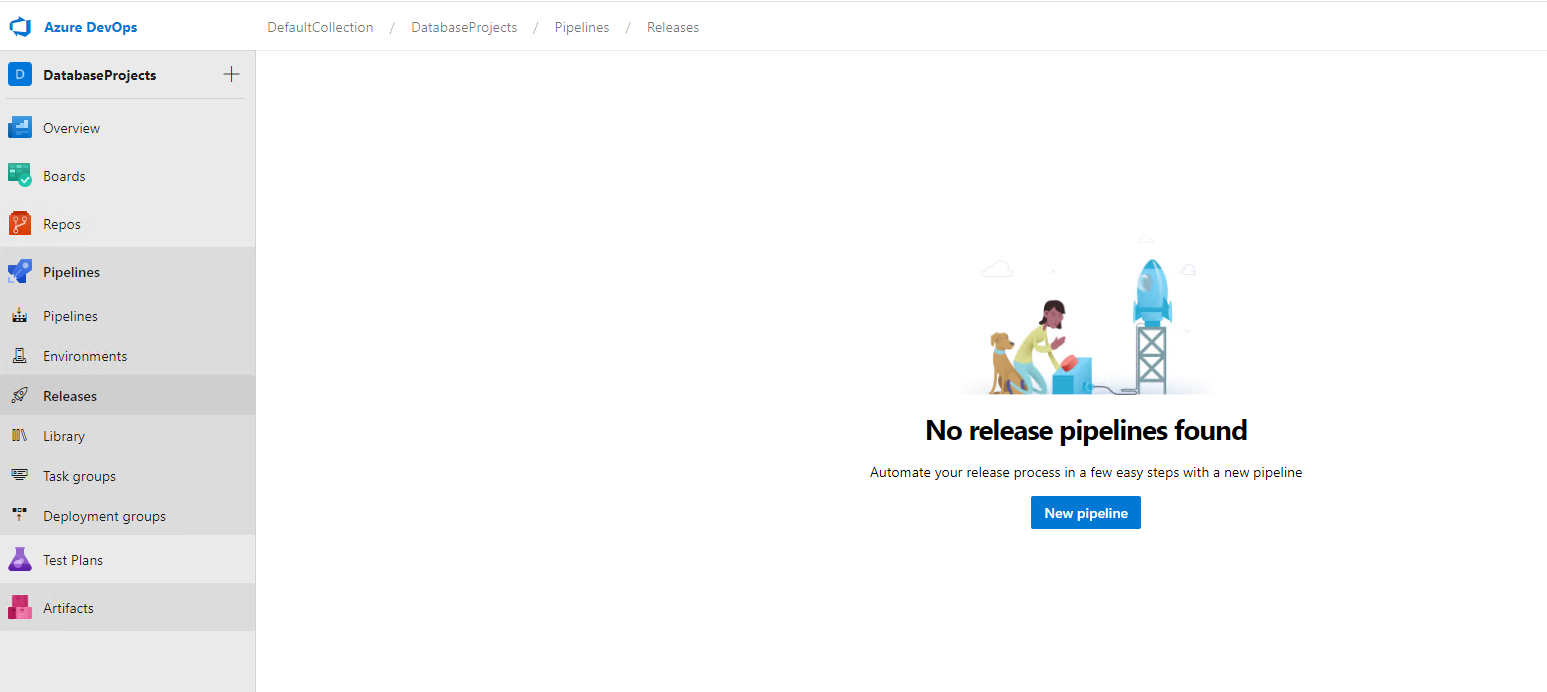
Step 1 - Navigate to the 'Releases' section of your project
a) If your project has never had a release pipeline created before, you will see a screen similar to below, simply select 'New Pipeline'. (If this isn't your first release pipeline, simply skip to section b))
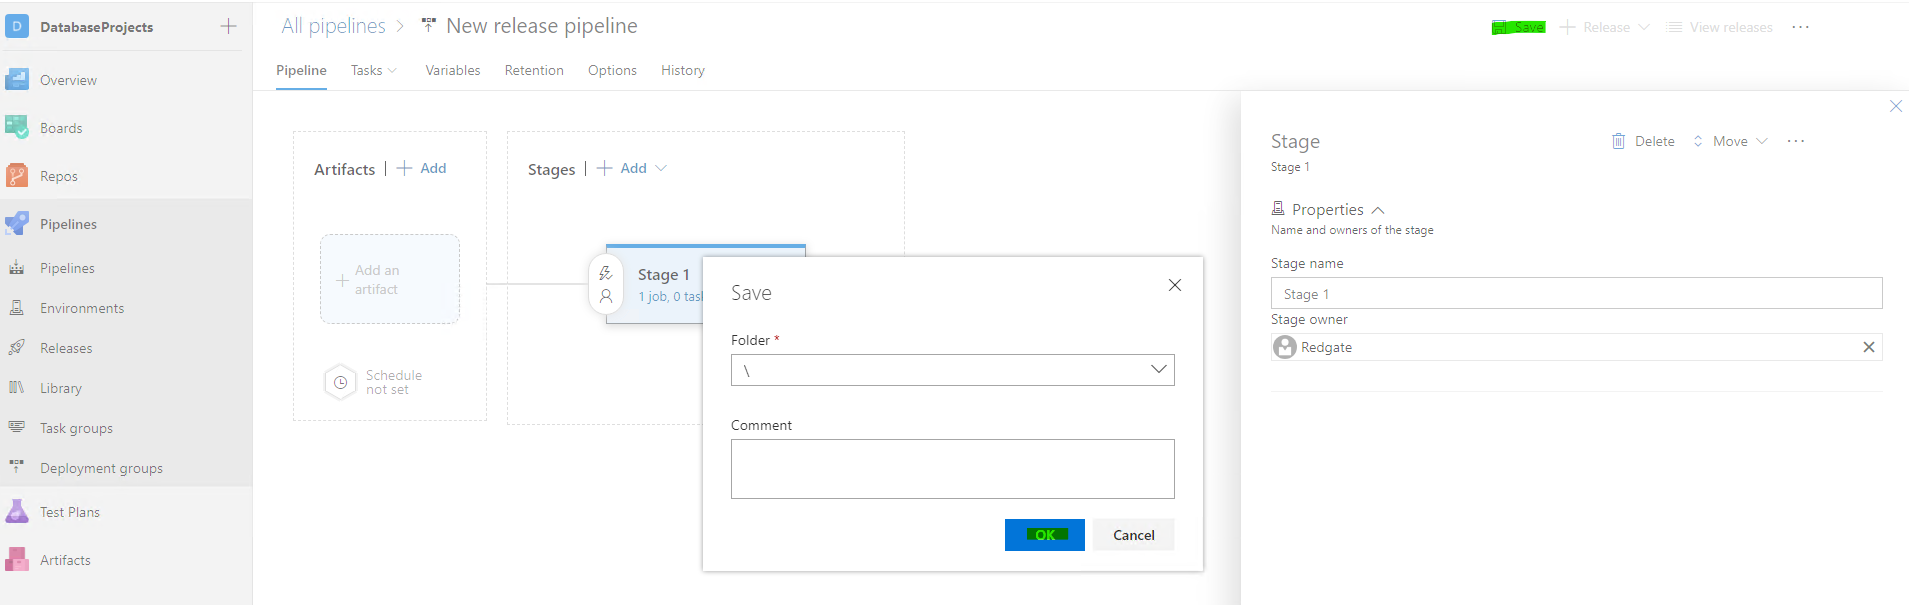
In the screen that follows, choose 'Or start with an Empty Job' to get to the main screen. Because it is necessary to Import a pipeline, rather than start from screen, simply choose the 'Save' button in the top right hand corner and select ok for the default location.
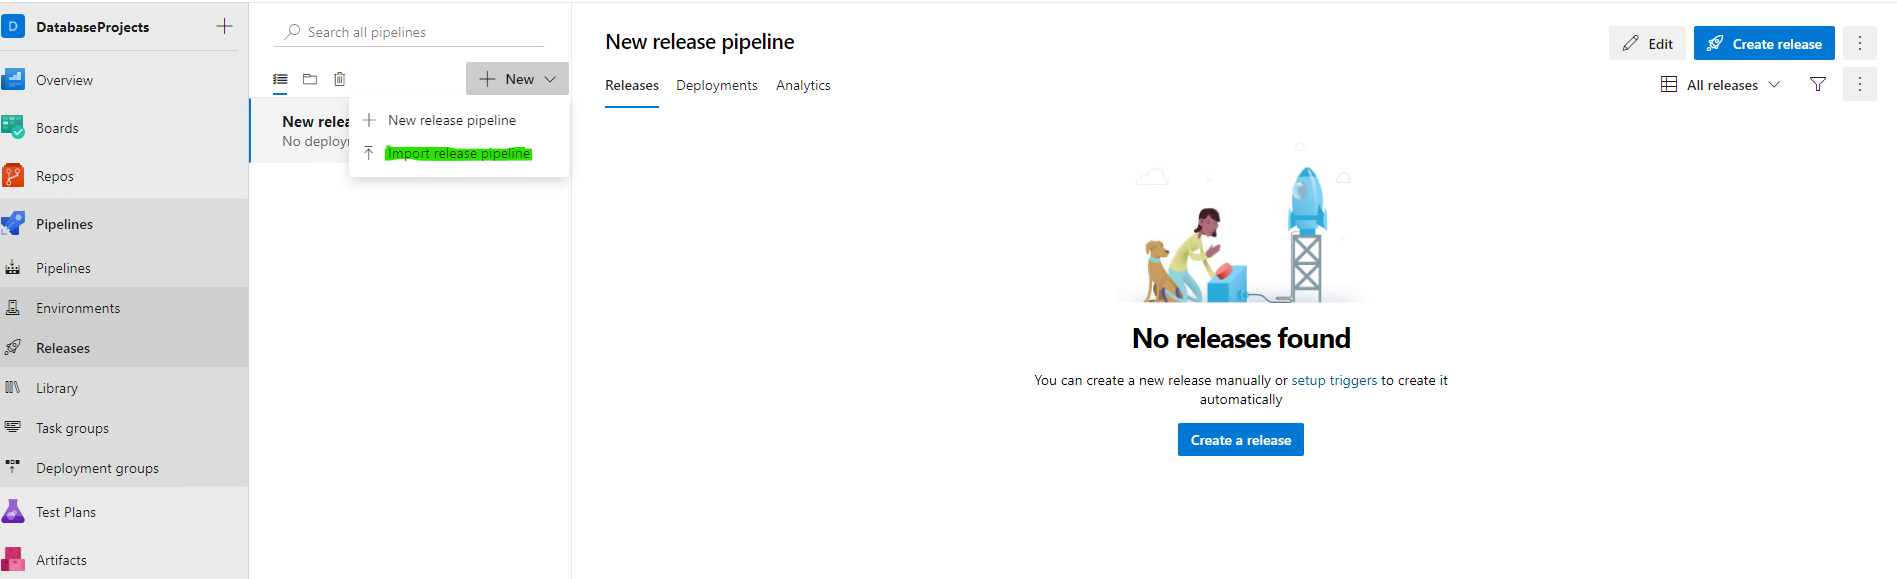
b) If you now return to the main 'Releases' homepage, by clicking 'Releases' on the left hand side. It will be possible to import a pipeline. To do this, click the '+ New' button and select 'Import release pipeline'
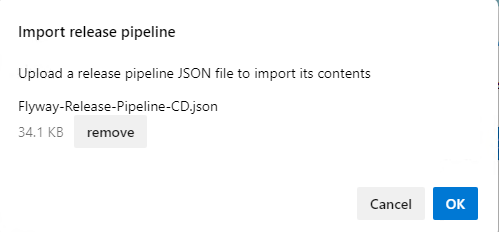
As before, locate your 'Flyway-Release-Pipeline-CD.json' file and select OK
Step 2 - Configure the Release Pipeline
Once imported, it's necessary to configure a few settings to make the pipeline relevant to your Azure DevOps setup. The first is to re-configure the artifact to your build pipeline. To do this, click the artifact called '_Flyway-Build-Pipeline-CI' > Then select 'Delete' in the top right corner.
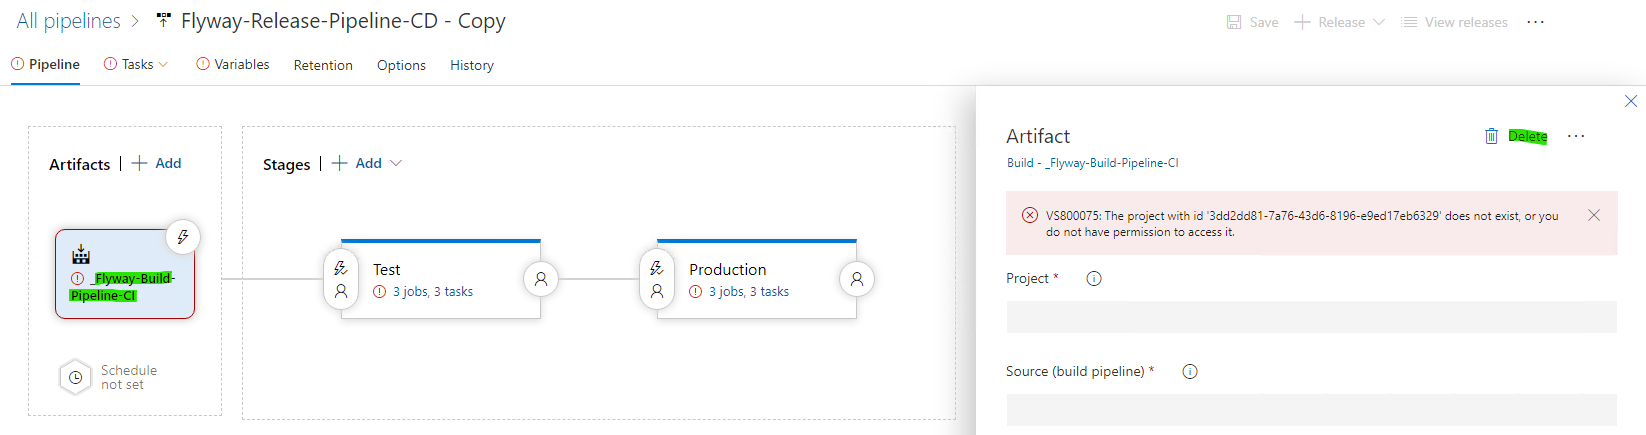
To create the new artifact, click the now available 'Add an artifact' button > Followed by selecting the correct Project and Source pipeline (This will be the build pipeline we created previously).

Step 3 - Configure the Agent Pools
For this example pipeline, we have made the assumption that there will be a Test stage and a Production stage. In the real world, there may be more or less stages depending on your setup. Because of this, you may wish to change the naming conventions or even duplicate the stages as required. For this example however, I will continue with this two stage approach.
To configure the Test stage, select the red exclamation mark '3 jobs, 3 tasks'. This can also be achieved by clicking 'Tasks' in the top bar and selecting the preferred stage.

As with the Build pipeline, we once more need to set the relevant Agent Pool. Therefore, Click both exclamation marks that require attention and choose the agent pool from the drop down.

Carry out the same steps for the Production stage by clicking 'Tasks' at the top and swapping to Production.
Step 4 - Configure the Release Pipeline Variables
In the top bar, select the 'Variables' section. Like the Build pipeline, we will need to input target database information that Flyway will use through the pipeline. Unlike the Build pipeline, we may have different connection details in Test compared to Production. This is why we can also scope variables to be used only in the correct part of the pipeline, for example JUST the Test stage. As this is the case, it is necessary to fill in the variables as required, see below for a breakdown:
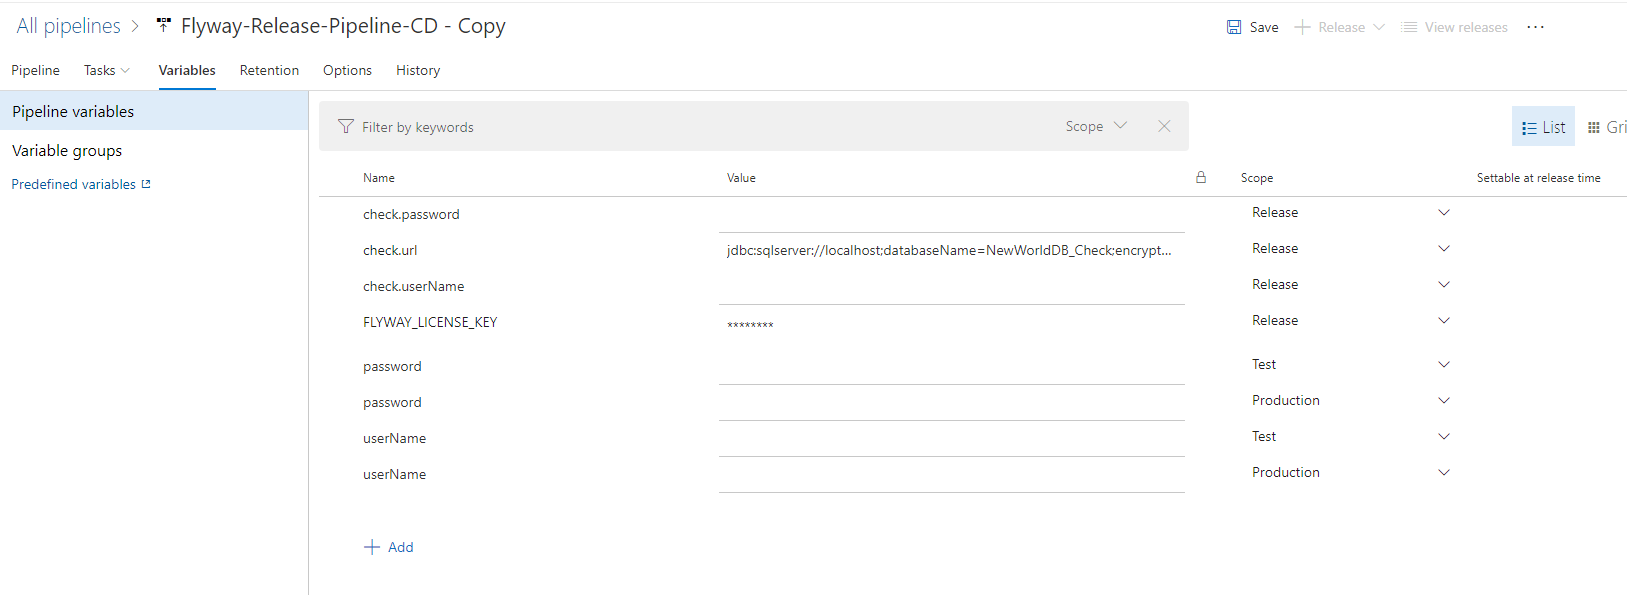
- check.url
- This needs to be a valid JDBC connection string, which will be provided to the Flyway CLI and used as the target database for this check report activity.
- As this is a report activitity, ensure the selected database is an empty database designed purely for compiling the project code. The database will be WIPED on each run.
- Example JDBC - jdbc:sqlserver://localhost;instanceName=MyInstance;databaseName=Flyway_Check;encrypt=true;integratedSecurity=true;trustServerCertificate=true
- More information on the check command can be found here - https://documentation.red-gate.com/fd/check-concept-184127467.html
- check.userName
- A valid username for authenticating with the target RDBMS, to connect to the check JDBC database above (Not required for Windows Auth, simply leave the value blank)
- check.password
- A valid password for authenticating with the target RDBMS, to connect to the check JDBC database above (Not required for Windows Auth, simply leave the value blank)
- FLYWAY_LICENSE_KEY
- This is the 516 character Flyway CLI license key, used to ensure that either Flyway Teams or Flyway Enterprise functionality is available within the pipeline.
- userName
- A valid username for authentication with the target RDBMS, to connect to that stage's target database (Not required for Windows Auth, simply leave the value blank)
- password
- A valid password for authentication with the target RDBMS, to connect to that stage's target database (Not required for Windows Auth, simply leave the value blank)
Tip - Setting variables to secret, helps to keep sensitive information secure within the pipeline. To do this, simply toggle on/off the padlock icon to the right of each variables value as required.
Step 5 - Save & Queue
With the pipeline now setup, it's time to 'Save' and kick-off the first run. Before you do this, you may want to change the name of the pipeline. This can be done by clicking the name 'Flyway-Release-Pipeline-CD - Copy' at the top of the page and changing as appropriate.
Once complete, click 'Save' in the top right > Followed by clicking '+ Release' > Create release
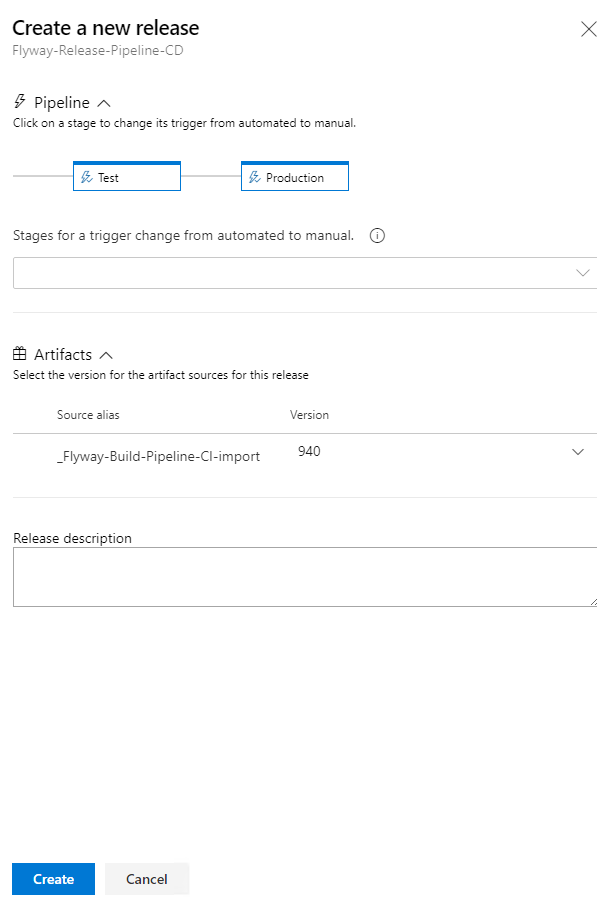
Click 'Create' when ready to trigger the release process. A green bar will show at the top of the page, click 'Release-1' to view the release details.

The pipeline has been incorporated with Manual Intervention gates, therefore before a release can be done to Test or Prod, it is necessary to either Resume or Reject the job. If happy, click Resume and pipeline will deploy all pending changes to the target stages environment.

Tip - By default, the agent being used will write a HTML report to disk on that agents machine. However, the location it writes to can be configured and can be extremely useful to view when reviewing and approving upcoming releases. To change this, simply tweak the Check report activity in each stage, specifically the reportFilename parameter.
Section 8 - Pipeline Testing
While this example pipeline is designed for ease of setup, running it a few times may be necessary to resolve any configuration issues. Consider testing JDBC connection details using Flyway Desktop or CLI before transitioning to the classic pipeline. If unable to access Flyway Desktop, alternative methods such as using Flyway CLI in a preferred Shell can be utilized for testing.
Section 9 - Conclusion
Flyway is an extremely flexible migrations-first engine, with the CLI able to be built into most modern CI/CD tools. In this article, it showcased how Flyway could be built into an Azure DevOps classic pipeline. However, this just scratches the surface around how Flyway could be incorporated in almost any pipeline tool to match your business requirements.
This documentation contains proprietary information and is protected by copyright law.
Copyright © 2026 Red Gate Software Limited. All rights reserved


