Tutorial - Using Flyway Check with SQL Server
Published 16 November 2022
Tutorial: Using Flyway Check with SQL Server
Introduction
The new check command is run prior to migrating, to give you confidence by producing a report which allows you to better understand the consequences of your planned migrations.
One or more of the following flags must be set, which determine what the report contains:
-changesproduces a report of all the changes that will be applied to the schema in the next migration.-driftproduces a report showing objects in the schema which are not the result of any of the currently applied migrations, i.e. changes made outside of Flyway.
More information can be found on the check command page.
This tutorial exemplifies the scenario where you have access to both your target DB (url) and a build DB (buildUrl).
Download the latest version of Flyway Enterprise CLI
First, download the latest version of the Flyway Enterprise CLI and extract its contents.
Setting up databases
To use check we will need access to two databases:
- The target database. This is the database we're interested in making changes to.
- A build database. Flyway will clean this database, apply migrations to it, and make comparisons in order to generate change and drift reports.
In this example, there are two databases in our SQL Server instance: foobar (the target) and check_build_db. Both can be accessed by the sa user.
Configuration
As well as the usual config parameters (flyway.url, flyway.user, flyway.password, flyway.licenseKey...), we also need to configure properties specific to the check command (see the documentation for more details). In this case, we only need to configure flyway.check.buildUrl and flyway.reportFilename as the other properties all have suitable default values.
Our flyway.conf file (found in the conf folder), should contain the following values:
flyway.url=jdbc:sqlserver://localhost;databaseName=foobar;trustServerCertificate=true
flyway.user=sa
flyway.password=Flyway123

flyway.check.buildUrl=jdbc:sqlserver://localhost;databaseName=check_build_db;trustServerCertificate=true
flyway.reportFilename=check_report
Setting up migrations
In the sql folder, we can create a new file V1__add_table.sql, containing a simple schema change:
create table PERSON (
    ID int not null,
    NAME varchar(100) not null
);
Detecting changes using -changes flag
Before we run migrate, we can use check to generate a change report by running it with the -changes flag:
./flyway check -changes
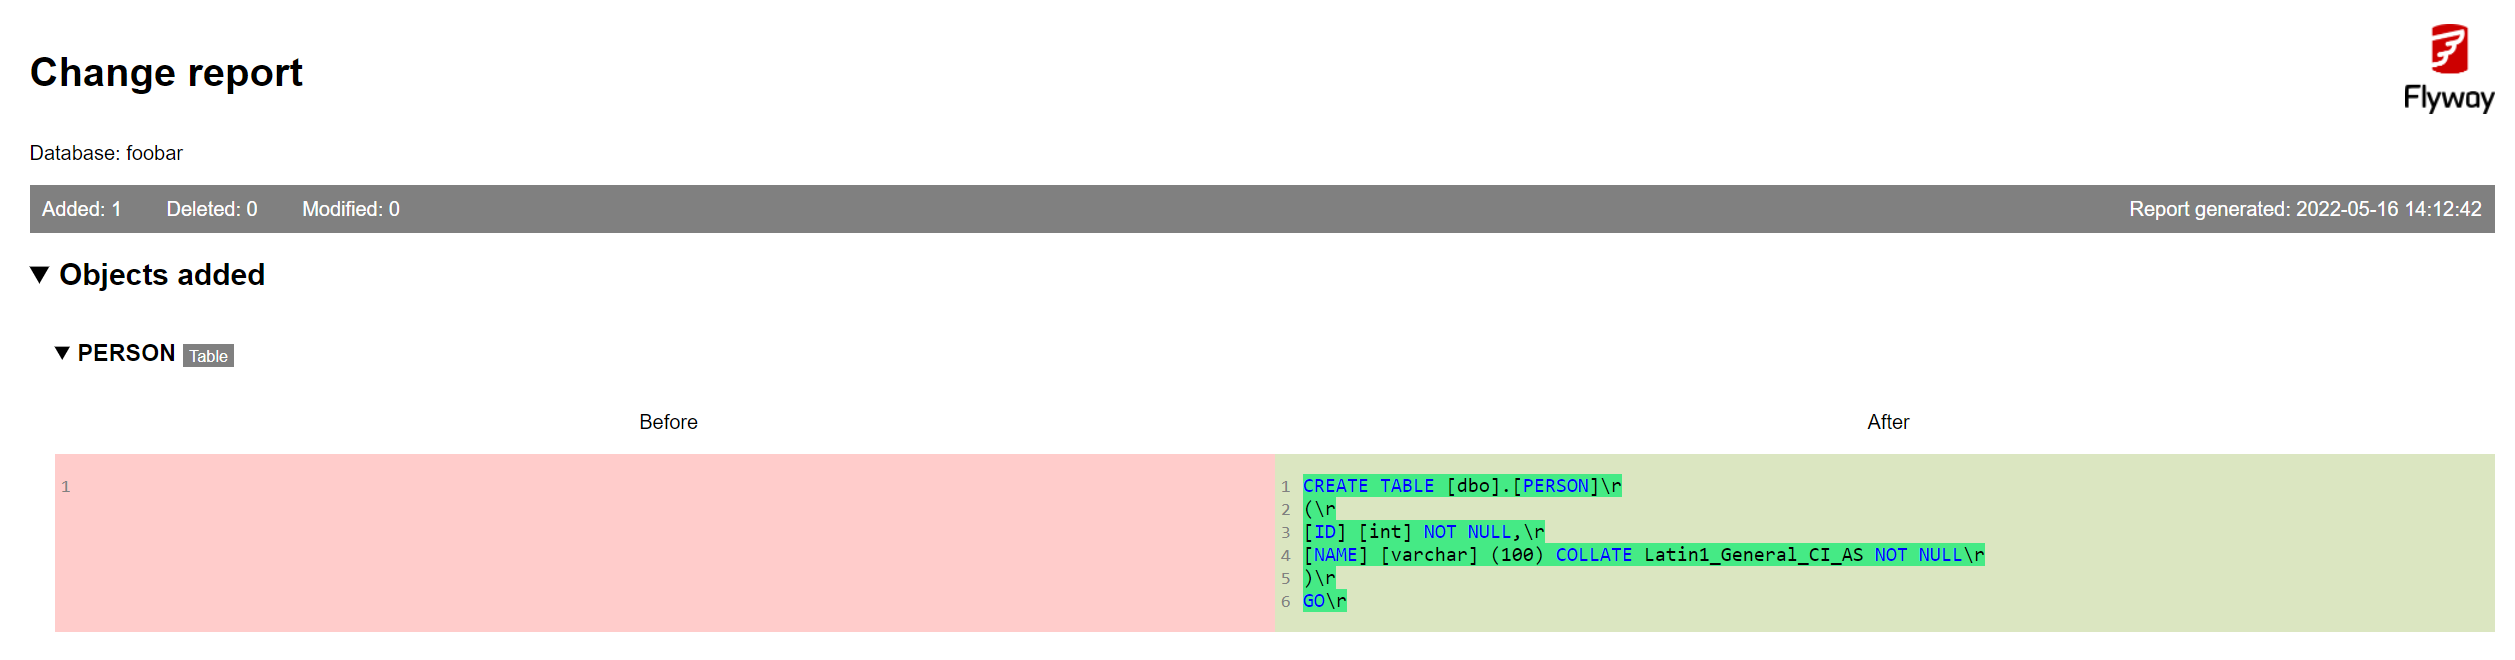
Viewing the report output
Having run the command, we can see that Flyway has generated HTML and JSON versions of the check report in the working directory. Opening check_report.html in a browser, we can clearly see what objects will change in our target schema as a result of running our pending migrations, expressed in the form of SQL queries. The JSON report contains the same information but in a more machine-readable format.
Applying the changes
We now know that applying our pending migrations will have the intended effect on our target schema, so we can go ahead and apply them using migrate:
./flyway migrate
Detecting drift using -drift flag
Before applying future migrations, we might also want to confirm that no drift has occurred in the target database, i.e. all schema changes have been applied in the form of flyway migrations, as oppose to unrecorded manual changes.
To demonstrate this, we can apply a manual change to the target database, e.g. using SSMS:
use foobar;

alter table PERSON add EMAIL varchar(100);
We can then run check with the -drift flag:
./flyway check -drift
This creates another pair of HTML and JSON reports. This time the files contain a drift report, showing how the target database schema (in this case foobar) differs from whats contained in the applied migrations.
Using Check in Docker
This feature can also be accessed through the Flyway Enterprise Docker images.
Pulling the images
First pull the relevant images for this tutorial:
docker pull mcr.microsoft.com/mssql/server
docker pull redgate/flyway
Running SQL Server
We can then use Docker to set up an instance of SQL Server with a login user sa and password Flyway123:
docker run -e "ACCEPT_EULA=Y" -e "SA_PASSWORD=Flyway123" -p 1433:1433 -d mcr.microsoft.com/mssql/server
Make sure there are no other SQL Server instances running with the same port
As before, create a target database foobar and a build database check_build_db e.g. using SSMS.
Preparing the local working directory
Folders in the local directory can later be mounted to the Flyway Docker image.
Create a folder called sql to contain migrations and add a new SQL migration V1__add_table.sql:
create table PERSON (
    ID int not null,
    NAME varchar(100) not null
);
Along with sql, you might also want to create a reports folder to store the reports that will be produced, and a conf folder to store the configuration file.
Inside conf, place a file called flyway.conf and add the following contents:
flyway.url=jdbc:sqlserver://localhost;databaseName=foobar;trustServerCertificate=true
flyway.user=sa
flyway.password=Flyway123

flyway.check.buildUrl=jdbc:sqlserver://localhost;databaseName=check_build_db;trustServerCertificate=true
flyway.reportFilename=reports/check_report
Running check in Docker
Run the check -changes Flyway Docker image:
docker run --rm --network="host" -v $PWD/sql:/flyway/sql -v $PWD/reports:/flyway/reports -v $PWD/conf:/flyway/conf redgate/flyway check -changes
Here, we have mounted the relevant volumes from the working directory and used a network where Flyway can access the SQL Server container.
This will generate a report showing the changes which will be made to the database on the next migrate. The HTML and JSON forms of the report can be found in the local reports folder.
Similarly, we could replace -changes with -drift to instead see how the target schema is different from what's defined in the migrations, or use both -changes and -drift to have both in the same report.
Using Docker Compose
We could also set up a similar environment using docker compose:
version: '3'
services:
  flyway:
    image: redgate/flyway
    command: -url=jdbc:sqlserver://db;trustServerCertificate=true -check.buildUrl=jdbc:sqlserver://db;databaseName=check_build_db;trustServerCertificate=true -password=Flyway123 -user=sa -reportFilename=reports/check_report check -changes
    environment:
      - FLYWAY_EMAIL=<put your PAT email here>
      - FLYWAY_TOKEN=<put your PAT here>
    volumes:
      - ./sql:/flyway/sql
      - ./reports:/flyway/reports
    depends_on:
      - db


  db:
    image: mcr.microsoft.com/mssql/server
    environment:
      - ACCEPT_EULA=Y
      - MSSQL_SA_PASSWORD=Flyway123
    ports:
      - 1433:1433
In this case, Flyway is using the default SQL Server databases and is being configured using command-line flags rather than mounting the conf volume.
Summary
This tutorial outlined the following concepts:
- How
checkcan be used to generate pre-migration reports. - Configuring
checkand applying it to SQL Server. - Using
checkin Docker.


