Setting up Microsoft Entra ID as your OpenID Connect Identity Provider
Published 21 August 2024
This documentation is intended to provide detailed information on how to set up Microsoft Entra ID (formerly Azure Active Directory) as your identity provider to enable authentication in Redgate Monitor via OpenID Connect. See our page on Authenticating with OpenID Connect for a general overview on this feature.
Pre-requisites
This guide assumes the following:
- You have already created your Microsoft Entra ID organization
- Your Redgate Monitor Web Server has been set up to use HTTPS by default. See this page for information on how to set this up.
Creating your App registration
First you will need to create and configure your Entra app registration for Redgate Monitor:
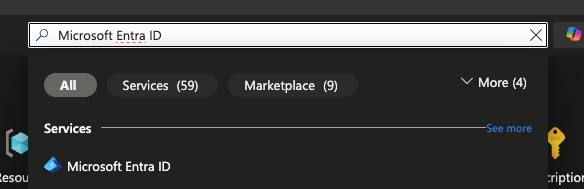
- In the Microsoft Azure Portal, search for the Microsoft Entra ID service and navigate to that page
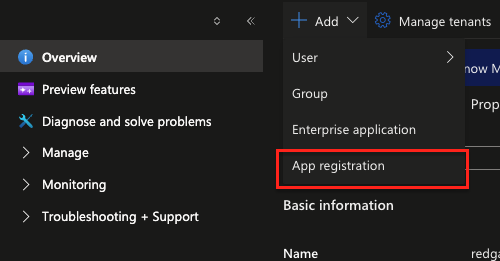
- In the Entra service page, click the Add button and then App registration
- In the Register an application page, choose a name for the application (e.g. Redgate Monitor) and select the supported account types that you will require.
- In the same page, for Redirect URI select Web and enter the HTTPS endpoint that you would typically use to access Redgate Monitor through the browser with
/openidconnectaccountas the path. For example:https://<machine-name>.domain:8080/openidconnectaccount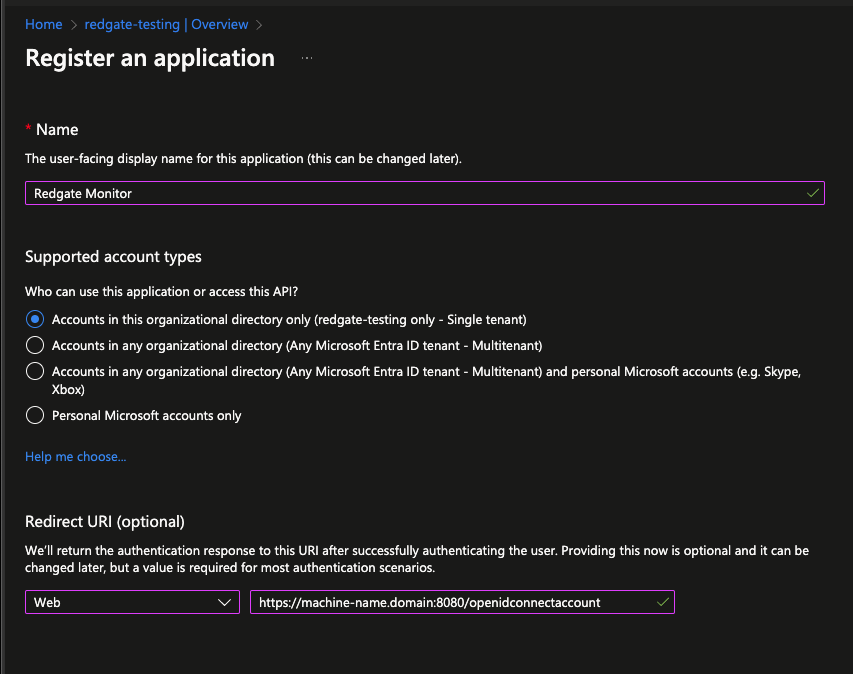
- Click Register to complete the app registration
Configuring your app registration
Before you can use your application integration in Monitor, you will need to make sure the app is correctly configured as follows:
- In the Manage > Authentication section of your app registration
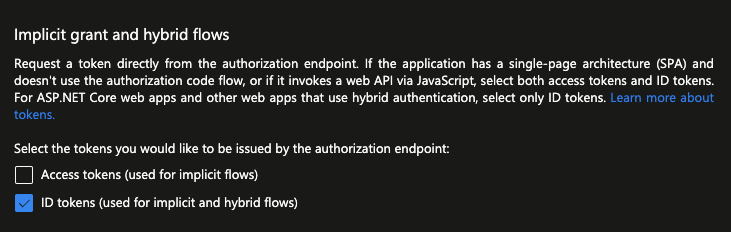
- For Implicit grant and hybrid flows select ID Tokens
- For the Front-channel logout URL use the same URL you used for the Redirect URI, except with
/signout-callback-oidcas the path. For example,https://<machine-name>.domain:8080/signout-callback-oidc
- For Implicit grant and hybrid flows select ID Tokens
- In the Manage > Token configuration section of your app registration
- Click Add groups claim, and select Groups assigned to the application. Selecting this option will limit the number of groups that are included in the ID tokens, as well as enable the use of
cloud_displaynameto include group names in the ID token, as described in Step 3 below.
Note that if you choose not to limit the groups to the application at this stage, you may encounter issues with token limitations. See this page for more information.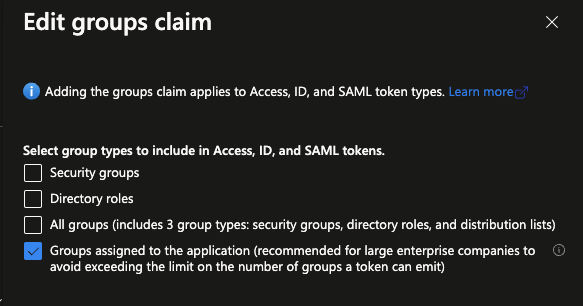
- Optionally, you can click Add optional claim and add
preferred_usernameoremailor another claim to the ID Token that can then be used as the Redgate Monitor username later if desired
- Click Add groups claim, and select Groups assigned to the application. Selecting this option will limit the number of groups that are included in the ID tokens, as well as enable the use of
- Optionally, if you would prefer to use the display names of groups rather than their object ID when configuring them as authentication principals within Monitor, then you must include
cloud_displaynameas an additional property of the group claim token.- In the Manage > Manifest section of your app registration, scroll to the optionalClaims section of the JSON manifest.
- Within the
optionalClaimsobject, you should have an array calledidToken. Within this array find the object with thenameproperty set togroups. - In the
additionalPropertiesarray of this object, addcloud_displayname. - Your manifest should contain something like the following (other objects and properties have been omitted here for brevity):
{
  "groupMembershipClaims": "ApplicationGroup",
  "optionalClaims": {
    "idToken": [
      {
        "additionalProperties": ["cloud_displayname"],
        "name": "groups",
      }
    ]
  }
}
Setting up and assigning groups
If you wish to use groups to streamline adding new users to Monitor you must set the group up within your Entra ID directory and add users from your organization into the group
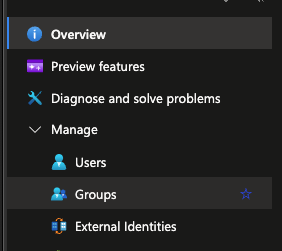
- In the main dashboard of your Entra ID admin page, navigate to the Manage > Groups section
- In this Groups page, click the New group button above the list of groups.
- In the New group configuration page, you should enter a group name (e.g. "Redgate Monitor Admins") and select Security as the type.
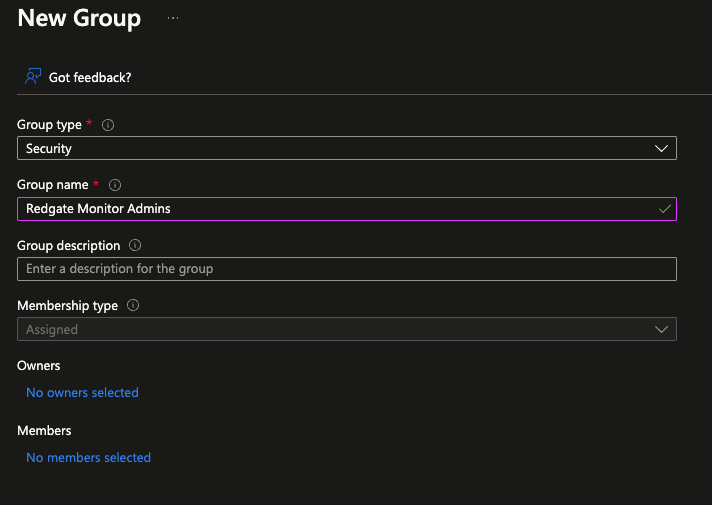
- At this point, you can also add owners and members by selecting No members/owners selected and picking the identity object you wish to add from the list that pops up.
- After adding the group, navigate back to the Entra ID dashboard and go to the Manage > Enterprise applications section
- This page should contain a list of registered applications. Find and select the Redgate Monitor application that was added earlier
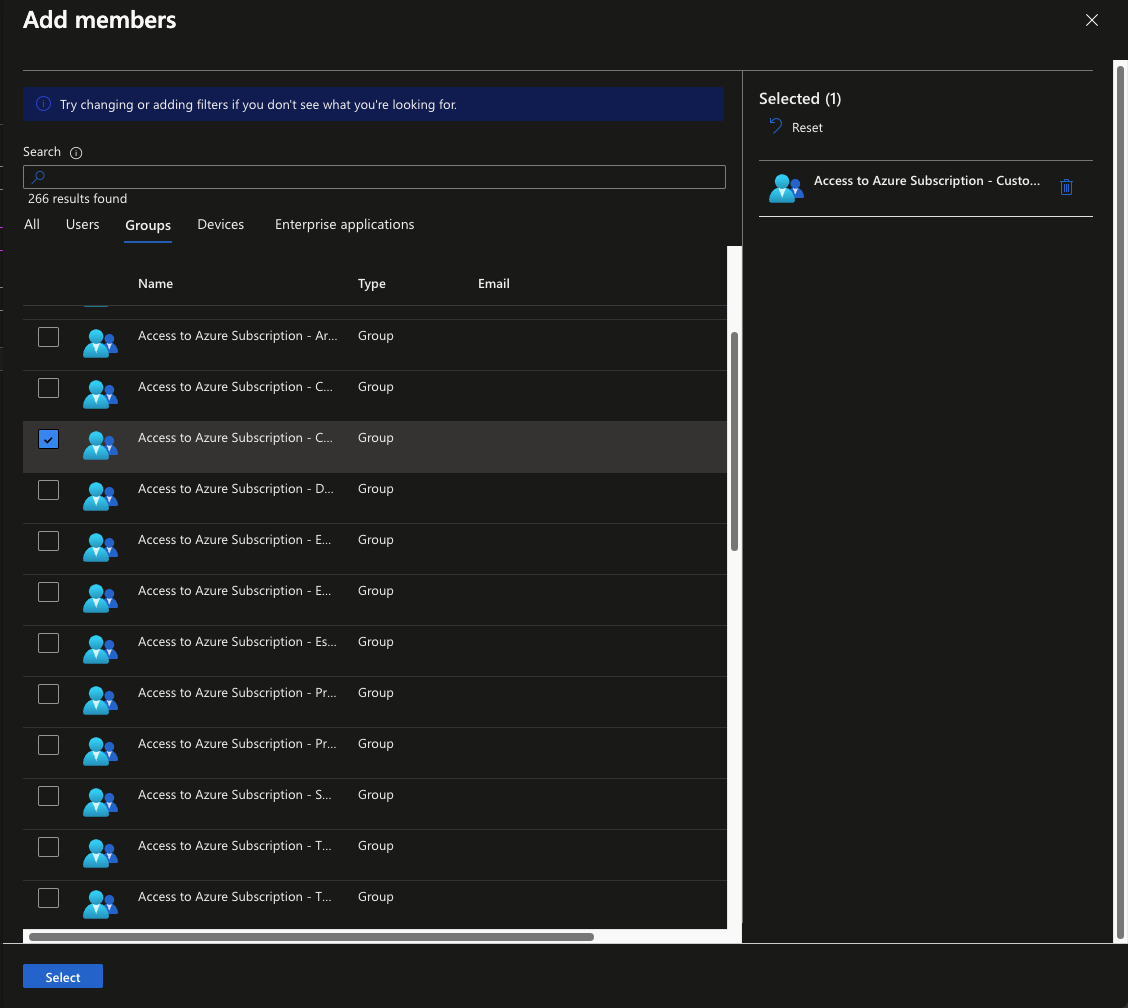
- In the Redgate Monitor application page, navigate to the Manage > Users and groups section and click Add user/groups
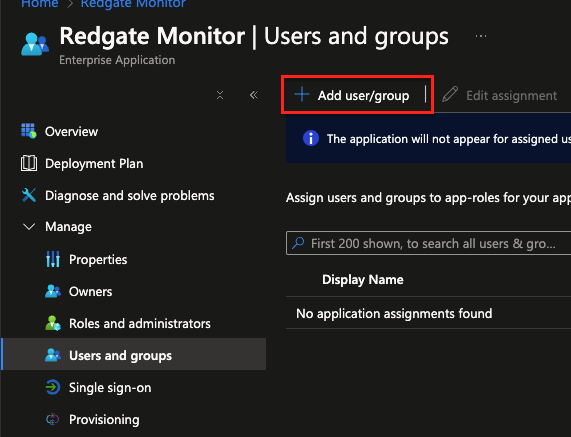
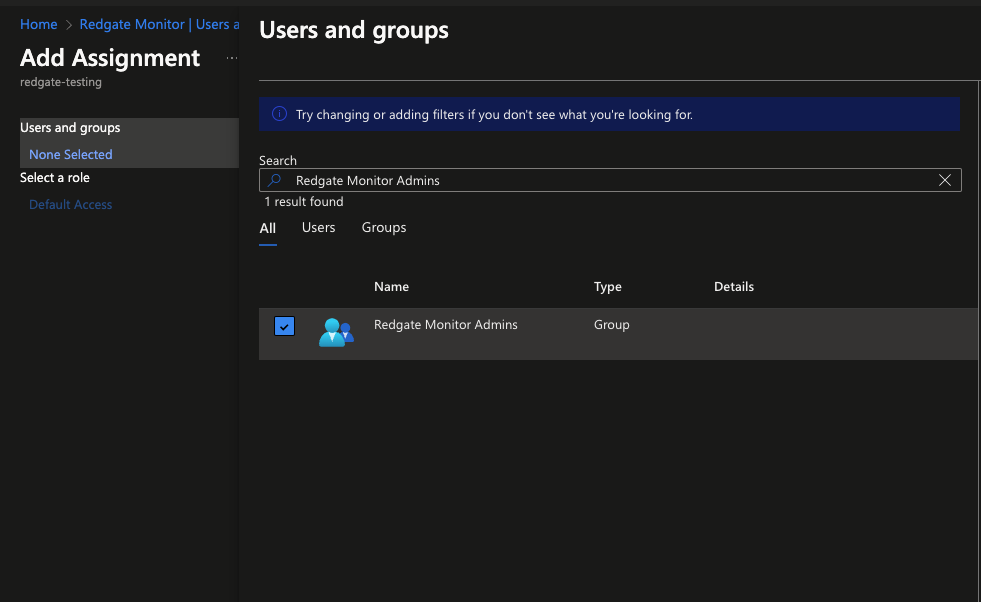
- On the Add assignment page, under "Users and groups" click None selected and then search for the group that was created earlier (e.g. "Redgate Monitor Admins") and select it, pressing Select and then Assign to add it to the application.
- This group will now show up in your list of group claims in the OIDC token that is issued to Monitor.
Configuring your OIDC provider in Redgate Monitor
At this point your Entra ID app registration should be fully set up to work with Monitor, so all that remains is to create the configuration.
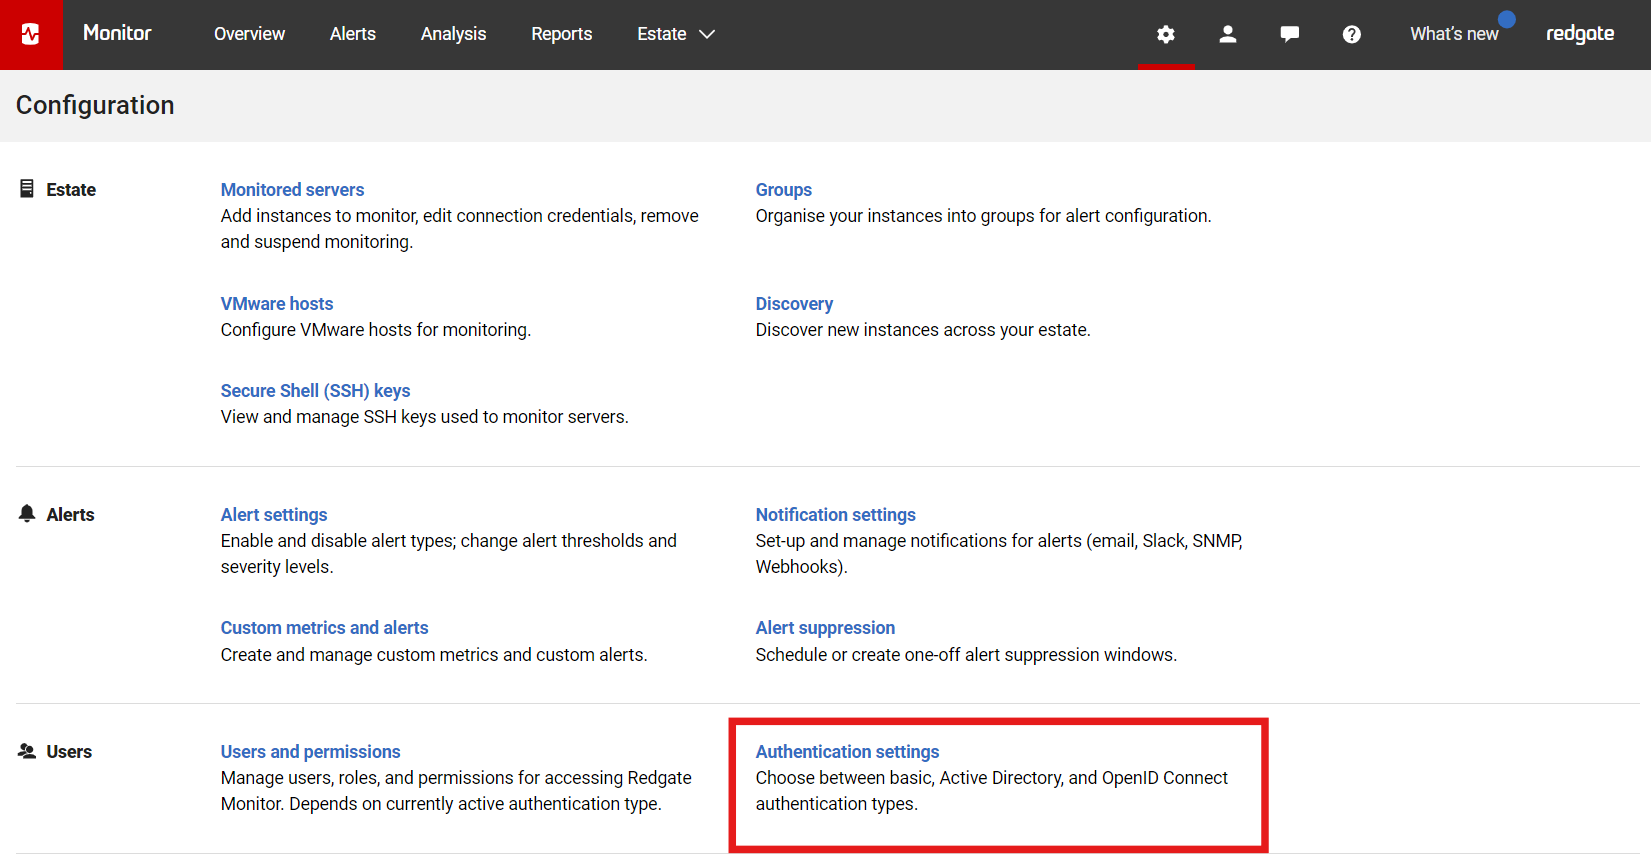
- In the Configuration page, under Users, click Authentication settings:
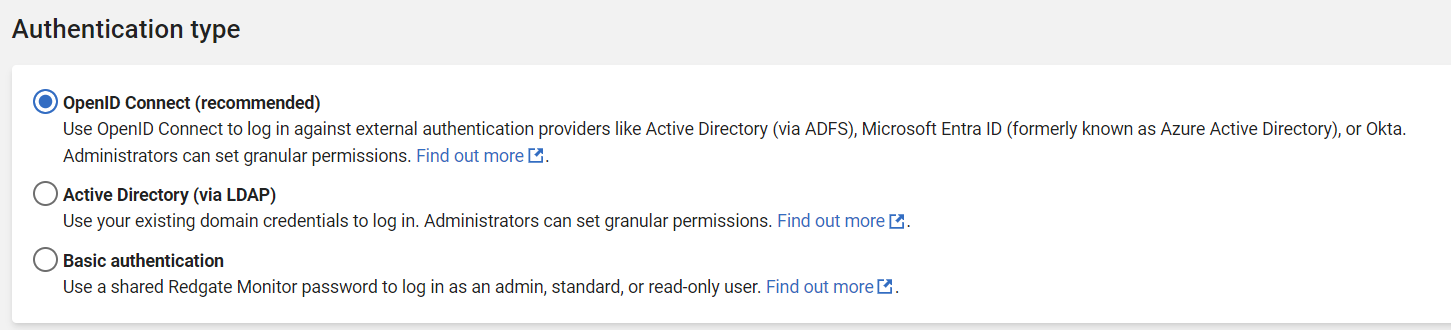
- Select Use OpenID Connect:
- A popup appears:
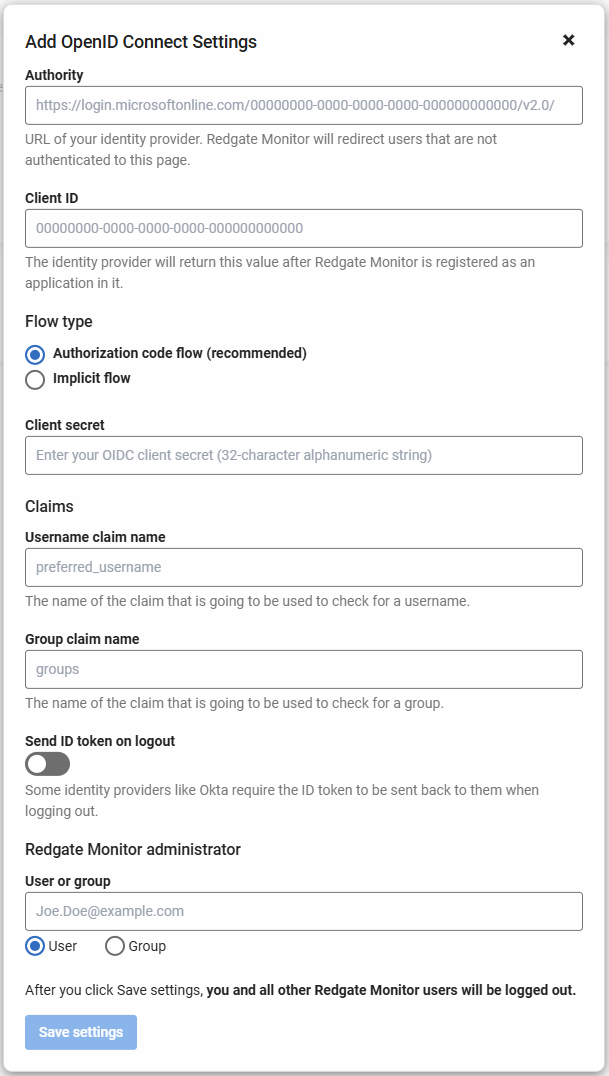
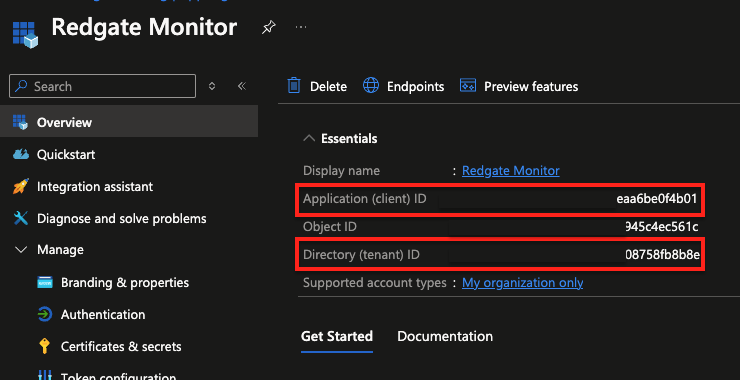
- Visit the Entra ID service dashboard and navigate to the Manage > App registrations section, then search for the Redgate Monitor app registration created earlier. Take a note of two values in the App registration Overview section:
- The Application (client) ID
- The Directory (tenant) ID
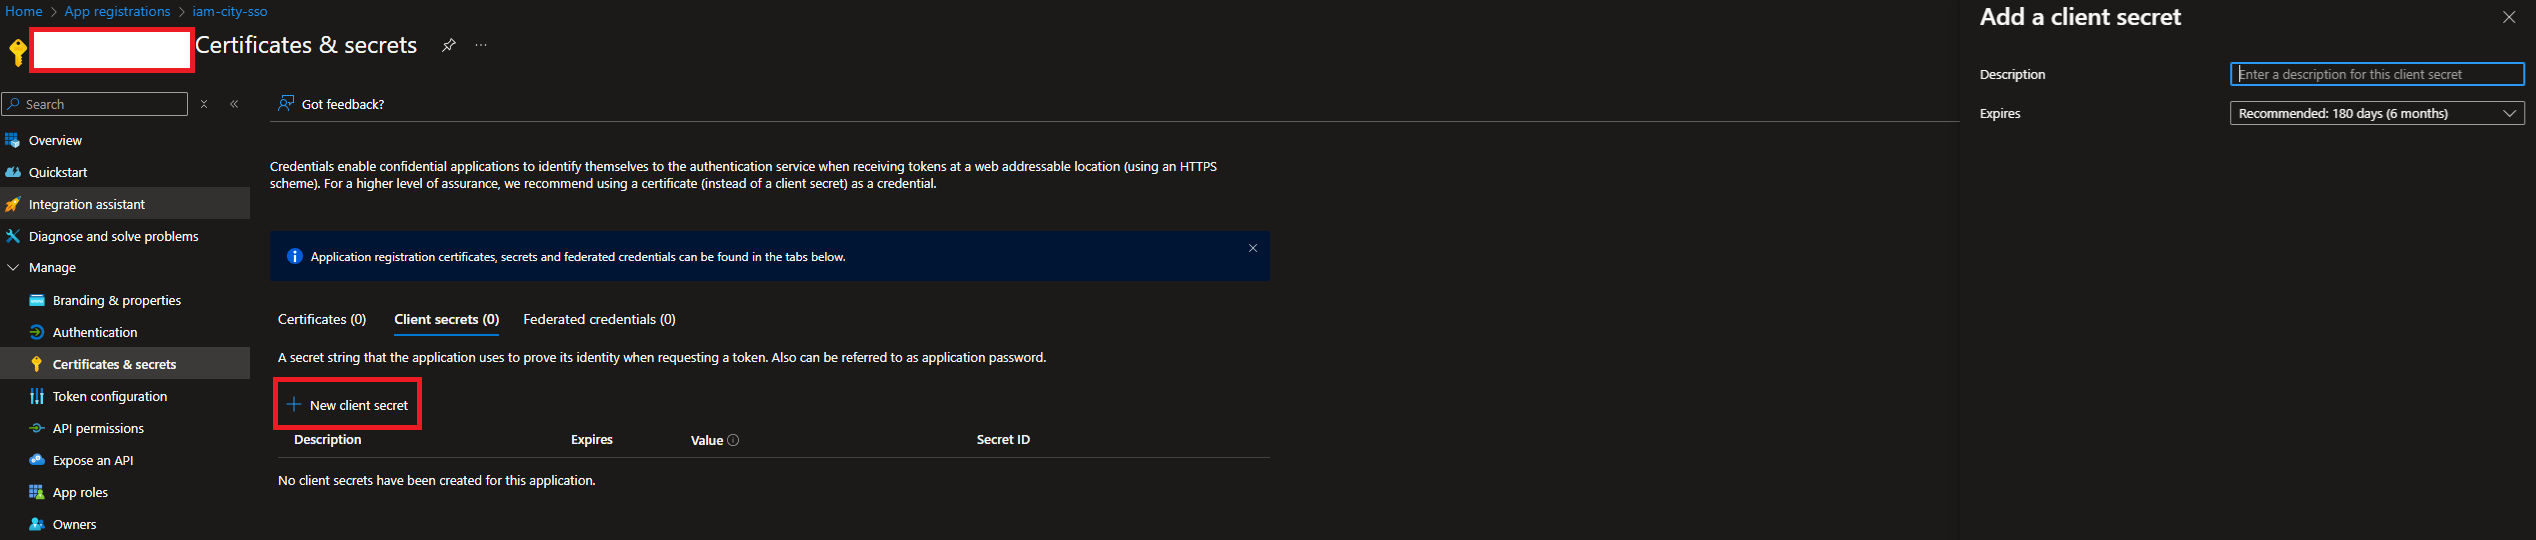
- Under Certificates & secrets, click 'New client secret' and specify a description and an expiry date. Take note of the client secret value. It will be required for configuring the OIDC authorization code flow later on.
- Under Authority, you should enter
https://login.microsoftonline.com/<tenant-id>/v2.0/replacing <tenant-id> with the Directory (tenant) ID from step 4b above. - Enter the Client ID, which will be the Application (client) ID from step 4a above.
- It's recommended to use the Authorization Code flow with PKCE instead of the Implicit flow because authorization code flow is more secure. To use authorization code flow, enter the Client Secret from step 5 above.
- Enter the Username claim name or Group claim name. By default this should be
preferred_usernamefor the Username claim name, unless you have specified a different optional claim, andgroupsfor the Group claim name. There is no need to enable Send ID token on logout. Entra ID does not require this.
Add an Administrator user or group.
If you have set up the
Redgate Monitor Adminsgroup as shown earlier in this guide, you should select the Group option. Additionally, if you have set upcloud_displaynameas described in Step 3 of Configuring your app registration above, you will have to enter either the display name of the group (Redgate Monitor Admins).Otherwise, if you have not set up
cloud_displayname, you must enter the the Azure object ID of the group. You can find this if you navigate to the Entra ID dashboard and visit Manage > Groups and then search for your group.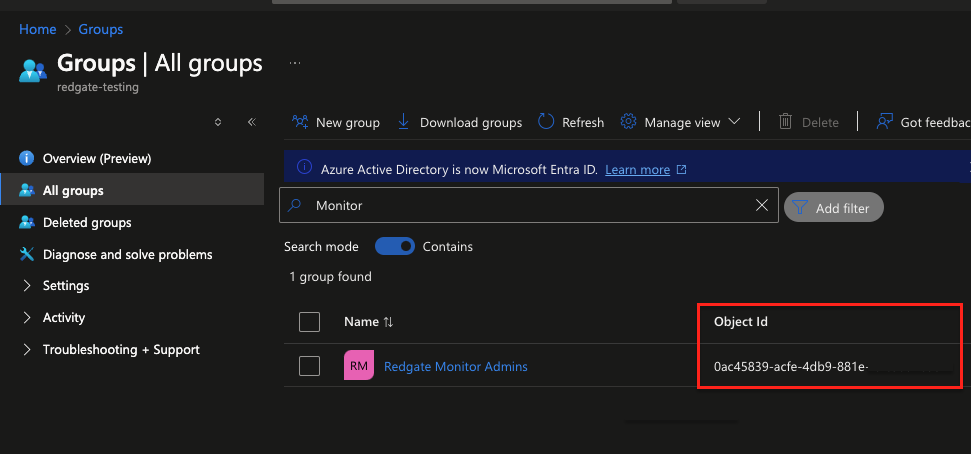
- If you are using a single user as an Administrator you will need the Azure object ID for the user, which you can find in the Entra ID dashboard Manage > Users section by searching for the user, similar to groups.
- Click Save settings. Redgate Monitor logs you and all other users out.
- Access the login page for Redgate Monitor which should redirect you to your Identity Provider's login page.
In case of any problems or misconfiguration, follow Switching back to Redgate Monitor basic authentication.
Adding additional roles
After adding your OIDC configuration to Monitor, you will have an administrator group or user defined. If you want to add more roles (e.g. standard users) via groups, or individual users, then this must be configured separately.
- If you intend to create a new group, for example "RGMonitor Read Only Users", first you should repeat the steps outlined in Setting up and assigning groups.
- Take a note of the group's object ID (or if you have set cloud_displayname, the group name), and follow our documentation on adding new OIDC users and groups to see how you can add it to Monitor
This documentation contains proprietary information and is protected by copyright law.
Copyright © 2026 Red Gate Software Limited. All rights reserved


