This page describes how to use SQL Backup Pro to set up backup verification for your database backups.
What is backup verification?
The most reliable test of your backups is to regularly restore a database from the latest backup and run a database integrity check (DBCC CHECKDB) to verify the logical and physical integrity of all its objects.
SQL Backup Pro 8 allows you to fully verify your backup files with the following steps:
- Create a scheduled backup job to back up databases regularly.
- Test backup files when they are created by including
CHECKSUM and RESTORE VERIFYONLY in backup jobs. - Create a reminder to set up backup verification with a scheduled restore job. The Schedule Restore Jobs wizard will be populated with details from the backup job when you launch it from the reminder.
- Create a scheduled restore job to regularly restore the database from the latest backup.
- Include a database integrity check (
DBCC CHECKDB) in the scheduled restore job to fully verify the backup. - Optionally drop the database automatically as part of the scheduled restore job.
- View results of backup verification in the Activity History.
Example: Verifying the latest backup identified by a folder and file name pattern
This example describes how to set up backup verification for scheduled full, differential and log backups of a database, where each backup file name is unique. In this example we will temporarily restore a test database from the backups in order to verify that the backups can be used.
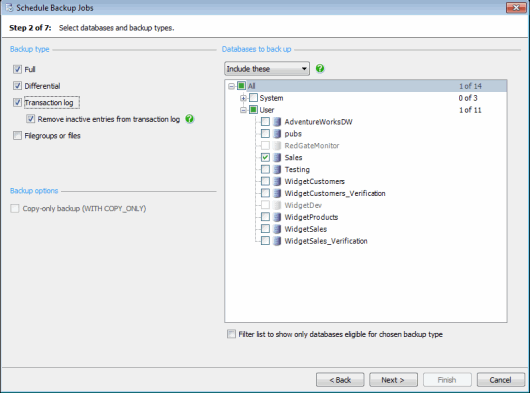
Using the Schedule Backup Jobs wizard, on step 1 select the server the database is on, then on step 2 select the types of backup and the database to back up. In this example we will take full, differential and transaction log backups of a database called Sales.
- On step 3, create a backup schedule for each type of backup. In this example, we will take a daily full backup at 00.00, a daily differential backup at 12.00 and transaction log backups every hour.
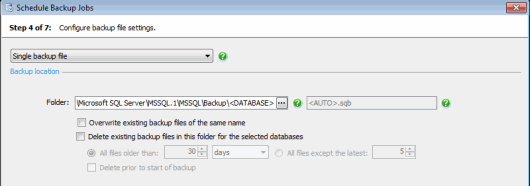
On step 4, specify the location in which the backups will be created. You can include the <DATABASE> tag in the folder path to organise your backups into folders according to the database you are backing up. The backup files will be named automatically because we are scheduling more than one type of backup (full, differential and log); the <AUTO> tag uses the file name format specified in the server's file management options. By default, the file name format is set to create unique file names by including the backup type, instance, database name, and date and time of creation.
- On step 5, specify the compression and optimization settings according to your setup and encrypt the backup if required.
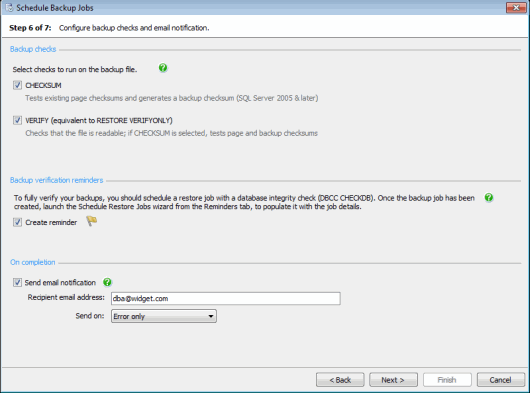
On step 6, select CHECKSUM and VERIFY to check the backup file when it is created. CHECKSUM will validate any page checksums and generate a backup checksum. RESTORE VERIFYONLY will check the backup is complete and readable, and validate the checksums.
Select Create reminder to create a reminder to schedule a restore job to verify the backups in the Reminders tab. When you launch the Schedule Restore Jobs wizard from the Reminders tab, the wizard is populated with details from the backup job.
Select Send email notification to receive an email with a copy of the completion log. By default, email notifications are only sent if errors occur during the backup process, such as a checksum failing; you can change this to Error or warning or Any outcome.
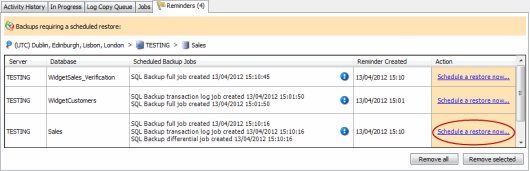
- Complete the wizard to create the scheduled backup job. The job is listed in the Jobs tab and a reminder is added to the Reminders tab. The results of the
CHECKSUM and RESTORE VERIFYONLY will be recorded in the Activity History. When you're ready to create a scheduled restore job to verify your backups, go to the Reminders tab and find the reminder for the Sales database. Click Schedule a restore now to launch the Schedule Restore Jobs wizard populated with details from the scheduled backup job.
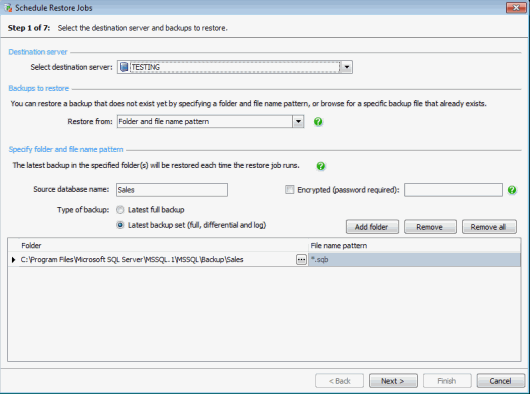
- Step 1 of the Schedule Restore Jobs wizard is populated with details from the backup job.
- The destination server (the server the backups will be restored on) is set to the server on which the scheduled backup job was created. For information on scheduling restore jobs to a different server, see Backing up and restoring on a network share.
- The Restore from option is set to Folder and file name pattern; because each backup will be created with a unique file name, it is not possible to specify the exact backups to restore each time.
- The Source database name is populated with Sales, the name of the database being backed up by the scheduled backup job.
- Latest backup set is selected because we scheduled full, differential and log backups. The most recent set of backups available will be restored each time the scheduled restore job runs.
- Folder is populated with the location specified in the Schedule Backup Jobs wizard.
- File name pattern is populated with the default file name pattern, *.sqb. SQL Backup Pro will use the file name pattern to identify the most recent set of backups of the source database in the specified folder.
If we had stored the backups in multiple folders, each folder would be listed with the default file name pattern. SQL Backup Pro would search all specified folders to identify the most recent backups.
On step 2, Create new database is selected by default and populated with the name of the source database followed by _Verification. In this example it is Sales_Verification.
The Overwrite on subsequent restores check box is selected to ensure that subsequent restores will not fail because a database of the same name already exists.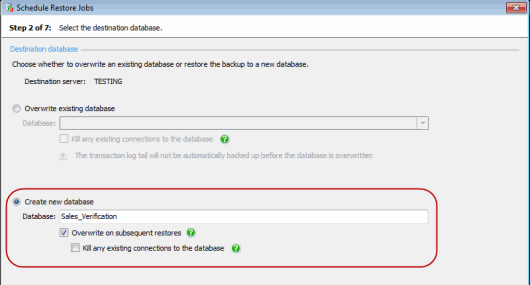
On step 3, Individual files to specified locations is selected by default. The grid is populated with details from the source database, using the logical names of the database files at the time the reminder was created. The new database name, such as Sales_Verification is appended to the file name.
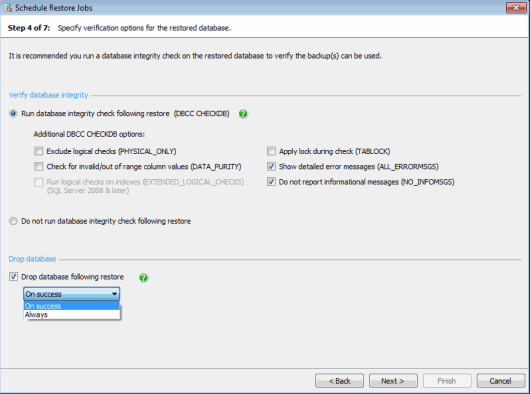
On step 4, Run database integrity check following restore is selected by default.
Select any additional options you want to include in the database integrity check. You can use these to specify the amount of feedback returned and the intensity of the check.
If you want to free the space used by the database between restore jobs, select Drop database following restore and specify either On success or Always. If you do not drop the database, it will be overwritten on the next restore because Overwrite on subsequent restores was selected in step 2 of the wizard.
On step 5, specify the recovery completion state.
Select Send email notification to receive an email with a copy of the completion log, including any errors which arise during the database integrity check. By default, email notifications are only sent if errors occur during the backup process; you can change this to Error or warning or Any outcome.- On step 6, create a restore schedule. SQL Backup Pro will identify the latest backups of the database and restore each backup in the set in the correct order.
In this example we set the schedule for full backups to 00.00, differential backups to 12.00 and transaction log backups to hourly. In order to verify the full and differential backups and a number of the transaction log backups every day, we set the restore schedule to 18.30 daily. If the disaster recovery requirements called for backups to be verified more frequently, we could set the restore schedule to multiple times a day. - Complete the wizard to create the scheduled restore job. The reminder is removed from the Reminders tab and the job is added to the Jobs tab. The results of the restore and database integrity check will be displayed in the Activity History.
Drop database
If you have restored a test database from a backup in order to verify the backup, you may wish to drop the database on completion of the process. The Schedule Restore Jobs wizard gives you the option to drop the database either if the restore and database integrity check were successful (On success), or regardless of the outcome (Always). You can also include these options using the RESTORE command.
Restore to a different server
You can restore backups to a different server using the Schedule Restore Jobs wizard. You may want to do this if you have limited space or resource on the server that the database is running on. For more information, see Backing up and restoring on a network share.
Verify the original database
You can also use the backup verification options to offload verification of a production database to a non-production server. Instead of regularly running a database integrity check on a production server, schedule a backup job for the source database, and then schedule the restore job on a non-production server with a database integrity check.
Additional database integrity check options
You can append the following additional options to the database integrity check (DBCC CHECKDB) to specify the amount of feedback returned and the intensity of the check. You can include these options using the Schedule Restore Jobs wizard or the RESTORE command.
- PHYSICAL_ONLY (Not available if DATA_PURITY or EXTENDED_LOGICAL_CHECKS is selected.) Limits the check to the physical structure of the database, reducing the time required to complete the check. The contents of the check depends on the version of SQL Server you're using; refer to your SQL Server documentation for more information.
- DATA_PURITY (Not available if PHYSICAL_ONLY is selected.) Adds a check for invalid or out-of-range column values to the integrity check. If the database was created on SQL Server 2005 or later, column values will be checked by default and there is no need to include this option.
- EXTENDED_LOGICAL_CHECKS (SQL Server 2008 and later. Not available if PHYSICAL_ONLY is selected.) Adds logical checks on indexes to the database integrity check. Running these checks can have a significant impact on performance and increase the time required to complete the check.
- TABLOCK Limits access to the database while the database integrity check is running. Selecting this option reduces the time required to complete the integrity check.
- ALL_ERRORMSGS Displays all reported errors for each object and includes them in the log file.
- NO_INFOMSGS Turns off reporting for all informational messages. If no additional options are selected, NO_INFOMSGS is included by default as there will not be any informational messages to return.
Refer to your SQL Server documentation for more information about the DBCC CHECKDB command and additional options.