Working with an existing database
Published 18 January 2018
SQL Change Automation's initial setup wizard is designed to help you develop and deploy changes to an existing database with ease.
This page provides information on how to do this by creating a baseline schema from an existing database.
Creating a baseline schema
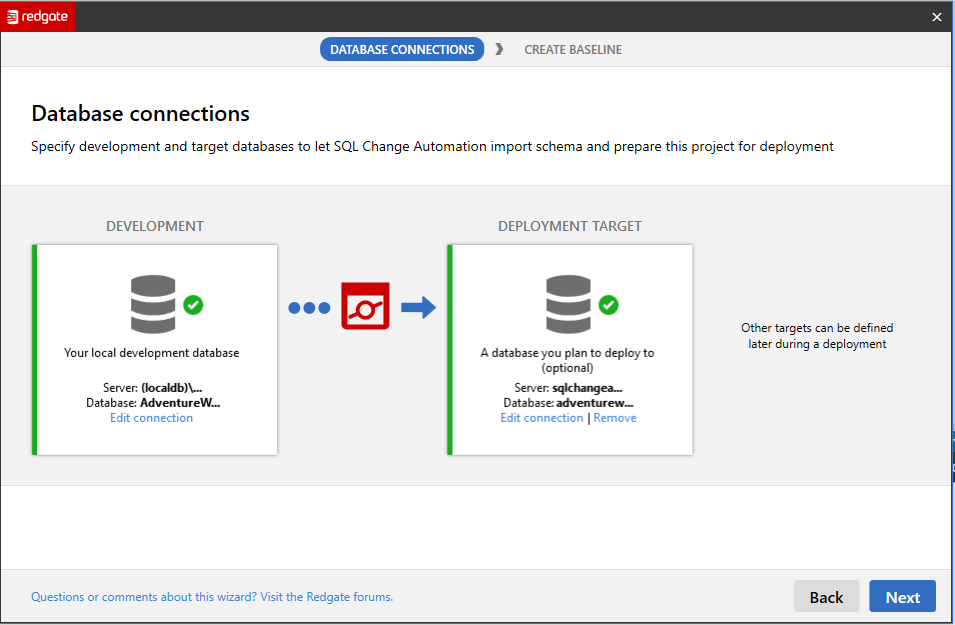
Create a new SQL Change Automation project. Once the project is created, the SQL Change Automation setup wizard should appear:
Step through the wizard to specify a sandbox development environment in the area marked Development. You can specify an existing database, or allow SQL Change Automation to create an empty one for you by selecting Create a New Database.
Specify the environment you would like to develop changes for in the area marked Deployment Target. This will be the environment you create a baseline schema from.
The schema of the Deployment Target will be read in order to create a baseline schema. This will not modify the Deployment Target in any way.
Continue through the wizard to the final page and click the Create Baseline button. This will cause SQL Change Automation to do the following:
- Create two folders – 1.0.0-Baseline and 1.1.0-Changes, under the Migrations directory.
- Import the schema of your Deployment Target into the 1.0.0-Baseline folder as a migration script
- This is a deployable representation of the schema – by running this script on an empty database you can re-create the schema of your Deployment Target.
- Populate the Offline Schema Model (OSM).
- This is a static representation of the schema on your Deployment Target.
- You will be prompted to enable Programmable Objects later on in the process.
You're now ready to make changes to your database schema.
Making changes
In order to start making changes, you must synchronize your SQL Change Automation project with Development and the Deployment Target.
If Development is empty this is simple – just click the Deploy Project button to deploy the baseline script to Development. This will make Development an exact representation of the schema on your Deployment Target.
If Development has changes that are not on your Deployment Target, you'll need to import these changes into your SQL Change Automation project. Click Refresh from the toolbar of the SQL Change Automation window. This scans the connected database for objects that are pending import. You will be able to review the objects that will be imported beforehand. It may be necessary to revert some changes – for instance if your development environment is behind your production environment. In this case you can right click the change and select Revert from the menu.
After clicking Import your schema will be imported into 1.1.0-Changes as a migration script.
You will be able to deploy your tables, views, procedures etc to a new database, however it will not include any data.
For information on how to populate your database with real-world data, including reference, lookup, or static data, see Data Population.
You can also manually add migration scripts to the baseline folder. This is useful if your target database contains changes that could not be imported as part of the baselining process, such as static data.
Preparing the SQL Change Automation project for your first deployment
- SQL Change Automation creates two objects in your database:
- (Table) [dbo].[__MigrationLog] keeps track of the migrations and Programmable Objects/additional scripts that have been executed against your database (additional executions of Programmable Objects/additional scripts will result in new rows being inserted)
- (View) [dbo].[__MigrationLogCurrent] lists the latest version of each migration/Programmable Object/additional script to have been executed against the database
- SQL Change Automation inserts row(s) into the [dbo].[__MigrationLog] table:
- A row will be inserted for each file within the baseline folder (i.e. Migrations\1.0.0-Baseline\*.sql). Additionally, if the Programmable Objects option is checked, a row will be inserted for each file within your Programmable Objects folder (i.e. Programmable Objects\**\*.sql)
- If you connected your SQL Change Automation project directly to your production environment and clicked Import, then a row will be inserted for each migration and Programmable Object that was generated by that import.
What happens when you Import directly from Production
If you specified your Production environment as the Deployment Target, then your database is already set up for the first deployment: no further action is needed, as your production environment was already populated with the required migration log records when you clicked Import. Once you've authored some new migrations, you'll be ready to perform your first deployment.
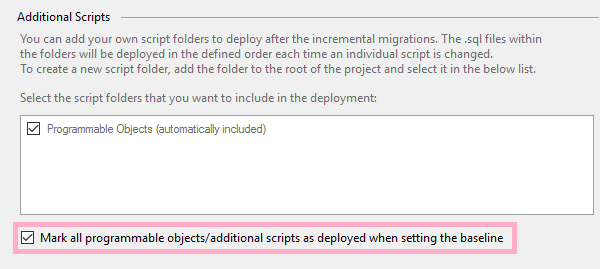
It is possible to exclude Programmable Objects from being executed during the first deployment to a pre-existing database. To mark-as-deployed any scripts within the Programmable Objects sub-folder, select the Mark all Programmable Objects/additional scripts as deployed when setting the baseline checkbox (this can be found under the Additional Scripts section of the Project Settings tab).
Programmable objects baseline
If you plan to use the Mark all Programmable Objects/additional scripts as deployed when setting the baseline option, it is highly recommended that you do not make any changes to the logic contained within your Programmable Objects prior to the initial deployment to an existing database. This is because any changes to the object scripts will not be applied in the first deployment; the deployment of the object will only occur once a further change to the script files is made and subsequently deployed.
If you do need to make logic changes to a programmable object as part of your first deployment, copy the contents of the affected object and paste it into a new migration, e.g. Migrations/1.1.0-NewChanges/001_Alter-MyProc.sql.
Deploying your changes to production
SQL Change Automation supports several deployment mechanisms. You can learn more about these on the Automating database changes documentation page.


