Worked example - Comparing and deploying database schemas
Published 26 July 2017
This worked example demonstrates a basic comparison and deployment of two schemas in an Oracle database.
In the example, The Wooly Widget Company has an Oracle database running on a live web server. This database contains many tables, views, indexes, packages, and other objects. The Wooly Widget Company's development team have been working on an upgrade to to their website. As part of this upgrade, they have made a number of changes to the structure of the development schema. They need to transfer the changes from the development schema to the test schema. This worked example uses Schema Compare for Oracle to transfer these changes.
The example has four steps:
- Set up the schemas.
Create the example database schemas on your Oracle server. - Set up the comparison.
Specify the schemas you want to compare. - Select objects to deploy.
Review the comparison results and select the objects you want to deploy. - Deploy the schemas.
Create and run a deployment script.
1. Set up the schemas
The worked example uses the WIDGETDEV and WIDGETTEST schemas:
- WIDGETDEV is the development schema
- WIDGETTEST is the test schema
To create the schemas on your Oracle server:
Copy the SQL creation script for the schemas:
- Paste the script into your SQL editor, and run it on any database you choose.The schemas are created.
2. Set up the comparison
- Start Schema Compare for Oracle if it isn't already running. The Project Configuration dialog box is displayed showing your most recent project:
In this example, we'll create a new project. - Click Cancel to close the dialog box.
- On the toolbar, click New Project. A new Project Configuration dialog box is displayed.
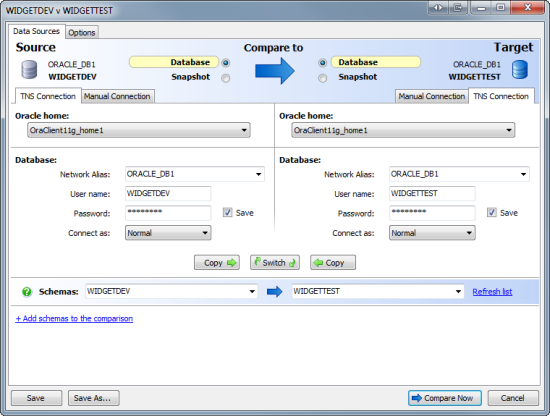
- In the shaded upper pane, ensure both Source and Target are set to Database.
In this example, we are comparing schemas from a live database; you can also compare schemas from saved snapshots. For more information, see Using snapshots. - Select a connection method to connect to the database on which you set up the schemas:
- If you want to connect using aliases in your tnsnames.ora configuration file, under Source, select the TNS Connection tab.
- If you do not not have Oracle client software installed, or cannot use a tnsnames.ora file, select the Manual Connection tab.
- Enter connection details for the database on which you set up the schemas.
- In the User name box, type WIDGETDEV, and in the Password box, type password.
- To set the target database to the same as the source, click .The connection details you entered for the source database are automatically entered for the target.
- Under Target, in the User name box, type WIDGETTEST, and in the Password box, type password.
- Under Source, in the Schemas box, select the WIDGETDEV schema.
Under Target, in the Schemas box, select the _WIDGETTEST schema.
In this example, we are comparing only one source schema and one target schema. Schema Compare for Oracle allows you to compare as many schemas as you like. For more information, see Selecting schemas to compare.- Click Compare Now.Schema Compare for Oracle displays a message dialog box that shows the progress of the comparison.
- When the comparison is complete, to close the message box, click OK.
3. Select objects to deploy
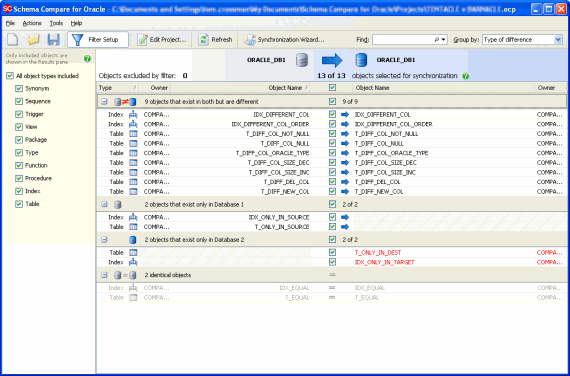
The results of the comparison are displayed:
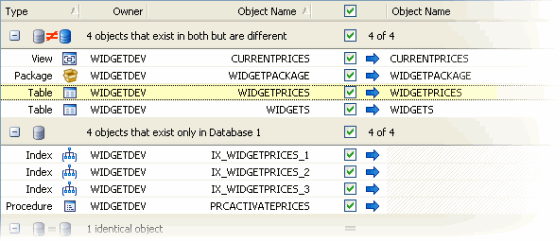
The results are grouped by:
| objects that exist in both databases but are different | |
| objects that exist in WIDGETDEV but do not exist in WIDGETTEST | |
| objects that exist in both databases and are identical |
To view the objects in a group, click :
To display a side-by-side, color-coded listing of the differences in the object creation scripts, click an object in the upper pane. The SQL Differences pane is displayed. This example shows the WIDGETPRICES table:
For more information, see:
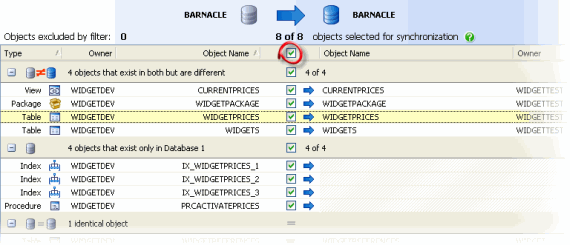
To select objects for deployment, use the check boxes in the middle of the results.
In this example, we will deployment all objects that are different:
- To the left-hand side of the comparison results, in the Filter pane, ensure the default filter All object types included is selected.The filter defines which objects are displayed. When you use the filter to exclude an object, it is removed from the Results pane and cannot be selected for deployment.
For more information, see Using the filter. - To select all objects for deployment, in the central column of the Results pane, select the top level check box:
All objects are selected, and the Deployment Wizard button becomes available. - Click Deployment Wizard.
4. Deploy the schemas
The Deployment Wizard creates the SQL script to make the objects you selected in the comparison results identical.
On the first page of the wizard you can choose to create and save a deployment script, or perform the deployment using Schema Compare for Oracle.
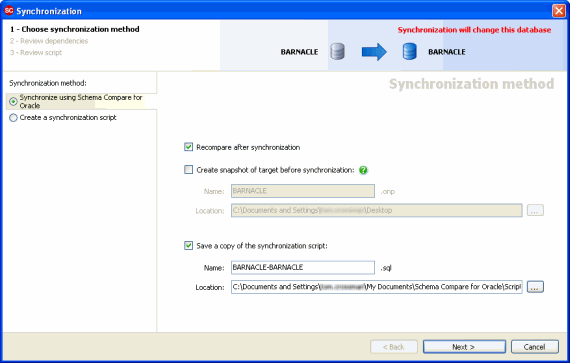
Choose deployment method
In this example, we will deploy using Schema Compare for Oracle:
- On the left side of the wizard, select Deployment using Schema Compare for Oracle, if is not already selected.
- Clear the Create snapshot of target before deployment check box. In this example, we will not create a snapshot before we deployment. For more information, see Backing up before deployment.
- Make sure the Recompare after deployment and the Save copy of the deployment script check boxes are selected.
In this example, we will run the script from Schema Compare for Oracle, and compare the databases afterwards to see that the deployment has been successful. We will also save a copy of the deployment script. - Click Next.
Review dependencies
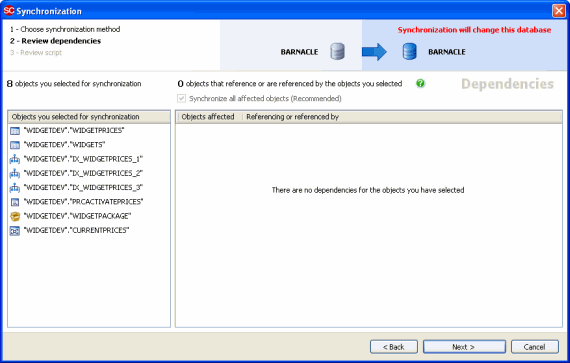
The Review dependencies page of the wizard lists any objects that you did not select for deployment that reference, or are referenced by, objects you did select for deployment:
All the objects you selected for deployment are listed in the left-hand pane, and any affected objects are listed in the right hand pane. For more information, see Review dependencies.
In this example, there are no affected objects.
Review script
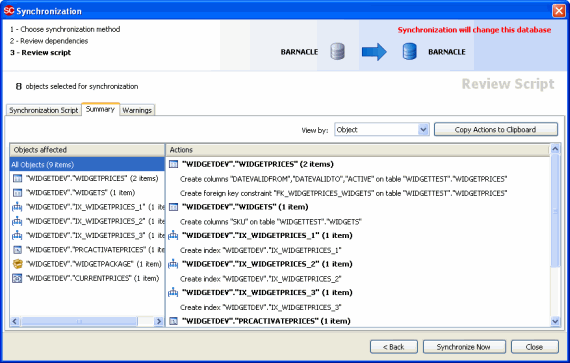
The final page of the wizard displays information about the deployment:
There are three tabs on the Review script page:
- Deployment script displays the script Schema Compare for Oracle has created to deploy the data sources.You can search the script, save it, or copy it to the clipboard.
- Summary displays a synopsis of the actions in the deployment script.You can view the summary grouped by the objects affected, by the type of modification, or by the order in which the script modifies the target.
- Warnings displays a list of any warnings about unexpected behavior that may occur when you deploy the databases. For more information, see Warnings.In this example there are no warnings.
Performing the deployment
When you have reviewed the script, deploy the schemas:
- Click Deploy Now.
- A confirmation dialog box is displayed; to continue, click Deploy Now.
- Schema Compare for Oracle displays a message dialog box that shows the progress of the deployment. When the deployment is complete, click OK to close the message box.
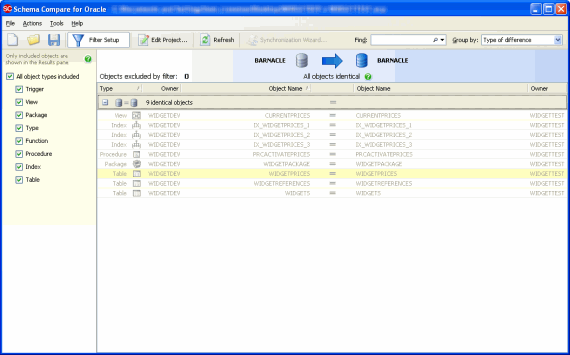
Schema Compare for Oracle then re-compares the databases. The results are shown in the main window. In this example, all objects are shown to be identical, confirming that the deployment has been a success:
