Worked example - deploying data in two databases
Published 10 December 2025
This worked example demonstrates a basic comparison and deployment of two SQL Server databases.
In the example, the Magic Widget Company has a SQL Server database running on a live web server. This database contains a number of tables, views, stored procedures, and other database objects. The Magic Widget Company's development team has been working on an upgrade to their website. As part of this upgrade, they've made a number of changes to the database, which need to be transferred to the production database.
You can follow the example on your own system. You'll need access to a SQL Server to do this.
This example has four steps:
- Set up the databases
Create the example databases on your SQL Server. - Set up the comparison
Specify the data sources, tables, and views you want to compare. - Select data to deploy
Review the results and select the rows you want to deploy. - Deploy the databases
Create and run a deployment script.
1. Set up the databases
The worked example uses the following sample databases:
- WidgetDev is the development database
- WidgetTest is the testing database
- WidgetLive is the production database
To create the databases on your SQL Server:
- Click here to download the SQL creation script for the databases.
Copy the script, paste it in your SQL editor application, and run it.
If databases named WidgetDev, WidgetTest or WidgetLive already exist on your SQL Server, the script will overwrite them.
The databases are created and populated with data.
2. Set up the comparison
In this example, there are three steps to setting up the comparison:
- Specify data sources
- Select tables and views
- Set object mappings
It's not always necessary to set object mappings. However, in this example there are some schema differences between the source and target. For more information, see Selecting tables and views
Specify data sources
- Start SQL Data Compare if it is not already running.
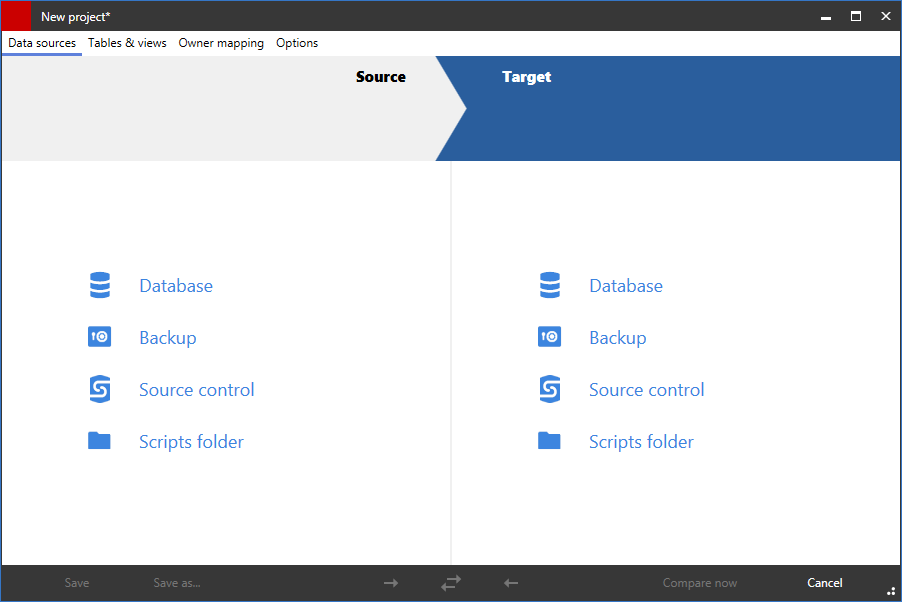
The Project Configuration dialog box is displayed showing your most recent project:
You can edit the current project, or create a new project.
If you want to create a new project, click Cancel to close the dialog box, and on the toolbar click (New Project).
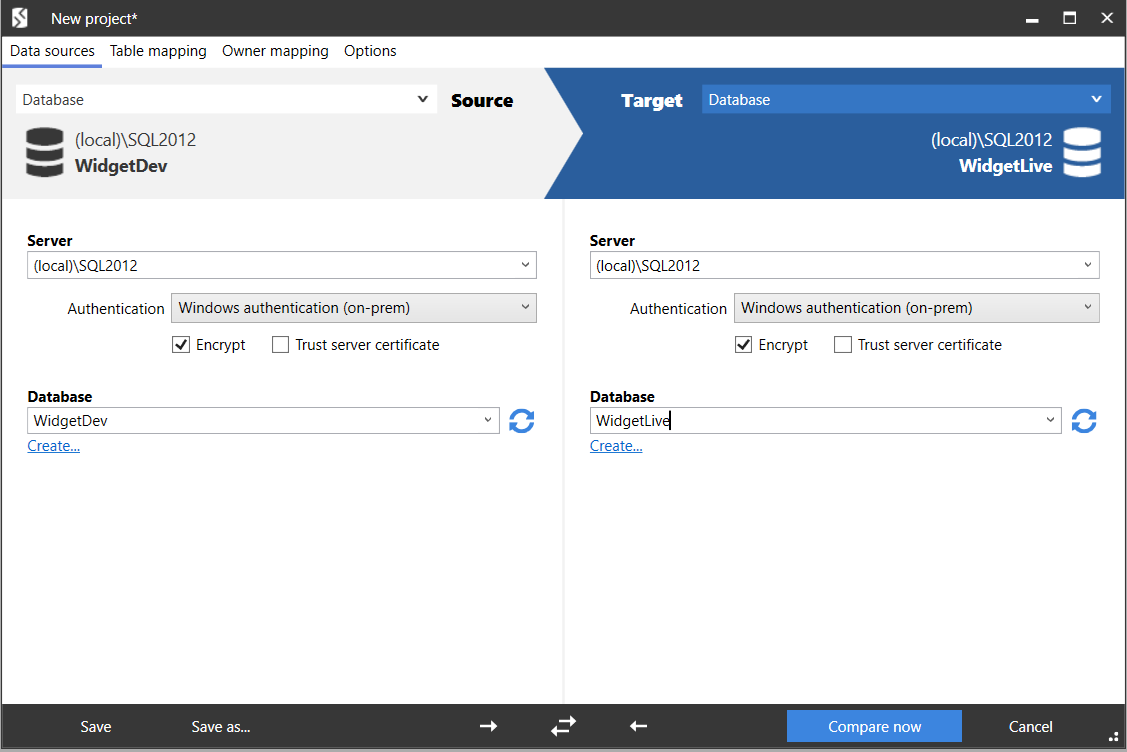
If you have any existing projects, and the Projects dialog box is displayed instead, click New Project. - In the shaded upper pane, ensure the Source and Target are set to Database.
In this example, we will compare databases. You can also compare backups and scripts folders. - For each data source, in the Server box, type or select the name of the server on which you set up the databases.
- For the source, in the Database box, type or select WidgetDev.
For the target, type or select WidgetLive.
If the databases are not displayed in the Database lists, right-click in each Database box and click Refresh, or scroll to the top of the list and click Refresh.
Select tables and views
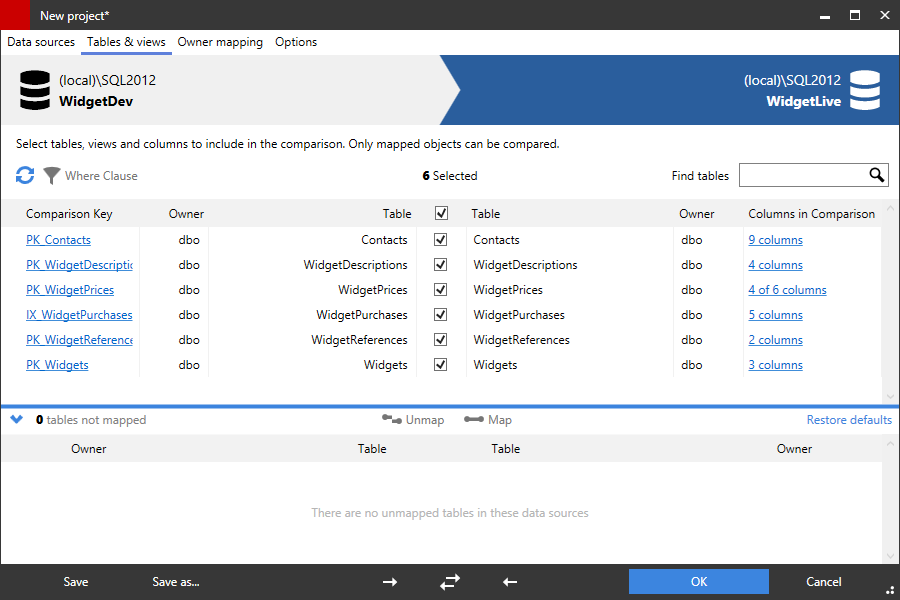
- To specify the tables and views you want to include, click the Tables & Views tab:
The Tables & Views tab enables you to specify:- the tables and views you want to compare
- which specific columns you want to compare
- the comparison key SQL Data Compare uses to match rows in the two databases
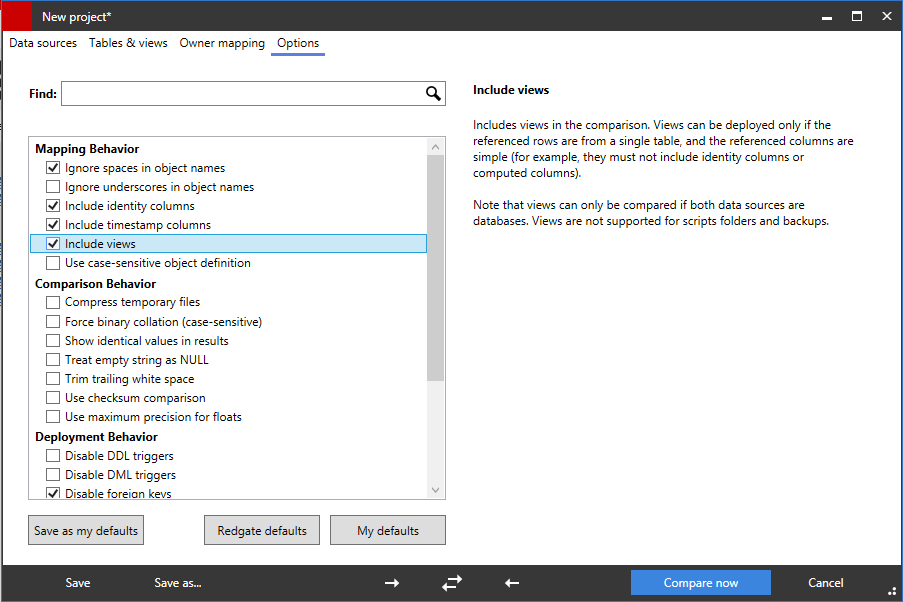
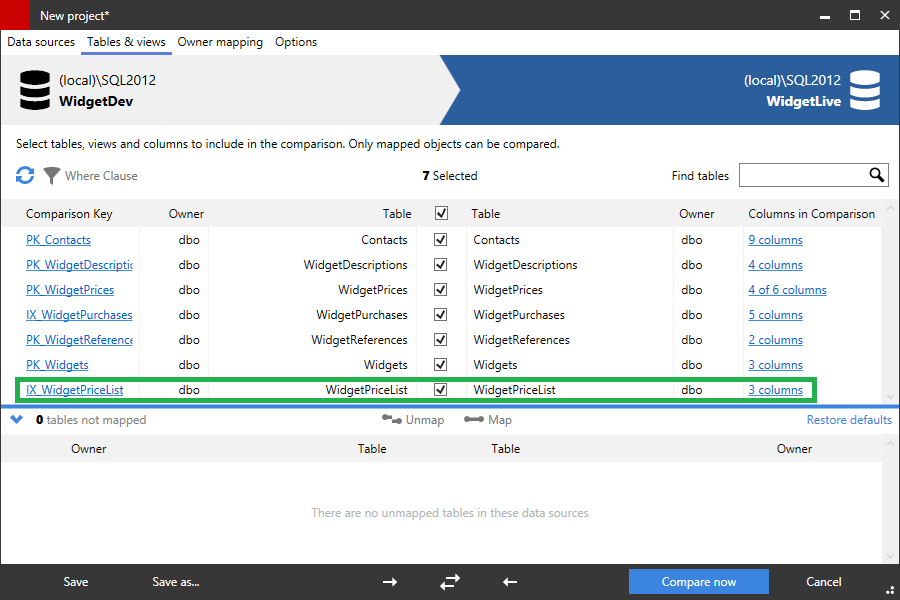
By default, SQL Data Compare does not compare views. To include views, on the Options tab, select the check box for Include views:
The Options tab allows you to modify the behavior of SQL Data Compare during comparison and deployment.- Click the Tables & Views tab again.
The WidgetPriceList view is now included in the comparison.
Set object mappings
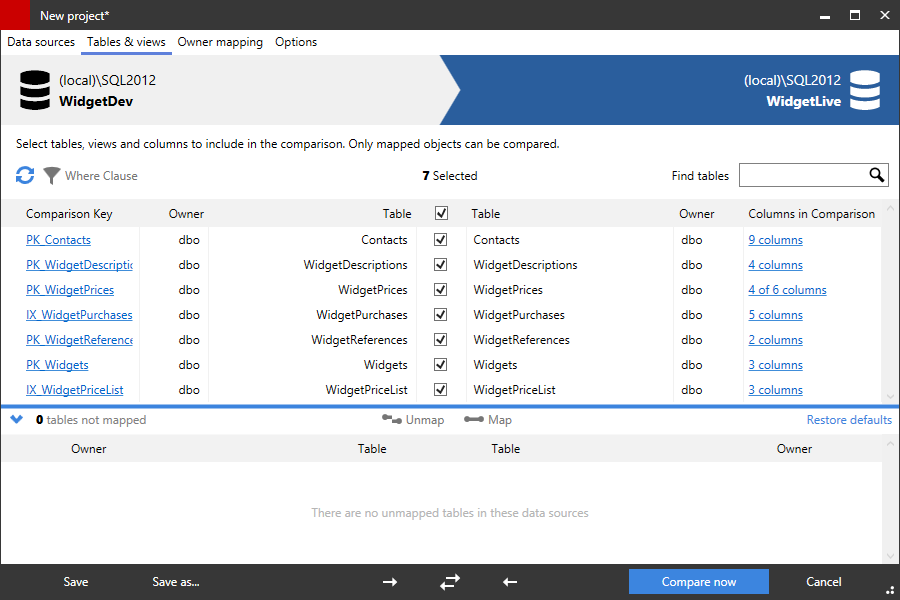
- To include the remaining columns, click the Tables & Views tab:
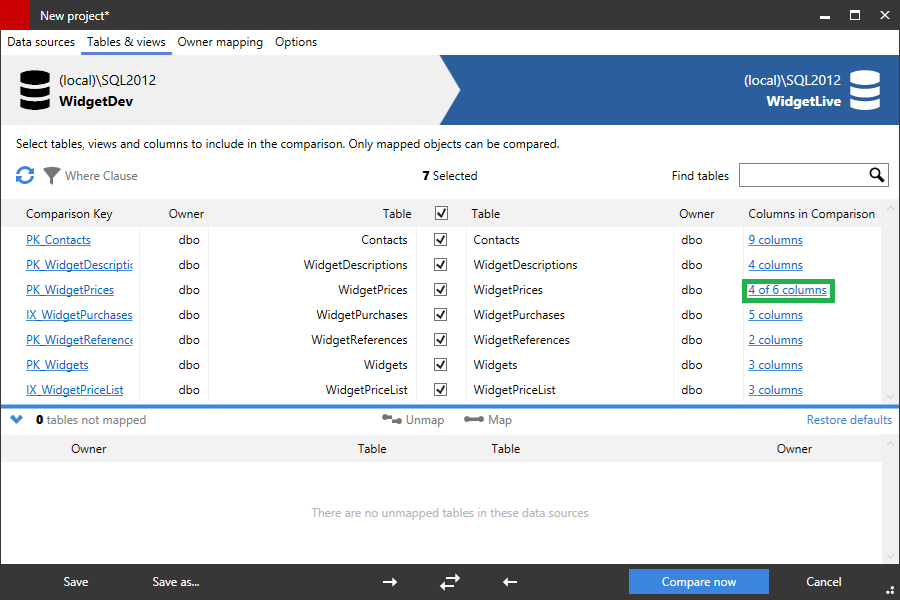
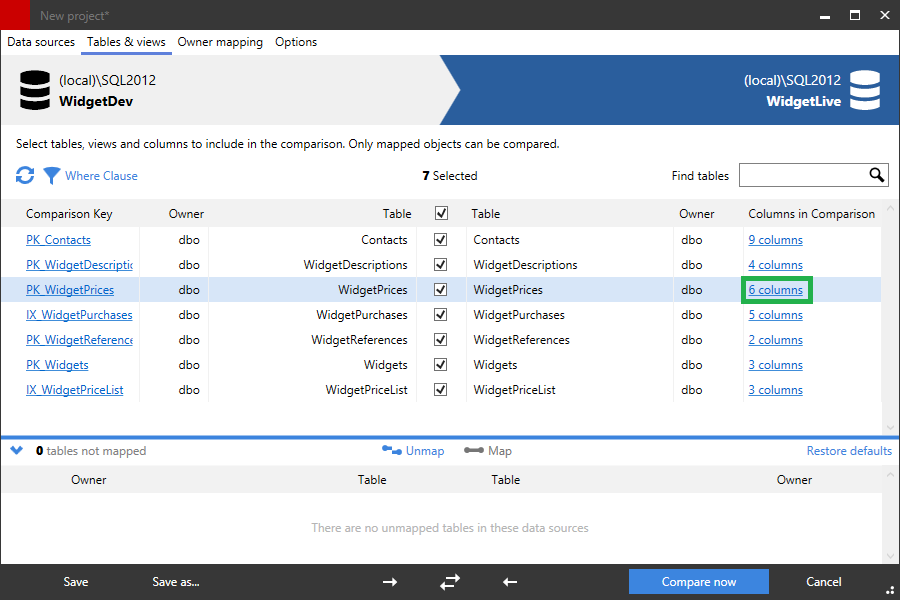
The Tables & Views tab displays a list of table and view mappings. Mappings define which tables and views can be compared. For example, the table WidgetDescriptions in WidgetDev is mapped to WidgetDescriptions in WidgetLive. However, it can be mapped to any table with a sufficiently similar structure.
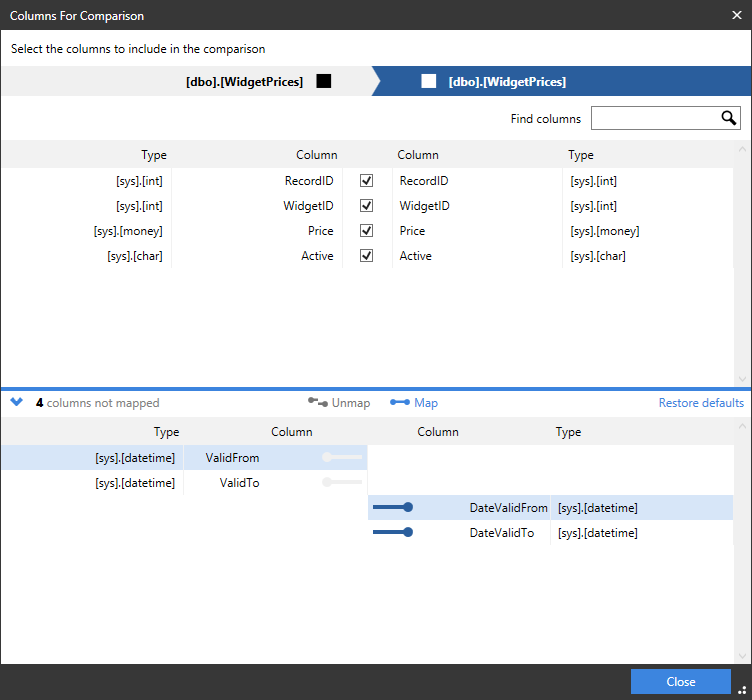
You can use the object mappings to compare tables or views with different or similar names. The table WidgetPrices shows a Partial mapping, as not all of its columns could be automatically mapped. - To view and edit the column mappings, in the Status column, click 4 of 6 columns for the WidgetPrices table:
A dialog box is displayed for you to edit the column mappings: - In the lower pane of the dialog box, click DateValidFrom and then ValidFrom, and then click Map to map the columns.The columns move to the upper pane of the dialog box.
- Map the DateValidTo and ValidTo columns in the same way, and click Close.The status for the WidgetPrices table changes to 6 columns.
- Click Compare Now.
SQL Data Compare displays a message dialog box that shows the progress of the comparison. If you select the Close dialog box on completion check box, SQL Data Compare closes this message dialog box automatically the next time that you run a comparison on a project. For this example, leave the setting as it is, and click OK to close the message box.
3. Select data to deploy
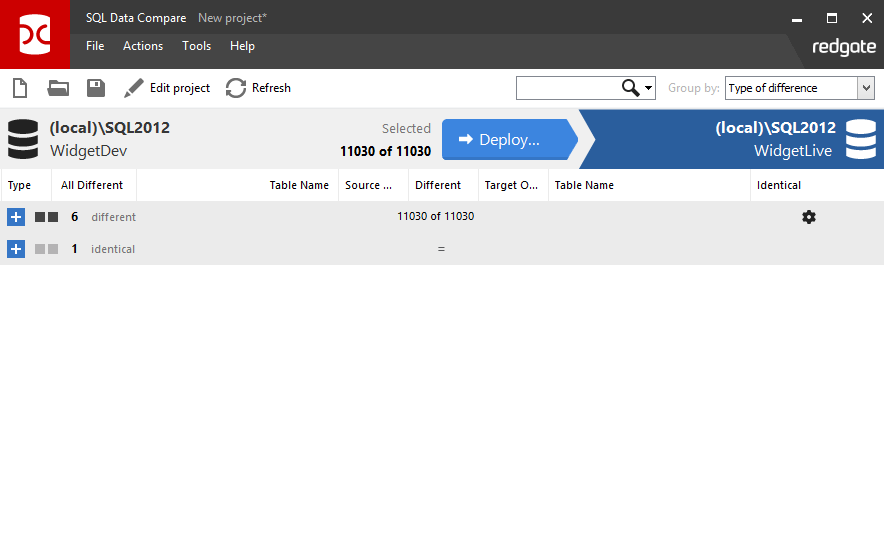
The comparison results are displayed in the main window.
In this example, the comparison results are grouped by:
The results are grouped by:
tables and views with differences in their rows | |
tables and views with only identical rows |
To display the comparison results in a single list, in the Group by box, select No groups.
To display the comparison results in groups, select Type of difference.
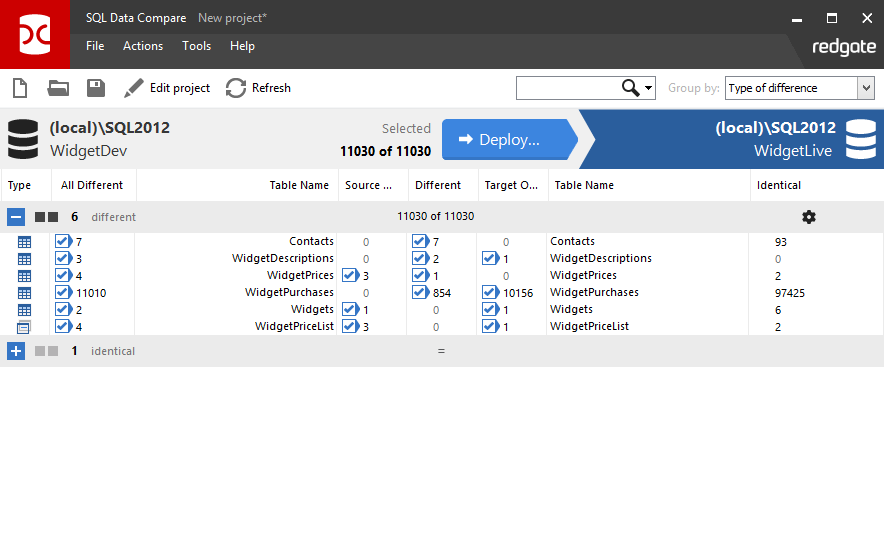
To view the comparison results for each object group, click or click the grouping bar:
The upper (Results) pane also shows how many rows of each type exist for each table or view. For example, the table WidgetPrices contains:
- three rows that exist in WidgetDev but not in WidgetLive
- one row that exists in both databases but has different values
- no rows that exist in WidgetLive but not in WidgetDev.
The Identical column shows that there are two rows that are identical.
Finding objects
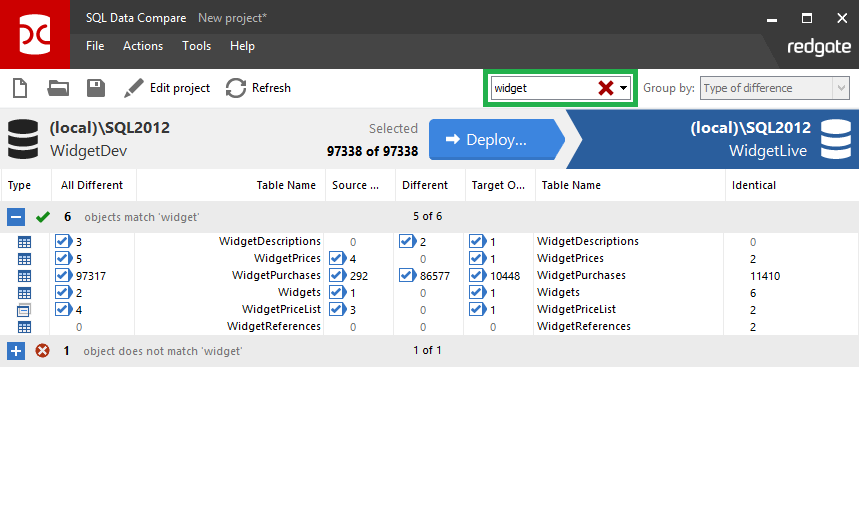
To locate objects, type the search text in the Find box. To select a recent search, click the Find arrow button
As you type, objects are grouped in the upper pane by whether they match or do not match what you type:
SQL Data Compare searches object names and owners (schemas).
Note that the search is not case-sensitive.
To clear the Find box click the button.
Viewing row differences
To view detailed information about the data in a table or view, click on it in the upper pane. The lower (Row Differences) pane is displayed.
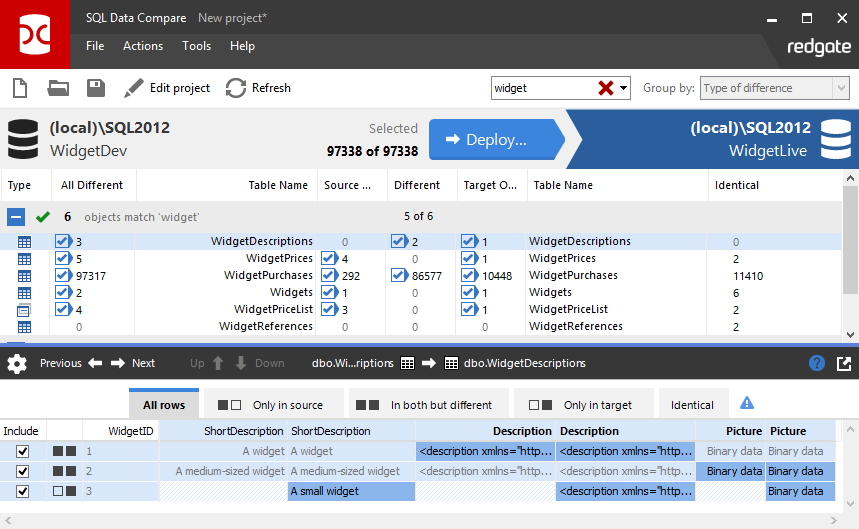
Click the table WidgetDescriptions to see the row differences:
In this example WidgetID is the comparison key , used by SQL Data Compare to match rows in the two databases.
For the row where WidgetId is 1, the values for Short Description and Description are the same in both databases, so the data is displayed in gray text.
The Picture values are different so they are displayed with the darker shaded background.
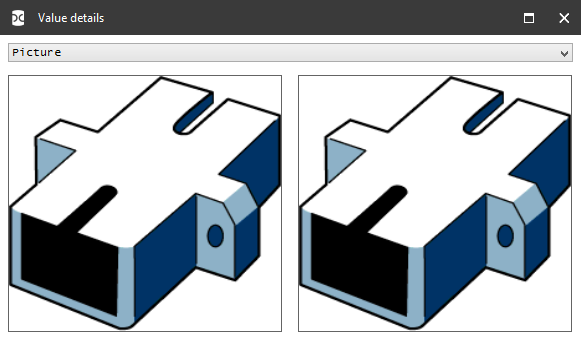
To view a specific value in a row double-click it, or right-click and select Show Viewer. Binary Data values are displayed as links. Click the Binary Data link for the row where WidgetID is 1:
You can move through each difference in turn using the buttons. To move through the differences for the current column, click
Selecting rows to deploy
Use the check boxes in each pane to select data for deployment. You can select individual tables or views to deploy, and for each table or view you can select the rows that you want to deploy. By default, all rows that differ are selected when you run a comparison.
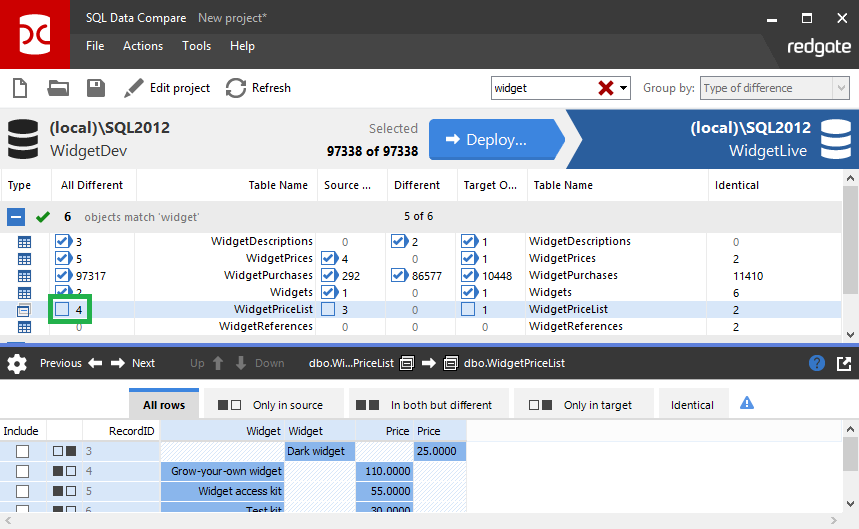
For this example, select all the tables and their rows. Make sure that the check boxes are cleared for the WidgetPriceList view. You do this by clearing the All Different check box for WidgetPriceList:
The number of rows selected for deployment is shown in the Direction Bar.
To deploy, click Deployment Wizard.
4. Deploy the databases
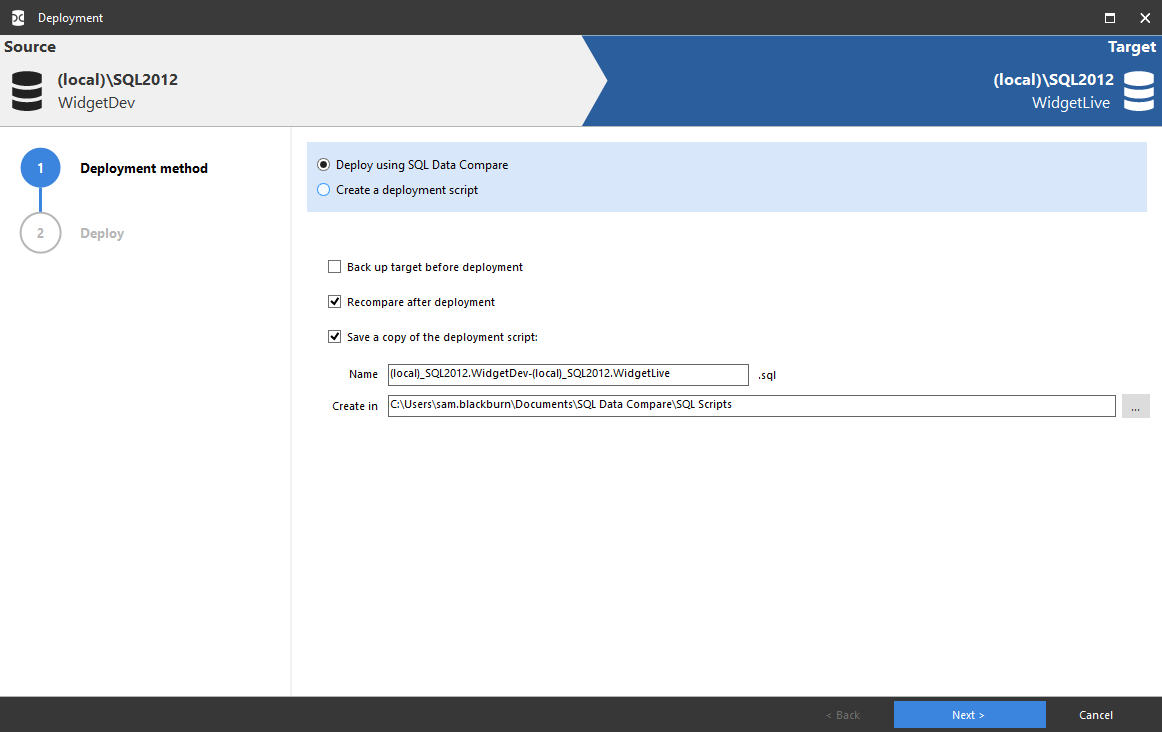
On the first page of the deployment Wizard you can choose to create and save a deployment script, or perform the deployment using SQL Data Compare.
Choose deployment method
In this example, we will deploy using SQL Data Compare.
- Make sure Deploy using SQL Data Compare is selected.
- Clear the Back up target before deployment check box if it's selected.
In this example, we won't back up before deployment.
For more information, see Backing up before deployment - To generate the deployment script, click Next.
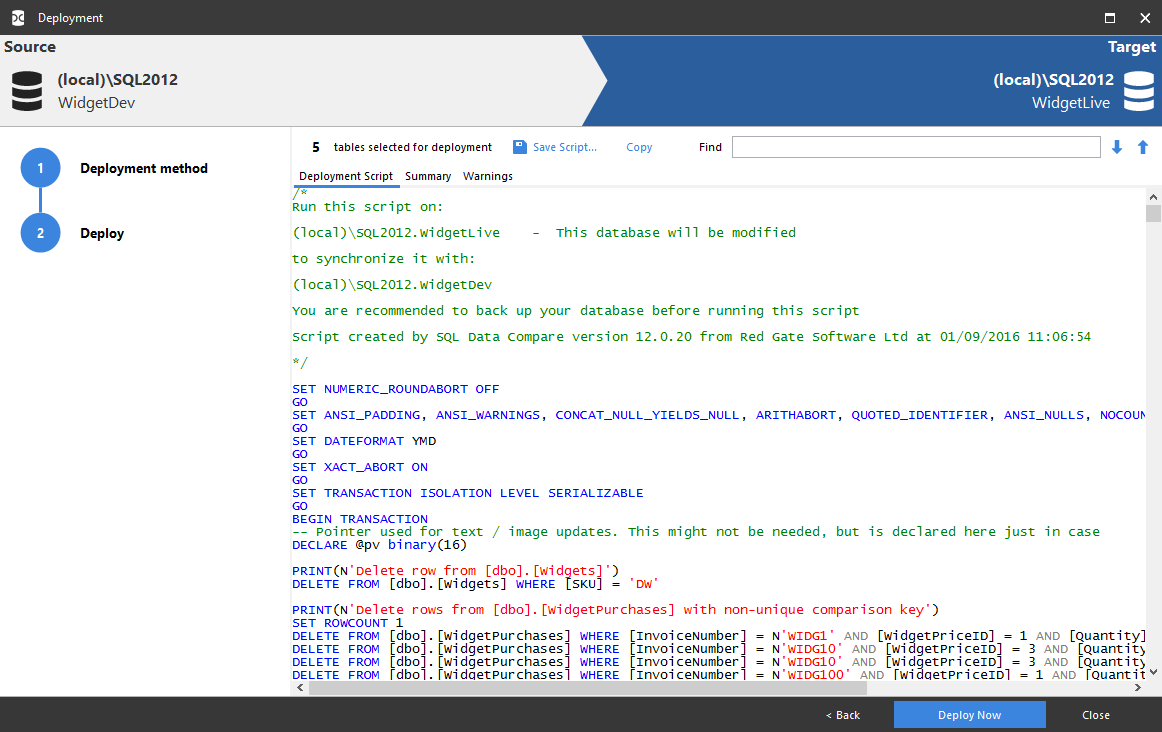
The Review page is displayed.
Review the deployment script
There are three tabs on the Review page:
- Deployment script shows the script to deploy the data sources.
You can search the script, save it, or copy it to the clipboard. - Summary shows a synopsis of the actions in the deployment script.
You can view the summary grouped by the objects affected, by the type of modification, or by the order in which the script modifies the target. - Warnings shows a list of any warnings about unexpected behavior that may occur when you deploy the databases.
For more information, see Deployment warnings.
Perform the deployment
When you have reviewed the script, deploy the databases:
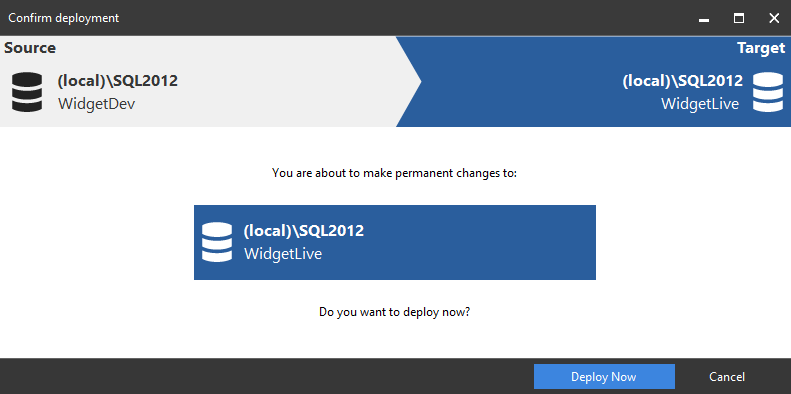
- Click Deploy Now to perform the deployment.
- A confirmation dialog box is displayed.
Click Deploy Now to continue. - SQL Data Compare displays a message dialog box that shows the progress of the deployment.
When the deployment is complete, click OK to close the message box.
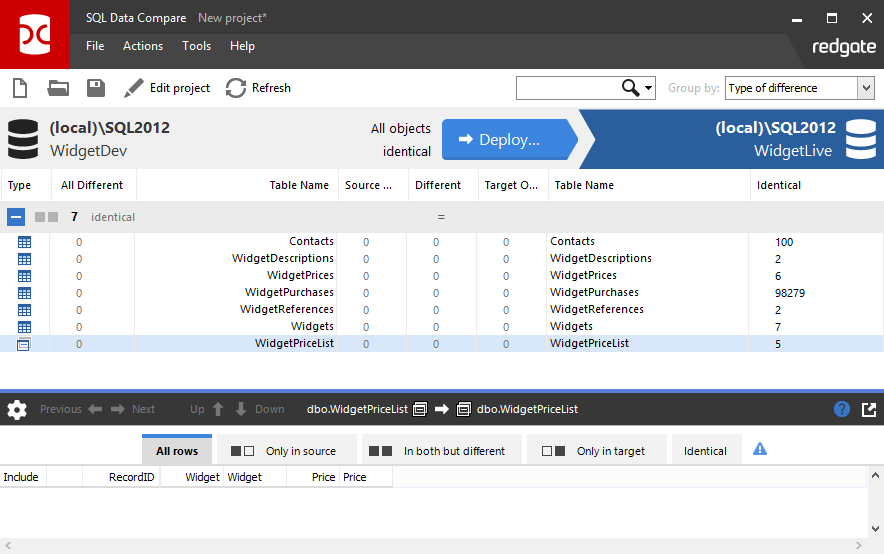
SQL Data Compare then re-compares the databases. The results are shown in the main window. In this example, all tables and their rows are shown to be identical, confirming that the deployment has been a success.
Note that the WidgetPriceList views are also now identical, because the tables that they reference have been deployed:

