Creating new generators
Published 04 February 2013
You may want to create a new generator if the supplied generators don't meet your requirements and you can't customize them to suit your needs.
To write your own generator, you must be proficient at a .NET 2.0 language, have a good understanding of .NET, and have access to SQL Data Generator on your computer.
The procedure is summarized below:
- In Microsoft Visual Studio, create a Class Library .NET project.
- Add references to RedGate.SQLDataGenerator.Engine and RedGate.SQLCompare.Engine
- Create a public class that implements IGenerator.
- Add the class attributes.
- Implement the constructor.
- Implement the method GetEnumerator.
- Copy the output DLL to %ProgramFiles%\Red Gate\SQL Data Generator 3\Generators (on 32-bit machines) or %ProgramFiles(x86)%\Red Gate\SQL Data Generator 3\Generators (on 64-bit machines).
Example Microsoft Visual Studio 2005 project files are provided in %ProgramFiles%\Red Gate\SQL Data Generator 3\UserExample\Generator (on 32-bit machines) or %ProgramFiles(x86)%\Red Gate\SQL Data Generator 3\UserExample\Generator (on 64-bit machines).
The examples are written in C#. If you want to build the projects, you must first add the project references for the SQL Compare Engine and the SQL Data Compare Engine. You may also want to change the output path. When you have built the project, copy the output DLL to %ProgramFiles%\Red Gate\SQL Data Generator 3\Generators (on 32-bit machines) or %ProgramFiles(x86)%\Red Gate\SQL Data Generator 3\Generators (on 64-bit machines).
Architecture
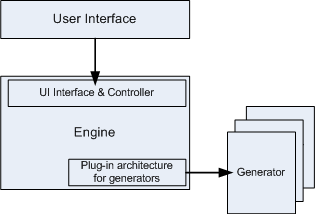
A simple diagram of the architecture is shown below.
The SQL Data Generator engine defines a series of interfaces. Each interface is very lightweight.
A generator must implement a series of interfaces in order that the engine considers it to be a generator. At startup, a specified folder is scanned for DLLs. Each DLL is loaded in turn, and reflection is used to check whether any public classes implement these interfaces. If they do, the class is considered to be a generator and is made accessible to the rest of the system.
By default, parameters for the generator are displayed in a standard Microsoft Grid Control. To override this default functionality, implement interfaces IGeneratorUIStyle and IGeneratorUI. See the FullDemo project for an example.
Basic interface: IGenerator
The IGenerator interface must be implemented for your class to be considered a generator.
The IGenerator interface is defined as:
namespace RedGate.SQLDataGenerator.Engine.Generators
{
	public interface IGenerator
	{
		IEnumerator GetEnumerator(GenerationSession session);
	}
}
You must also implement a special constructor that takes a single parameter of type GeneratorParameters. This parameter describes the SQL field in the Table that is being assigned. If necessary, your code can throw exceptions and so on.
To display your generator in the graphical user interface (GUI), you must add a simple Generator attribute to your class. The following example code produces random values between 0 and 1024 for the 8 times table.
namespace Basic
{
  [Generator(typeof(int), "Generic", "8 times table",
"8, 16, 0, 256, ...")]
   public class Basic : IGenerator
  {
   public Basic(GeneratorParameters parameters)
    {
    }

   public System.Collections.IEnumerator GetEnumerator
(GenerationSession session)
   {
      Random r = new Random(0);
      while (true)
      {
        yield return r.Next(0, 1024) * 8;
      }
    }
  }
}
The Generator attribute defines the type of .NET result, the Category that the generator is to be placed in, and the name and description to be displayed in the GUI. It must be defined only once per class.
SQL Data Generator assigns the SQL data type that corresponds to the specified type of .NET result. To create a generator that supports multiple SQL data types, add SupportSQLType. SQL Data Generator will add SQL data types based on SqlTypes defined in the SQL Compare engine.
Make sure the class is public, and the Generator class exists.
Constructor
GeneratorParameters provides access to the field. This enables your code to verify that lengths and types are consistent.
GetEnumerator
The easiest way to implement this code is by using the Yield statement; the above example never runs out of values. However, it is not always possible to do this. The engine is designed to cater for a limited number of values from the GetEnumerator. If necessary, the GetEnumerator can throw exceptions.
Interface: ISeedableGenerator
This interface enables the generator to specify a seed. The generator can then generate random data that is different each time.
The ISeedableGenerator is defined as:
public interface ISeedableGenerator
	{
		int Seed { get; set; }
	}
Use the seed to initialize the Random class in the GetEnumerator.
The engine will automatically give a value to Seed at initialization. Each column will have its own seed, therefore the same generator can be assigned multiple times within a table and different values will be produced for each column.
A typical implementation is:
public int Seed
        {
            get { return m_Seed; }
            set { m_Seed = value; }
        }
For a complete example, see %ProgramFiles%\Red Gate\SQL Data Generator 3\UserExample\Generator\Seedable\Seedable.cs (on 32-bit machines) or %ProgramFiles(x86)%\Red Gate\SQL Data Generator 3\UserExample\Generator\Seedable\Seedable.cs (on 64-bit machines).
Interface: IUniqueableGenerator
This interface enables the generator to specify whether the data generated is unique so that the generator can then generate a unique value.
The IUniqueableGenerator is defined as follows:
public interface IUniqueableGenerator
	{
		bool Unique { get; set; }
	}
A typical implementation is:
public bool Unique
        {
            get { return m_Unique; }
            set { m_Unique = value; }
        }
For a complete example, see %ProgramFiles%\Red Gate\SQL Data Generator 3\UserExample\Generator\Uniqueable\Uniqueable.cs (on 32-bit machines) or %ProgramFiles(x86)%\Red Gate\SQL Data Generator 3\UserExample\Generator\Uniqueable\Uniqueable.cs (on 64-bit machines).
The generator can now be assigned to unique fields. The engine automatically configures the Unique flag as on when the generator is assigned.


