Generating a new SSH key pair
Published 11 July 2023
SQL Monitor can connect to a Linux Machine using any private SSH key (plus passphrase if used) as long as there is a corresponding public SSH key installed on that machine.
If you do not already have SSH keys generated you can use this guide to get them setup. This page will use the OpenSSH version of ssh-keygen, however other versions are available such as Tectia SSH or PuTTYgen.
Verify OpenSSH is installed
Open a Terminal and type the following command to confirm that OpenSSH is installed:
ssh -V |
You should then see output along the lines of this:
![]()
If it is installed then you can skip the next section "Install OpenSSH"
Install OpenSSH
We recommend using the OpenSSH package provided by your Linux distribution.
This can vary, but the following commands should work in a terminal for these machines:
For Debian-based distributions (such as Debian, Ubuntu, Linux Mint, etc.):
sudo apt update && sudo apt install openssh-clientFor Fedora-based distributions (Fedora, CentOS, Red Hat Enterprise Linux, Oracle Linux, etc.):
sudo dnf install openssh-clientsFor Arch Linux-based distributions:
sudo pacman -Sy opensshFor SUSE-based distributions (SUSE Linux, openSUSE Linux, etc.):
sudo zypper install openssh
Once this is completed you can go back and run the ssh -V command in the "Verify OpenSSH is installed" section
Create an SSH key pair
- Open Terminal
Execute the following command, substituting the username of the account you want SQL Monitor to connect with. This will use the Ed25519 algorithm for encryption:
ssh-keygen -t ed25519 -C "<YOUR USERNAME>"
Note, if this doesn't work because you are on a legacy system that does not support the Ed25519 algorithm then you can use the following command instead.
Whilst still secure, this is considered less secure than the recommended command (see SSH Academy under the section "Choosing an Algorithm and Key Size" for an excellent overview on the differences in these algorithms):
ssh-keygen -t rsa -b 4096 -C "<YOUR USERNAME>"
- A full example can be seen here:
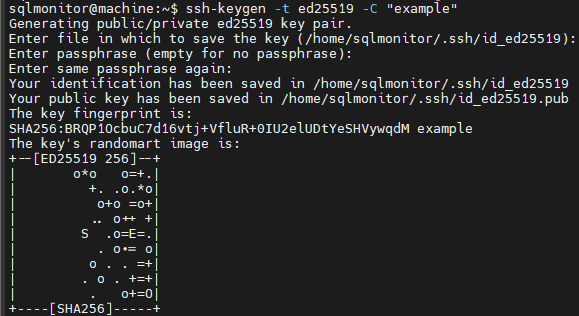
- You should first be prompted where to save the file, you can just press enter to accept the default location shown in brackets, or you can type an exact location if preferred.
Note. This can be automated using the -f argument, for example
ssh-keygen -t ed25519 -C "<YOUR USERNAME>" -f "<FILENAME>"
- You will then be asked for a passphrase (See SSH Keys overview for more information on why you may want to do this), or optionally press enter to skip this step.
- You will be asked to repeat this a second time as well
- After this you should see the full output from your generated SSH key as shown above
- The private key is the file shown as "Your identification":

- The public key is the file shown as "Your public key" and will be the same file name/path as the private key but with a .pub extension:

- The private key is the file shown as "Your identification":
Copying the Public Key to Authorized Keys
The following command can be used to copy the public key into the .ssh/authorized_keys file so that the key can be used to SSH into this machine.
The following parameters are required and must be updated in the command below: (these assume that you are running the command on the machine that you are providing access to).
- PUBLIC_KEY_FILEPATH - The path to the public key file, i.e.
~/.ssh/id_ed25519.pub - USERNAME - The username of the user account that should be used when an SSH connection is made on this machine
- REMOTE_HOST - The host address of this machine
cat <PUBLIC_KEY_FILEPATH> | ssh <USERNAME>@<REMOTE_HOST> "mkdir -p ~/.ssh && touch ~/.ssh/authorized_keys && chmod -R go= ~/.ssh && cat >> ~/.ssh/authorized_keys"
Uploading to SQL Monitor
Now you have generated your keys and set them up to be authorized for SSH. You can either copy the contents of the private key file (The key file without the .pub extension) or you can save the private key file which can later be uploaded to SQL Monitor.
You should now be able to follow the instructions in the article Connecting to a Linux Machine to begin monitoring using this key.


