Organizing monitored servers into groups
Published 07 October 2020
Use the Groups page (Configuration > Groups) to organize your servers into groups sharing similar properties.
Using Server Groups
To make it as easy as possible to define and apply the monitoring and alerting strategy you need, you should organize your servers into Groups with similar properties and monitoring requirements, so that you can adapt your monitoring and alerting strategy to suit the requirements of each group, and also so that SQL Monitor organizes the monitoring and alert data by these groups, when it's displayed in the UI.
The following diagram shows two main groups (Production and Development) and one subgroup of production called T1 Production.
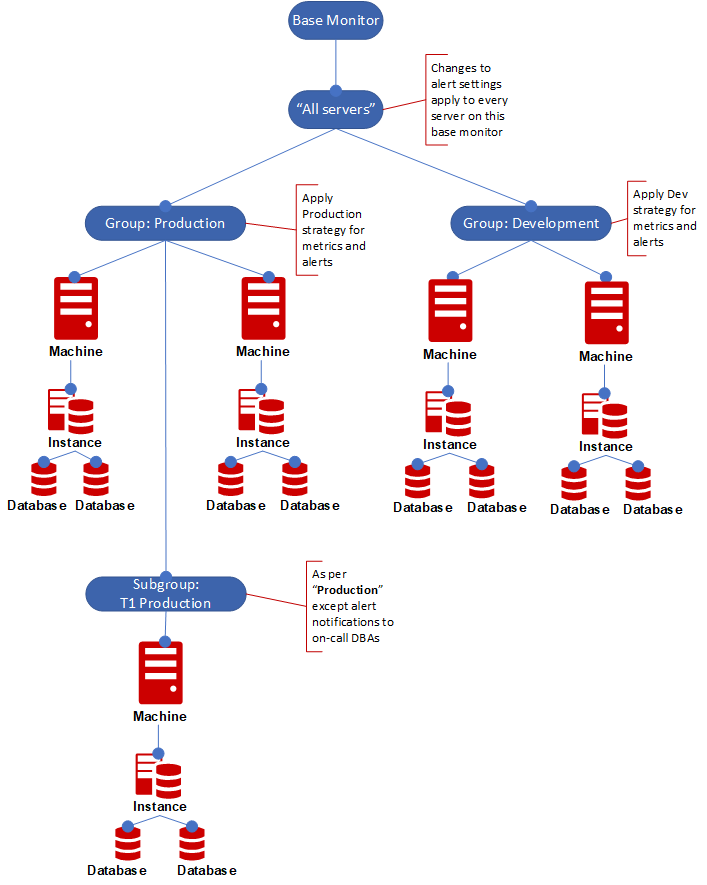
By grouping monitored servers in this way, you can apply the same alert configuration settings to them more easily. For example, you may have a number of production servers on different host machines but you want them all to use the same alert settings. Any changes to the settings for certain alert types, for the T1 Production group, would apply to all machines, instances and databases in that group. The settings for all other alert types would be inherited from Production, which in turn inherits from All Servers.
You can also filter the Global Overview and Alert Inbox by group, to look at information for groups of servers at a time.
Groups are identified in the Monitored servers list by the group  icon.
icon.
Creating a group
- Go to the Configuration tab. Under Monitoring, select Groups:

You can also use the Manage groups link on the left of any overview page or the Alert Inbox.
- Click New group, enter a name and click Create.
To add servers to the group, drag and drop each one in turn onto the group name. (You cannot drag multiple selected servers.)
In the example below, the machine is-sql2017.testnet.red-gate.com is about to be moved to the Test-Standalone group:
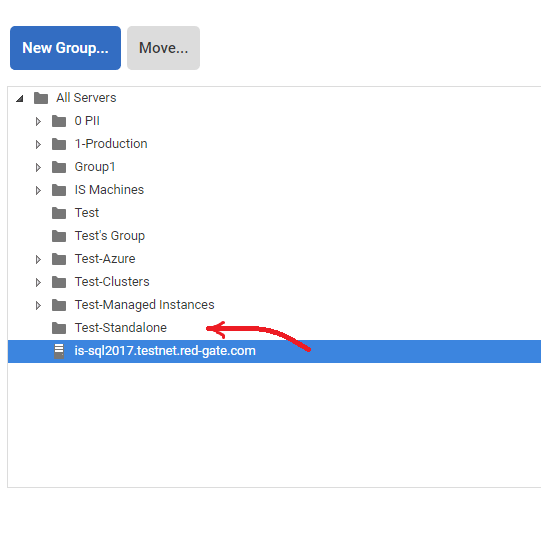
Only host machines are listed:
- You cannot move individual SQL Server instances; they are moved automatically with their host machine.
- If you move a cluster into a group, all its nodes and instances are moved with it.
You can also select a server, and click Move. Select the destination group in the Move box.
Creating a hierarchy
You can move one group into another. For example, if you want to further organize your Production servers into several regions, you should first create your Production group, then create a group for each region and move those groups into Production.
In the example below several subgroups have been created for the Test-Azure group. Moving the Test-Managed Instances group will also move any servers in that group.
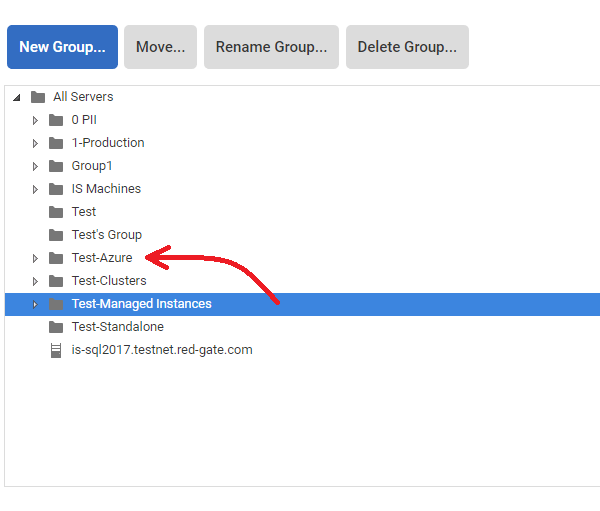
By default, each group inherits all alert settings from the group above; so this allows you to create alert settings for all your production servers, which are applied to each region. However, you can then tweak the settings for just one of those regions, if required.
Removing a server from a group
To remove a server from a group, do one of the following:
- Drag it to All servers.
- Select the server, click Move and then select All servers.
Working with groups
Use the buttons above the list of groups to rename, delete or move a selected group.
Deleting a group doesn't delete the servers it contains; instead, the servers are moved to the next level up in the server hierarchy.
Configuring alerts by group
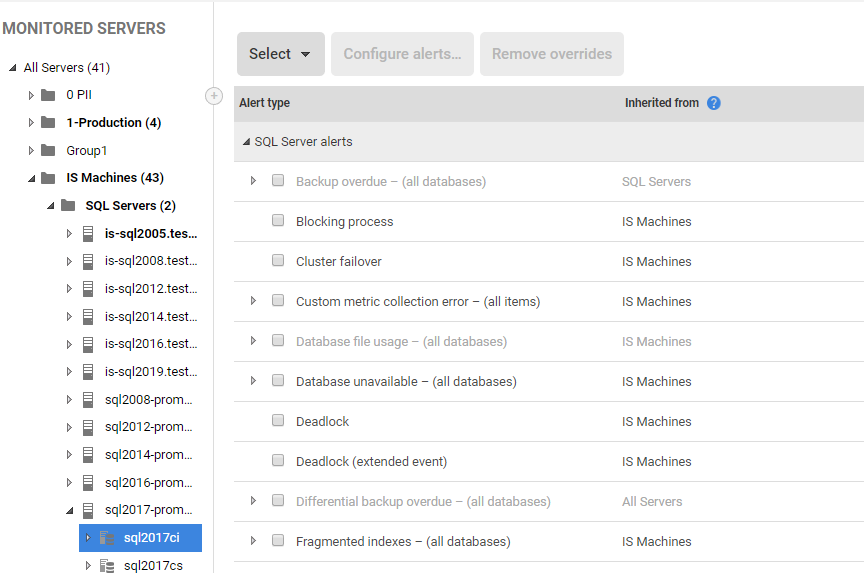
One of the main benefits of adding servers to a group is that you can configure alert settings at the group level. Everything in that group inherits these settings (unless specifically customized at a lower level). Each group in the hierarchy can be customized separately.
In the example below, on the Alert settings page, different types of alerts have been customized at various levels; the Inherited from column shows which level each type of alert is customized at:
For more information, see Customizing your alerting strategy using Groups.
Next step
This documentation contains proprietary information and is protected by copyright law.
Copyright © 2026 Red Gate Software Limited. All rights reserved


