Running the package
Published 06 February 2013
When SQL Packager has generated the package, you can run it using a graphical user interface or from the command line.
The graphical user interface may differ from the interface described in this topic if it has been customized.
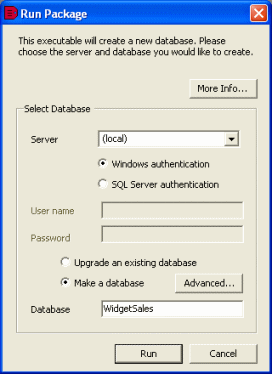
Using the graphical user interface to create a database
To create a new database:
- Display the Run Package dialog box:
- For an .EXE package, run the executable in the usual way.
For example, double-click the .exe file in Microsoft Windows Explorer. - For a C# project, open the project in Visual Studio, press F5 to run it, or on the Debug menu, click Start.
Alternatively, compile the project and run the executable in the usual way.
- For an .EXE package, run the executable in the usual way.
- To view any notes that were added to the package when it was generated, or to see a summary of the SQL scripts and any warnings, click More Info.
The More Information dialog box is displayed with the information. Click OK to close it. - In the Server box, type or select the name of the SQL Server on which you want to create the database.
If you experience problems selecting a SQL Server that is not running on the LAN, for example if you are accessing the SQL Server via an internet connection, you may need to create an alias to the SQL Server using TCP/IP (refer to your SQL Server documentation for details). You can then type the alias name in the Server box to connect to the remote SQL Server. - Select the authentication method, and for SQL Server authentication enter the User name and Password.
- Do one of the following:
To create a new database, click Make a database (the default) and type a name for the database in the Database box.
If you want to change the default database properties, click Advanced and enter the details as required. For more information about database properties, see Entering extra package information.If you want your database to use filegroups or full-text processing you should create the database manually, and use the Upgrade an existing database option.
- To populate an empty database that you have already created, click Upgrade an existing database and in the Database box, type or select the name of the database.
- Click Run.
A message dialog box is displayed for you to confirm that you want to continue. A second message dialog box confirms that the package has run successfully.
Using the graphical user interface to upgrade a database
To upgrade an existing database:
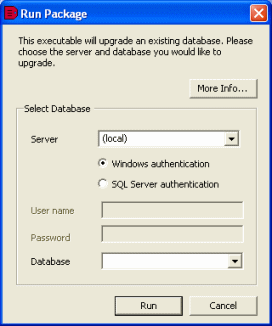
- Display the Run Package dialog box:
- For an .EXE package, run the executable in the usual way
For example, double-click the .exe file in Windows Explorer. - For a C# project, open the project in Visual Studio .NET, press F5 to run it, or on the Debug menu, click Start.
Alternatively, compile the project and run the executable in the usual way.
- For an .EXE package, run the executable in the usual way
- To view any notes that were added to the package when it was generated, or to see a summary of the SQL scripts and any warnings, click More Info.
The More Information dialog box is displayed with the information. Click OK to close it. - In the Server box, type or select the name of the SQL Server for the database you are upgrading.
If you experience problems selecting a SQL Server that is not running on the LAN, for example if you are accessing the SQL Server via an internet connection, you may need to create an alias to the SQL Server using TCP/IP (refer to your SQL Server documentation for details). You can then type the alias name in the Server box to connect to the remote SQL Server. - Select the authentication method, and for SQL Server authentication enter the User name and Password.
- In the Database box, type or select the name of the database that you want to upgrade.
- Click Run.
A message dialog box is displayed for you to confirm that you want to continue. A second message dialog box confirms that the package has run successfully.
Using the command line
When you run the package from the command line, the following options are available:
/server:<server>
The name of the SQL Server. The default is (local).
/server:<server>\<instance>
The name of the SQL Server and instance. The default is (local).
/database:<database>
The name of the database that you want to create or upgrade.
/username:<username>
The user name for the database for SQL Server authentication.
/password:<password>
The password for the database for SQL Server authentication.
/quiet
Runs the package without displaying the graphical user interface.
/makedatabase
Creates the database on the specified SQL Server.
/makeupgrade
Upgrades the database on the specified SQL Server.
/presql:<filename>
Specifies a SQL script to run before the package is run.
/postsql:<filename>
Specifies a SQL script to run after the package has been run. Note that the script is always run, even if errors occur when the package is run.
For example, to create a database called MyDatabase on SQL Server MyServer using SQL Server authentication, navigate to the folder that contains the package, and at the command prompt, type:
MyPackage.exe /server:MyServer /database:MyDatabase /username:MyUserName /password:MyPassword
SQL Packager sets two return codes that you can use in batch files or scripts to determine whether the package ran successfully:
- 0 is returned if the package ran successfully
- -1 is returned if an error occurred
If you have specified /quiet to run without the graphical user interface, the return code is stored in the ERRORLEVEL environment variable, and the error message is written to the console.


