Jenkins YAML (Jenkinsfile) Windows/Linux
Published 22 March 2022
A working example of how-to setup a flyway pipeline within Jenkins, using the declarative Jenkinsfile method (Examples in both Windows and Linux syntax).
Section 1 - Introduction
To make the most of Flyway, and the migrations model it offers, it is often desirable to implement Flyway within a CI/CD pipeline. However, with such a wide variety of CI/CD tools out there, it can be difficult to know where to start.
This article has therefore been created to work through two commonly asked questions:
- How do I run Flyway commands inside a pipeline?
- How can I setup a Jenkins pipeline, using Flyway?
Section 2 - Redgate Documentation
Before we get started, it’s valuable to note that a lot of the content discussed in this document can also be found on various Redgate Documentation websites. See below for helpful resources:
Therefore, if you require any additional knowledge around the topics discussed in this article, it is strongly advised to review the helpful guides provided above.
Section 3 - Getting Started
In this example, the Jenkinsfile defines the pipeline. Jenkinsfile examples are available for Windows and Linux.
Reminder - These pipelines contain example logic for setting up and using Flyway with Jenkins. Therefore, please be aware that these scripts are EXAMPLES and should be treated as such. Meaning these scripts will need to be reviewed and tested, by yourselves, before being executed against any environments.
Section 4 - Considerations
Before taking a look within the Jenkinsfile, consider as you go the following questions:
- What do I want my automated pipeline to look like?
- How many environments do I want to have automated and will I need any manual intervention gates?
- Do I have/want Linux or Windows based agents?
Answers to these, will help guide how you may want to setup your automated processes.
Section 5 - CI/CD Tools
Although this article has a focus on Jenkins, it is fundamental to mention that Flyway as a CLI has no pre-requisite for any one individual CI/CD tool. Meaning that depending on your personal pipeline requirements, you are free to select a CI/CD tool that best fits your needs. With the knowledge that the Flyway CLI can be built into any pipeline tool, that has the capability of running a CMD/PowerShell or Bash style script.
Additionally, Flyway has the capability of being installed on a large number of platforms. Making pipelines much more flexible, when it comes to operating system requirements. At the time of writing this article, Flyway installers can be found for the following platforms:
- Download Installers
- If possible, we recommend using Flyway on Docker because then there is nothing to install/maintain on your agent (except the ability to run docker).
Section 6 - Jenkins
With Jenkins being the leading open source automation software, we often get asked if Flyway is compatible and can be used within its Build and Release pipelines? The answer to this, is a resounding yes! This is because, as mentioned in the previous section, Flyway can be installed on a range of platforms and can be interacted with in a range of fashions. Making it simple to call Flyway using your preferred scripting language, built directly into a Jenkins pipeline.
In Section 8, which will be around setting up a basic pipeline, we will be using Jenkins’ declarative pipeline functionality. Which utilizes the concept of a YAML file, called a Jenkinsfile by default, structured in the coding language Groovy (which is a Java based language).
If you’re unfamiliar with any of this, please find some helpful articles below:
- https://www.jenkins.io/doc/book/pipeline/syntax
- https://www.lambdatest.com/blog/jenkins-declarative-pipeline-examples
Declarative pipelines are versioned controlled, so changes can be tracked and you can also copy the code to setup new piplines quickly.
Section 7 - Jenkins Agents
At this point, it is worth noting that Jenkins utilizes agents (just like other CI/CD tools). These agents can be installed and configured on your preferred OS. The Jenkins Controller (i.e the original node) uses the agents to execute the steps in your pipeline. Agents help balance the workload and pipelines can be setup to use specific agents for the task at hand.
As we will be focusing on Windows and Linux in this article, it is necessary for your Jenkins Agent to have the following installed/configured:
- Flyway
- If possible, we recommend using Flyway on Docker. If you have Docker on your agent, then there is nothing else to install or maintain.
- If not,
- Download and install Flyway on the agent machine.
- Ensure Flyway has been configured as an Environment Variable in the PATH on the agent. This allows Flyway to be called from the command line, without having to reference where the installation directory is.
- Permissions
- The Jenkins Agent service will need to have the correct OS permissions to be able to access specific file directories. In addition to being able to execute scripts and access Flyway on PATH. Without this, you will likely get issues when running the pipeline in subsequent sections.
- During testing, you could always provide elevated permissions and remove them as you see fit once you’ve tested core functionality.
Section 8 - Jenkinsfile Examples
In order to demonstrate the ability of utilizing Flyway within Jenkins, it is now time to review the two example files provided in 'Section 3'. Both pipelines carry out the same activities, however the script functionality has been changed against Windows and Linux respectively. With the key difference between the two files, being the scripting language called that initiates Flyway from the pipeline. Which is a ‘Batch’ file for Windows and BASH (Bourne Again SHell) for Linux. The rest of the pipeline utilizes the same structure, as this is the Groovy syntax required for the Declarative Pipeline within Jenkins.
Declarative Pipeline Breakdown
To utilize one of the Jenkinsfile examples in your project, it is necessary to commit the file into your preferred repo at the root level. Something we will cover in Section 9. However, it is first valuable to look through the pipeline to understand how it works and configure certain variables to match your environment.
Pipeline Information
Section | Code Tag | Notes |
Agent | Label | Although optional, this value will inform Jenkins as to which group of agents should be utilized to run the pipeline. When not set, Jenkins will use any available agent node. |
Environment | buildDirectory | The location where the GIT directory will be cloned to |
releaseName | Concatenation of ‘Build_’ and the Jenkins build number. This will be used by the Flyway process later in the pipeline. | |
FLYWAY_LICENSE_KEY | When provided, Flyway will be able to run with additional functionality. This variable can also be set at the OS level to add security, or through secure variables in Jenkins. | |
Triggers | pollscm | By default this value is empty, requiring the pipeline to be run manually. However, it is likely this value is to be changed to ensure Jenkins polls GIT at regular intervals. |
Pipeline Information
pipeline {
   agent {
      label "" //Specifying a label is optional. However, can be valuable to ensure only specific agents are used.
   }
   environment {
      buildDirectory = "C:\\Build\\Jenkins\\Eastwind\\Build-${BUILD_NUMBER}" //Directory location for build files to be written to
      releaseName = "Build_${env.BUILD_NUMBER}"
      FLYWAY_LICENSE_KEY = "" //Enter your Flyway Teams license here. For added security, this could also be passed in as a secure environment variable if required.
   }
   triggers {
      pollSCM('') // GIT can be polled every minute for changes, simply insert * * * * * - This has been disabled for testing, therefore manually trigger the pipeline run - Best Practice - GIT Repo to inform Jenkins when a PUSH request is made to preferred branch.
   }
Stage - Build
Section | Code Tag | Notes |
Environment | databaseHost | The host address for the target database |
databasePort | The port for the target database | |
databaseInstance | Optional – Instance name for target Database | |
databaseName | The name of the target database. ${env.STAGE_NAME} is a Jenkins variable for taking the name of the current stage, this could be used if relevant. | |
databaseUsername | The authentication username for accessing the environment. Tip – If using integrated security, leave this and the password blank. But ensure ;intergratedSecurity=true is added to the JDBC connection string below | |
databasePassword | The password to authenticate to the target database | |
flywayJDBC | This is the connection string Flyway uses to connect to the target database. Currently this is configured for sqlserver, however can be changed to match other RDBMS | |
flywayLocations | This is a parameter used by Flyway to point to the migrations folder that will be used by the process. By default, Flyway will look for a folder called ‘migrations’ in the current working directory. However, this can be changed. | |
Steps | Dir | This logic is designed to perform a GIT Clone of the target repo, into a pre-defined Build Directory as configured in the environment variables at the top of the file. Files pulled through this clone, will be used with Flyway in the next sections.
|
Script | buildStatus | This section of code is designed to run an inline script that calls the flyway CLI. The script will be either Bat in Windows or sh in Linux. The syntax is slightly different in each, however the following tasks are run: - Change Directory to Build Directory (Add sub-folders to this string if required, so that we are in the folder that can access the ‘migrations’ folder) - Flyway clean/migrate/info The result of the script will be stored in the buildStatus variable and checked straight after, to see if the process has been successful (I.e build status of 0). On a non-zero status, the pipeline will fail out. |
Stage - Build Variables
stages {
      stage('Build') {
         environment {
            databaseHost = "Localhost" //Database Host Address for Build Database
            databasePort = "1433" //Database Port Address for Build Database
            databaseInstance = "" //Optional - Database Instance Address for Build Database
            databaseName = "DatabaseName_${env.STAGE_NAME}" //Build Database Name - {env.STAGE_NAME} will take the active stage name to append to DB name
            databaseUsername = "UserName" //Add Username If Applicable
            databasePassword = "SecurePasswordGoesHere" //Add Password If Applicable. For security, this could be entered within Jenkins credential manager and called.
            flywayJDBC = "-url=jdbc:sqlserver://${env.databaseHost};databaseName=${env.databaseName};instanceName=${env.databaseInstance}" //Add ;integratedSecurity=true to the end of this string if you do not require a Username/Password
            flywayLocations = "-locations=filesystem:\"${env.buildDirectory}\\SomeSubFolder\\migrations\"" //This is the location of the local cloned GIT repo. {env.WORKSPACE} refers to the Jenkins Agent workspace area. It might be necessary to add some sub-folders to point to the migrations folder

         }
		steps {
			echo "Building database"
			flyway clean migrate ${flywayJDBC}
		}
	}
}
See this video and documentation from Jenkins about securing your credentials.
Stage 3 - Approval Gate
This approval gate is optional, however will add a Jenkins stage that requires someone to manually state ‘I Approve The Deployment’ before the pipeline can continue. The stage has a default timeout of 30 minutes, before an automatic rejection is made. (This is so it doesn't block the agent for too long from running other processes.)
Approval Gate
stage('Approval Gate') {
         steps {
            script {
               def message = "Approve Database Changes Before Proceeding"

               // wrapping in a time out so it doesn't block the agent and simply fails the build after 5 minutes if there's no user intervention
               timeout(time: 30, unit: 'MINUTES') {
                  def userInput = input(
                     id: 'userInput', message: "$message", parameters: [
                        [$class: 'TextParameterDefinition', defaultValue: 'I Approve The Deployment', description: 'To Proceed, type I Approve The Deployment', name: 'Review deployment artifacts before proceeding']
                     ])
                  // echo ("Env: "+userInput)
                  if (userInput.indexOf('I Approve The Deployment') == -1) {
                     currentBuild.result = 'ABORTED'
                     error('Deployment aborted')
                  }
               }
            }
         }
      }
Stage - Production
This stage of the process utilizes the same logic as ‘Stage – Build’, due to the same parameters being required by Flyway to carry out the production migration piece. The main difference in this stage, being that the flyway command being run is ‘flyway migrate info’ and does not perform a clean command. You NEVER want to run clean in an environment where the data matters.
As you get more familiar with the Jenkinsfile process, it may be valuable to evolve this Production stage by incorporate an additional piece of logic into the script code block. This could involve running the flyway check functionality, which provides the following reports:
- Drift Detection - have any changes been made to the target environment since the last pipeline
- Change Report - a diff report showing how many objects will be changed, the type of change, and exactly how the look before and after the deployment
- Dry Run Script - What is the exact SQL script that will be / has been run on this target environment
Section 9 - Setting up the Jenkins Pipeline
To get started, as mentioned previously, it’s necessary to place your Jenkinsfile into the root of your Git repository. By doing this, we will be able to reference this location later when setting up the Jenkins pipeline. The name of the file can be anything, however the default naming convention is ‘Jenkinsfile’. Before continuing, ensure the changes have been pushed to the remote repository location.
Now that the ‘Jenkinsfile’ is all set, which is the YAML file containing pipeline steps Jenkins will attempt to follow. We can navigate to the Jenkins dashboard webpage (This steps presumes Jenkins has already been setup within your environment, if not follow this article - https://www.jenkins.io/doc/book/installing. From here, select ‘New Item’ within the left-hand navigation menu.)
In this example pipeline, we will be using the ‘Pipeline’ option as illustrated below. Therefore, enter a name for the pipeline > Select Pipeline > Select ok

Build Triggers
For this pipeline, we are going to leave these settings as default (I.e nothing set). However, these can be extremely valuable in a Production pipeline, as they dictate when the pipeline will get run. Something we could also set from within the ‘Jenkinsfile’, under the Triggers > pollSCM variable.
Pipeline
Change the ‘Definition’ from ‘Pipeline Script’ to ‘Pipeline script from SCM’. This informs Jenkins to look for the Jenkinsfile from within the GIT repo, rather than hardcoded into the pipeline. In this method, the ‘Script Path’ text box is how Jenkins will attempt to locate the file. By default it looks for a file named ‘Jenkinsfile’ from the root of the repo. However, this can be changed to updated either the name of the file and/or any sub-directories to look within.
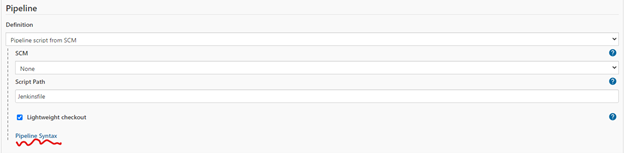
Pipeline Syntax
Finally, change the ‘SCM’ drop down to ‘GIT’ and enter the following details:
- Repository URL
- The repo URL that Jenkins will use to clone the repository when carrying out each build.
- Depending on your Repo permissions, you will likely also need to configure access credentials. Something that can be achieved by selecting ‘Add’ and following the on-screen instructions.
- Branch Specifier
- If the default branch you want to build on isn’t Master, change this to match your requirements.
Once you’re happy, select ‘Save’ and the pipeline will be created. To test the pipeline, simply select ‘Build Now’ from the left-hand menu and a new build will showcase in the ‘Build History’ section. Each build can then be drilled into by selecting the build number.
Section 10 - Conclusion
Flyway is an extremely flexible migrations engine, with the CLI able to be built into most modern CI/CD tools. In this article, it showcased how Flyway could be built into Jenkins on both a Windows and Linux operating system. However, this just scratches the surface around how Flyway could be incorporated in almost any pipeline tool and match your business requirements.
This documentation contains proprietary information and is protected by copyright law.
Copyright © 2026 Red Gate Software Limited. All rights reserved


