GitHub YML Self Hosted Agent (Using GitHub Actions)
Published 05 January 2023
Section 1 - Introduction
To make the most of Flyway, and the migrations model it offers, it is often desirable to implement Flyway within a CI/CD pipeline. However, with such a wide variety of CI/CD tools out there, it can be difficult to know where to start.
This article has therefore been created to work through three commonly asked questions:
- How do I run Flyway commands inside a pipeline?
- How can I setup a starter GitHub pipeline, using Flyway?
Reminder - This article outlines a simple working pipeline using GitHub, utilizing basic Flyway command line actions throughout. To learn more around Flyway and available parameters, navigate to the Flyway documentation website by clicking HERE
Section 2 - Redgate Documentation
Before we get started, it’s valuable to note that a lot of the content discussed in this document can also be found on various Redgate Documentation websites. See below for helpful resources:
- https://documentation.red-gate.com/fd/flyway-cli-and-api-183306238.html
- https://www.red-gate.com/hub/university/courses/flyway
Therefore, if you require any additional knowledge around the topics discussed in this article, it is strongly advised to review the helpful guides provided above.
Section 3 - Getting Started
During this article, the below example YAML pipeline will be referenced:
Example GitHub Docker YAML Pipeline
# This is a basic workflow to help you get started with Actions

name: Example GitHub Pipeline (Self-Hosted)

# Controls when the workflow will run
on:
  # Triggers the workflow on push or pull request events but only for the "release" branch
  #push:
    #branches:
      #- release
      #- 'migrations/**'

  # Allows you to run this workflow manually from the Actions tab
  workflow_dispatch:

env:

  FLYWAY_LICENSE_KEY: ${{ secrets.FLYWAY_LICENSE_KEY }} #Repository Secret - Create this within the Projects Settings > Secrects > Actions section
  # If the first undo script is U002, this will validate all undo scripts up to and including that
  FIRST_UNDO_SCRIPT: ${{ secrets.FIRST_UNDO_SCRIPT }}
  # Enable this for additional debug logging
  ACTIONS_RUNNER_DEBUG: true

# A workflow run is made up of one or more jobs that can run sequentially or in parallel
jobs:
  # This workflow contains a single job called "build"
  build:
    name: Deploy Build
    # The type of runner that the job will run on
    runs-on: self-hosted
    environment: 'build' #Ensure this environment name is setup in the projects Settings>Environment area. Ensuring any reviewers are also configured
    env:
      stage: 'Build'
      # Environment Secrets - Ensure all of the below have been created as an Environment Secret (Projects Settings > Secrets > Actions section, specially related to the environment in question) #
      databaseName: ${{ secrets.databaseName}}
      JDBC: ${{ secrets.JDBC }}
      userName: ${{ secrets.userName }}
      password: ${{ secrets.password }}
      # End of Environment Secrets #
      displayName: 'Build'
      executeBuild: true
      publishArtifacts: true

    # Steps represent a sequence of tasks that will be executed as part of the job
    steps:
      # Checks-out your repository under $GITHUB_WORKSPACE, so your job can access it
      - uses: actions/checkout@v3

      # Runs the Flyway Clean command against the Build database
      - name: Clean Build DB
        if: env.executeBuild == 'true'
        run: |
          flyway -user="${{ env.userName }}" -password="${{ env.password }}" -baselineOnMigrate="true" -licenseKey="${{ env.FLYWAY_LICENSE_KEY }}" -configFiles="${{ GITHUB.WORKSPACE }}\flyway.conf" -locations="filesystem:${{ GITHUB.WORKSPACE }}\migrations" info clean info -url="${{ env.JDBC }}" -cleanDisabled='false'

      # Runs the Flyway Migrate command against the Build database
      - name: Migrate Build DB
        if: env.executeBuild == 'true'
        run: |
          flyway -user="${{ env.userName }}" -password="${{ env.password }}" -baselineOnMigrate="true" -licenseKey="${{ env.FLYWAY_LICENSE_KEY }}" -configFiles="${{ GITHUB.WORKSPACE }}\flyway.conf" -locations="filesystem:${{ GITHUB.WORKSPACE }}\migrations" info migrate info -url="${{ env.JDBC }}" -cleanDisabled='false'

      # Runs the Flyway Undo command against the Build database
      - name: undo Build DB
        if: env.executeBuild == 'true'
        run: |
          flyway -user="${{ env.userName }}" -password="${{ env.password }}" -baselineOnMigrate="true" -licenseKey="${{ env.FLYWAY_LICENSE_KEY }}" -configFiles="${{ GITHUB.WORKSPACE }}\flyway.conf" -locations="filesystem:${{ GITHUB.WORKSPACE }}\migrations" info undo info -url="${{ env.JDBC }}" -cleanDisabled='false' -target="${{ env.FIRST_UNDO_SCRIPT }}"

       # Create a directory to stage the artifact files
      - name: Stage files for publishing
        if: env.publishArtifacts == 'true'
        run: |
          cp -R ${{ GITHUB.WORKSPACE }}/migrations Artifact_Files/Migration/


      #After migration scripts are validated, publish them as an artifact
      - name: Publish Validated Migration Scripts as Artifact
        if: env.publishArtifacts == 'true'
        uses: actions/upload-artifact@v3.1.1
        with:
          name: flyway-build-artifact
          path: Artifact_Files/Migration/

  prod-preparation:
      name: Production Deployment Preparation - Report Creation
      # The type of runner that the job will run on
      runs-on: self-hosted
      environment: 'prod' #Ensure this environment name is setup in the projects Settings>Environment area. Ensuring any reviewers are also configured
      if: ${{ true }} #Set this variable to false to temporarily disable the job
      needs: build
      env:
        stage: 'Prod'
        # Environment Secrets - Ensure all of the below have been created as an Environment Secret (Projects Settings > Secrets > Actions section, specially related to the environment in question) #
        databaseName: ${{ secrets.databaseName}}
        JDBC: ${{ secrets.JDBC }}
        userName: ${{ secrets.userName }}
        password: ${{ secrets.password }}
        check_JDBC: ${{ secrets.check_JDBC }}
        check_userName: ${{ secrets.check_userName }}
        check_password: ${{ secrets.check_password }}
        # End of Environment Secrets #
        generateDriftAndChangeReport: true
        failReleaseIfDriftDetected: false
        staticCodeAnalysis: false #Currently not setup in this pipeline
        publishArtifacts: true

      # Steps represent a sequence of tasks that will be executed as part of the job
      steps:
        # Checks-out your repository under $GITHUB_WORKSPACE, so your job can access it
        - uses: actions/checkout@v3

        # Runs the Flyway Check command, to produce a deployment report, against the Production database
        - name: Create Check Reports
          if: env.generateDriftAndChangeReport == 'true'
          run: |
            flyway -user="${{ env.userName }}" -password="${{ env.password }}" -baselineOnMigrate="true" -licenseKey="${{ env.FLYWAY_LICENSE_KEY }}" -configFiles="${{ GITHUB.WORKSPACE }}\flyway.conf" -locations="filesystem:${{ GITHUB.WORKSPACE }}\migrations" check -dryrun -changes -drift "-check.failOnDrift=${{ env.failReleaseIfDriftDetected }}" "-check.buildUrl=${{ env.check_JDBC }}" "-check.buildUser=${{ env.check_userName }}" "-check.buildPassword=${{ env.check_password }}" -url="${{ env.JDBC }}" "-reportFilename=${{ GITHUB.WORKSPACE }}\reports\${{ env.databaseName }}-Run-${{ GITHUB.RUN_ID }}-Check-Report.html"
          continue-on-error: true

         # Create a directory to stage the artifact files
        - name: Stage files for publishing
          if: env.publishArtifacts == 'true'
          run: |
            cp -R ${{ GITHUB.WORKSPACE }}\reports Artifact_Files/Reports/

        - name: Publish Check Report as Artifact
          uses: actions/upload-artifact@v2
          with:
            name: flyway-reports
            path: Artifact_Files/Reports/


  prod:
    name: Deploy Production
    # The type of runner that the job will run on
    runs-on: self-hosted
    environment: 'prod' #Ensure this environment name is setup in the projects Settings>Environment area. Ensuring any reviewers are also configured
    if: ${{ true }} #Set this variable to false to temporarily disable the job
    needs: prod-preparation
    env:
      stage: 'Prod'
      databaseName: ${{ secrets.databaseName}}
      JDBC: ${{ secrets.JDBC }}
      userName: ${{ secrets.userName }}
      password: ${{ secrets.password }}
      pauseForCodeReview: true

    # Steps represent a sequence of tasks that will be executed as part of the job
    steps:
      # Checks-out your repository under $GITHUB_WORKSPACE, so your job can access it
      - uses: actions/checkout@v3

      # Runs the Flyway Migrate against the Production database
      - name: Migrate Build DB
        if: ${{ true }}
        run: |
          flyway -user="${{ env.userName }}" -password="${{ env.password }}" -baselineOnMigrate="true" -licenseKey="${{ env.FLYWAY_LICENSE_KEY }}" -configFiles="${{ GITHUB.WORKSPACE }}\flyway.conf" -locations="filesystem:${{ GITHUB.WORKSPACE }}\migrations" info migrate info -url="${{ env.JDBC }}" -cleanDisabled='false'
Reminder - The above pipeline contains example logic for setting up and using Flyway with GitHub. Therefore, please be aware that these scripts are EXAMPLES and should be treated as such. Meaning these scripts will need to be reviewed and tested, by yourselves, before being executed against any environments.
Section 4 - Considerations
Before taking a look within the GitHub pipeline, consider as you go the following questions:
- What do I want my automated pipeline to look like?
- How many environments do I want to have automated and will I need any manual intervention gates?
- Which version of Linux or Windows do I want my GitHub Runners to use? Do I have a preference, or will the default suffice?
Answers to these, will help guide how you may want to setup your automated processes.
Section 5 - CI/CD Tools
Although this article has a focus on GitHub, it is fundamental to mention that Flyway as a CLI has no pre-requisite for any one individual CI/CD tool. Meaning that depending on your personal pipeline requirements, you are free to select a CI/CD tool that best fits your needs. With the knowledge that the Flyway CLI can be built into any pipeline tool, that has the capability of running a CMD/PowerShell or Bash style script.
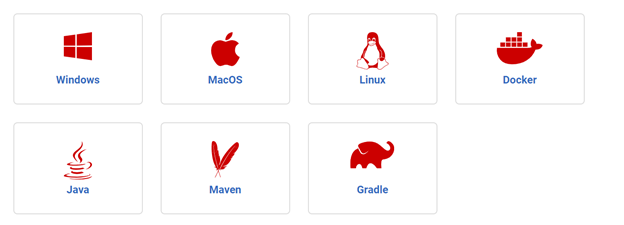
Additionally, Flyway has the capability of being installed on a large number of platforms. Making pipelines much more flexible, when it comes to operating system requirements. At the time of writing this article, Flyway installers can be found for the following platforms:
Tip - If you're interested in seeing how this same process could work in Azure DevOps, click HERE
Section 6 - GitHub
With GitHub being one of the leading SaaS platforms for end-to-end DevOps development and deployment, we often get asked if Flyway is compatible and can be used within its CI/CD pipelines? The answer to this, is a resounding yes! This is because, as mentioned in the previous section, Flyway can be installed on a range of platforms and can be interacted with in a range of fashions. Making it simple to call Flyway using your preferred scripting language, built directly into a GitHub pipeline.
In Section 8, which will be around setting up a basic pipeline, we will be using GitHub Actions functionality. This utilizes the concept of a YAML file, which allows users to script out their pipeline in a single markup file.
If you’re unfamiliar with any of this, please find some helpful documentation below:
Section 7 - GitHub Runners
In order to carry out the pipeline actions, GitHub uses the concept of runners. The most common Runners used, are Runner SaaS or Self-Hosted.
- GitHub Hosted Runner (SaaS)
- These runners are automatically maintained and upgraded by GitHub. However, each time you run a pipeline, a fresh virtual machine is spun up for each job in the pipeline. Once the job is complete, the virtual machine is then discarded (This means that any changes that a job makes to the virtual machine file system, such as checking out code, will be unavailable to the next job).
- About GitHub-hosted runners - GitHub Docs
- Self-Hosted Runner
- These runners are setup and managed by yourselves and is used to run jobs within the pipeline. Self-Hosted runners provide more flexibility and control around dependent software that may be required for builds and deployments. Something that is extremely valuable within a Flyway pipeline.
- More information
For the remainder of this article, I will be presuming Self-Hosted agents are in use, with the following Redgate software installed and functional on the agent machine:
- Flyway CLI (Teams/Enterprise Edition)
Section 8 - GitHub Pipeline Setup
Although the example YAML pipeline contains all the relevant steps to get started with Flyway, it is FUNDAMENTAL that the pipeline is reviewed and the variables updated before use. This is due to the highly configurable nature of Flyway and it's ability to connect to the databases and folder locations in your environment.
Reminder - Every environment is different, therefore please ensure the pipeline script is reviewed and updated accordingly before running.
The easiest method for updating the YAML pipeline, is by using the GitHub editor. This is because it analyses the file as you edit, checking for syntax issues and helping to ensure it's structured correctly, which we describe how to do in the following steps.
After reviewing the pipeline file, you'll notice that there are 3 distinct stages. These stages are Build, Prod-Preparation and Production; designed to mimic an example customer environment. With any good pipeline, security should always be a pertinent consideration. Which is why, the pipeline utilizes two types of variables throughout the process. The first being 'Action Secrets'/'Environment Secrets', which provides a secure method of adding pipeline information, without the inherit risk of using plain text values. The second being pipeline specific variables, which contain non-sensitive information for use throughout the pipeline. The setup of both of these are fundamental to the running of the pipeline.
Therefore, please follow the instructions below.
Step 1 - Create the necessary Actions secrets
Actions secrets are used in this pipeline to add an extra level of security around the more sensitive pieces of information. For example, licenses, urls, usernames and passwords.
To setup the Actions secrets of your project, from the main menu. Click 'Settings'

Then select 'Secrets > actions' from the left hand menu.
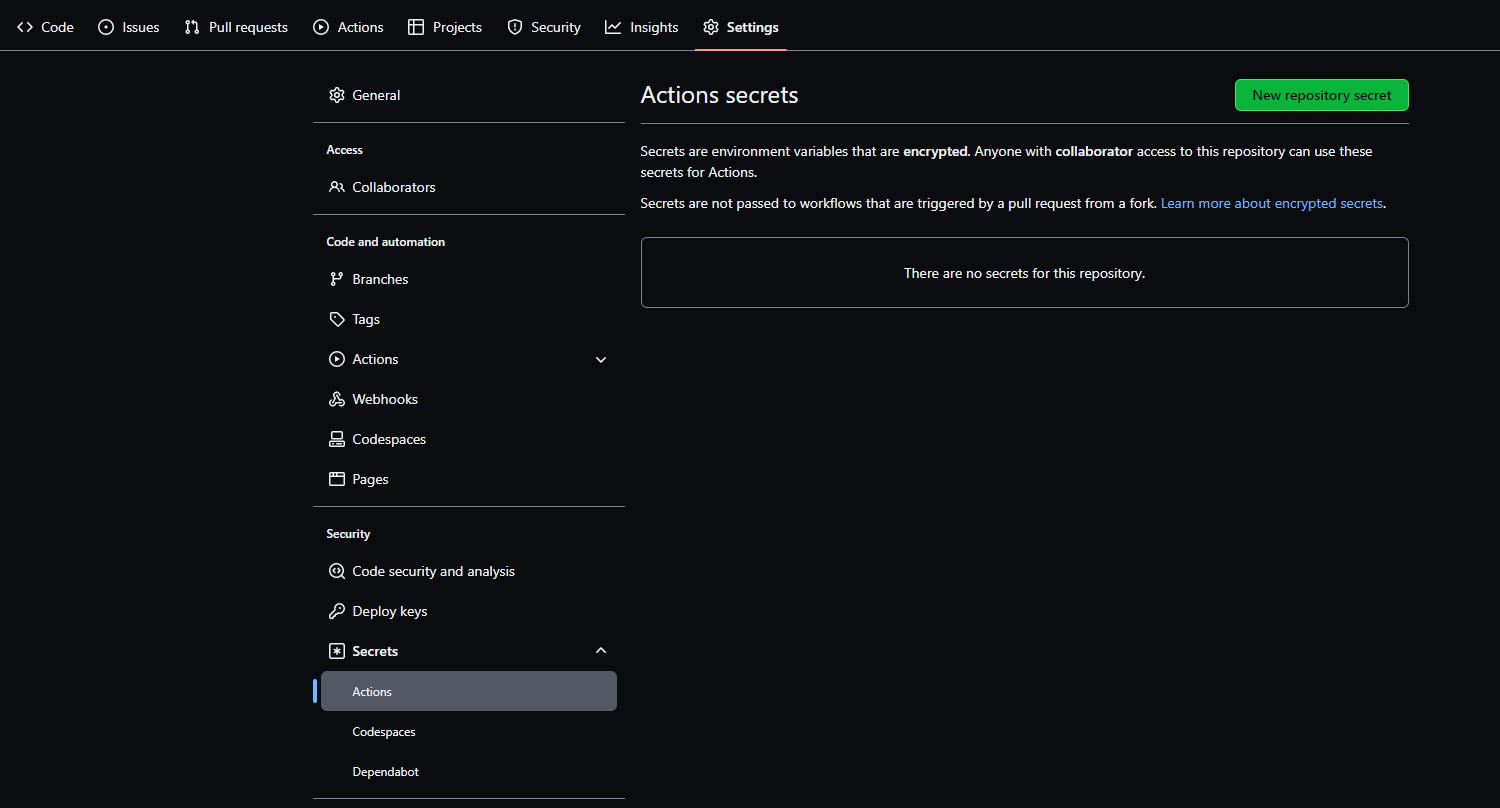
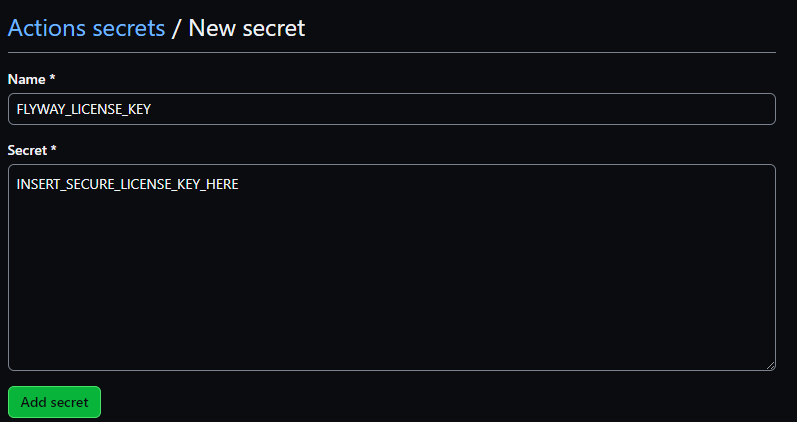
For the pipeline to function, it is necessary to create a mixture of repository secrets and environment secrets. The former provide a method of creating secure variables for use throughout the pipeline, whilst the latter are secure variables related to environment specific sections of the pipeline. From this webpage, we will start by creating a repository secret that will contain the Flyway CLI license key. To do this, simply click the 'New repository secret' button.
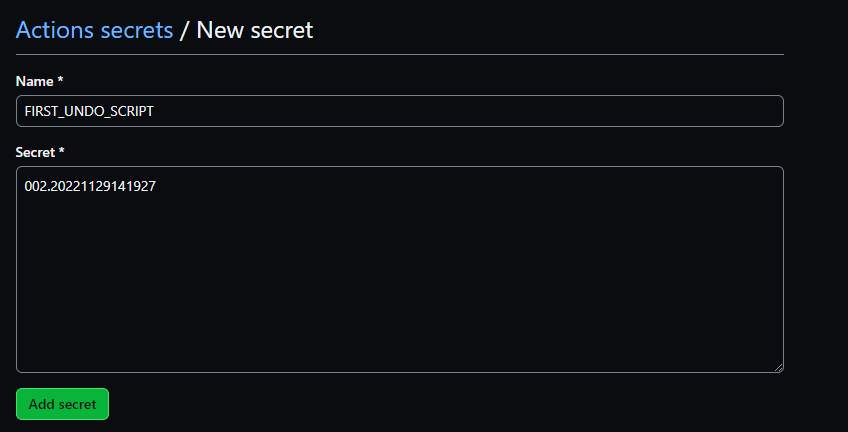
*The value for the above secret should be solely the version number of the first version script that contains a corresponding undo script. For example, if the first versioned migration script in my project was 'V002_20221129141927__AddWorkPhoneColumn.sql' and it had a corresponding undo script. Then the value in this secret would be '002_20221129141927'
With these secrets now created, select the 'Environments' button from the left-hand navigation panel.

From here, it's necessary to create a new environment for all databases we'll be interacting with within the pipeline. Based on the example YAML file, this will simply be the Build and Prod environments (However, if you intend to evolve the pipeline to include more databases, simply add additional environments and reference these where necessary in the YAML pipeline).
Within the configuration of each environment, it's possible to setup 'Environment Secrets'. Below detail the secrets required for each environment:
- build - This is a CI stage where we clean (deletes all data and schema) and rebuild the database from scratch as a deployment test
- Secret Name: DATABASENAME
- Value = YOURBUILDDB
- Example - FlywayDB_Build
- Value = YOURBUILDDB
- Secret Name: JDBC
- Value = JDBCCOnnectionString
- Example - jdbc:sqlserver://localhost;instanceName=SQLEXPRESS;databaseName=FlywayDB_Build;encrypt=true;trustServerCertificate=true
- Notes - A valid JDBC connection string will need to be provided, so that the Flyway CLI can connect to the relevant target stage database.
- If you're unsure how to setup and test your JDBC connection details, start by following the Flyway Redgate University courses:
- Tip - Flyway Desktop can be a great tool for building and testing your JDBC connection strings.
- Value = JDBCCOnnectionString
- Secret Name: USERNAME
- Value = MyUsername
- Example - Redgate (This is typically a SQL Server Auth username, in order to access the Build database)
- Value = MyUsername
- Secret Name: PASSWORD
- Value = MyPassword
- Example - SecureRedgatePassword (This is typically a SQL Server Auth password for the above username, in order to access the Build database)
- Value = MyPassword
- Secret Name: DATABASENAME
- prod- This will contain secrets related to the Production environment, where we will want to deploy to
- Secret Name: DATABASENAME
- Value = YOURBUILDDB
- Example - FlywayDB_Build
- Value = YOURBUILDDB
- Secret Name: JDBC
- Value = JDBCCOnnectionString
- Example - jdbc:sqlserver://localhost;instanceName=SQLEXPRESS;databaseName=FlywayDB_Build;encrypt=true;trustServerCertificate=true
- Notes - A valid JDBC connection string will need to be provided, so that the Flyway CLI can connect to the relevant target stage database.
- If you're unsure how to setup and test your JDBC connection details, start by following the Flyway Redgate University courses:
- Tip - Flyway Desktop can be a great tool for building and testing your JDBC connection strings.
- Value = JDBCCOnnectionString
- Secret Name: USERNAME
- Value = MyUsername
- Example - Redgate (This is typically a SQL Server Auth username, in order to access the Build database)
- Value = MyUsername
- Secret Name: PASSWORD
- Value = MyPassword
- Example - SecureRedgatePassword (This is typically a SQL Server Auth password for the above username, in order to access the Build database)
- Value = MyPassword
- Secret Name: CHECK_JDBC
- Value = JDBCCOnnectionString
- Example - jdbc:sqlserver://localhost;instanceName=SQLEXPRESS;databaseName=FlywayDB_Check;encrypt=true;trustServerCertificate=true
- Notes - A valid JDBC connection string will need to be provided, so that the Flyway CLI can connect to the relevant target stage check database. This variable is needed for all stages, EXCEPT the Build stage.
- The purpose of the Check Database is solely for the ability to create pipeline reports, designed to increase confidence with your migrations (More details can be found in the below link). Therefore, for this variable, it is necessary to provide the JDBC connection details for your designated Check database. Which will be an EMPTY database when it is first created.
- https://documentation.red-gate.com/fd/check-167936128.html
- A single Check database can be used throughout multiple pipeline stages. HOWEVER, it is recommended that a unique check database is created PER STAGE, in order to avoid deployment collisions. I.e multiple Azure DevOps jobs running in parallel, each trying to access the same check database.
- https://documentation.red-gate.com/fd/check-167936128.html
- If you're unsure how to setup and test your JDBC connection details, start by following the Flyway Redgate University courses:
- Tip - Flyway Desktop can be a great tool for building and testing your JDBC connection strings.
- The purpose of the Check Database is solely for the ability to create pipeline reports, designed to increase confidence with your migrations (More details can be found in the below link). Therefore, for this variable, it is necessary to provide the JDBC connection details for your designated Check database. Which will be an EMPTY database when it is first created.
- Value = JDBCCOnnectionString
- Secret Name: CHECK_USERNAME
- Value = MyUsername
- Example - Redgate (This is typically a SQL Server Auth username, in order to access the Check database)
- Value = MyUsername
- Secret Name: CHECK_PASSWORD
- Value = MyPassword
- Example - SecureRedgatePassword (This is typically a SQL Server Auth password for the above username, in order to access the Check database)
- Value = MyPassword
- Secret Name: DATABASENAME
The above secrets added are already configured for use within the YML pipeline, therefore once everything is setup in this location, they are ready to be used.
Step 2 - Create a new GitHub action
To start the process, it is first necessary to create a GitHub actions, to do this within your repository in GitHub, click on the Actions Icon (pictured below)

The following page will appear, click on the configure button for a simple workflow.
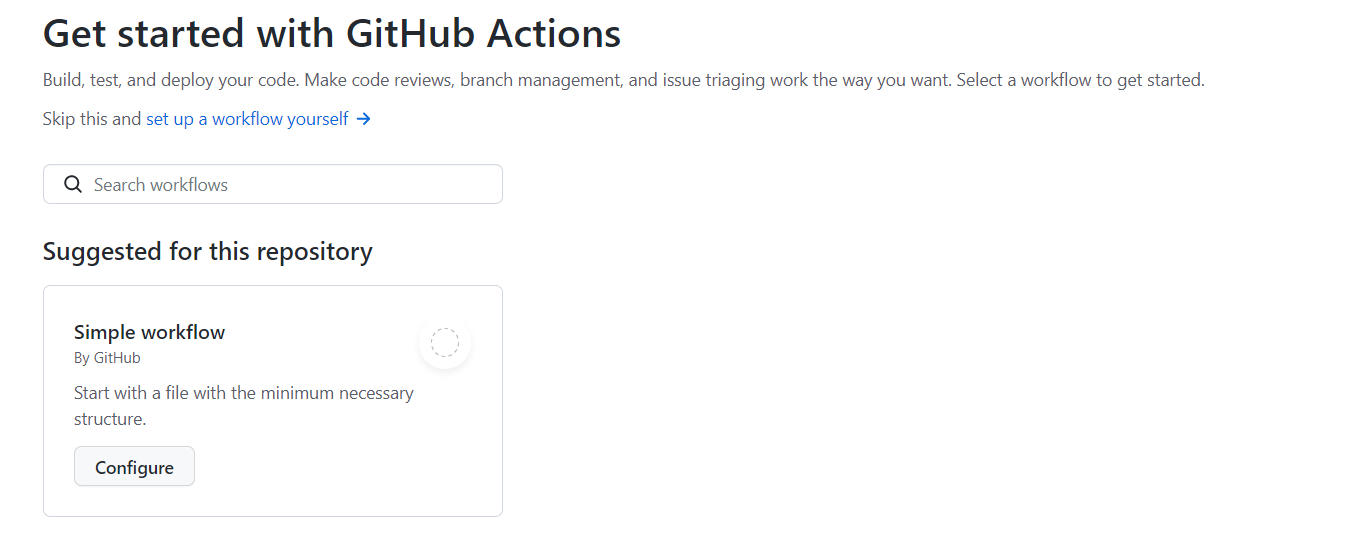
This will present you with a example basic action, delete the contents and paste in the the example workflow provided at the start of this document.

At the top of the editor, replace the word blank with the appropriate name for your workflow (pictured below)

Step 2 - Personalise the YAML contents
At the top of the pipeline is a name which should be customised to meet your needs:
Example GitHub YAML Pipeline Name
name: GitHub Pipeline (Self-Hosted)
Throughout the YAML file, variables are used to make it simple and easy to configure how the pipeline functions. The first group of these are found at the top of the pipeline file and can be considered as pipeline environment variables. This means that the variables may be utilized anywhere throughout the pipeline, rather than be scoped at a stage/job level.
The three variables used in this pipeline are
- FLYWAY_LICENSE_KEY
- This captures the repository secret for use within the pipeline
- FIRST_UNDO_SCRIPT
- This captures the repository secret for use within the pipeline
- ACTIONS_RUNNER_DEBUG
- Setting this to true, helps debugging pipeline issues, by ensuring enhanced logging is enabled.
Pipeline Environment Variables
env:

  FLYWAY_LICENSE_KEY: ${{ secrets.FLYWAY_LICENSE_KEY }} #Repository Secret - Create this within the Projects Settings > Secrects > Actions section
  # If the first undo script is U002, this will validate all undo scripts up to and including that
  FIRST_UNDO_SCRIPT: ${{ secrets.FIRST_UNDO_SCRIPT }}
  # Enable this for additional debug logging
  ACTIONS_RUNNER_DEBUG: true
Step 3 - Commit the GitHub Action file
Once you have changed the pipeline as you require, you can commit the new pipeline by pressing the start commit
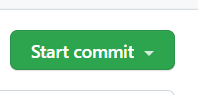
Add a description and appropriate commit message and press 'Commit new file'

Section 9 - Pipeline Testing
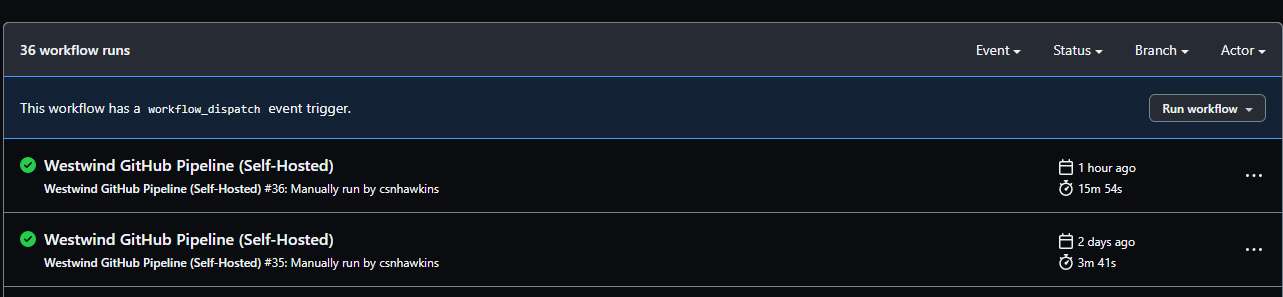
It is not uncommon to have to review and amend the GitHub Action a few times to get it running as you expect, go to the Actions tab within your repository and select the pipeline from the left hand menu (If required) and you will see the ability to 'Run Workflow'. This is possible due to the 'workflow_dispatch' trigger configured on like 14 of the pipeline. This is an extremely valuable configuration whilst testing the pipeline. At a future state, this can either be removed or used in conjunction with automatic triggers. For example a new push to the Release branch, with example code for this commented out and available between lines 8 - 11 of the example pipeline.
Although this example pipeline has been designed to be simple to stand-up and configure. There may be a need to run the pipeline through a few times, in order to iron out any configuration kinks that may be present. One tip to make this process as simple as possible, is to first test your JDBC connection details using Flyway Desktop. Where it can help build the JDBC connection string syntax, porting this over to the relevant secret once complete. If you're unable to access Flyway Desktop, you could also use the Flyway CLI in your preferred Shell to test out the connection details outside of the pipeline.
Section 10 - Conclusion
Flyway is an extremely flexible migrations-first engine, with the CLI able to be built into most modern CI/CD tools. In this article, it showcased how Flyway could be built into a GitHub YAML pipeline. In addition to utilizing GitHub self-hosted runners with the Flyway CLI, to speed up deployments and provide a more cost effective way of working. However, this just scratches the surface around how Flyway could be incorporated in almost any pipeline tool to match your business requirements.


