Baselining your downstream environments
Published 27 January 2022
Baselining is only necessary for migrations-based deployments. It is not a concern when doing state-based deployment. See deployment approaches with Flyway.
If you are working on a project with existing databases (e.g., not a brand new greenfield project where the downstream databases don't exist yet), then you will need to baseline your downstream environments before you can deploy your changes via migration scripts to those existing environments. Baselining each of your downstream environments (Test, Staging, Prod, etc) is a one-off task and ensures the baseline script created in Flyway Desktop represents what has already been deployed. If you tried to run the baseline script against your target environments, it would fail since those objects already exist there.
It's easier if all your downstream environments are at the same starting point. This might be right after a release happens or if your dev and test environments were just refreshed with a cleansed copy of Production. You can use the Comparison Tools, to make sure all your environments are in sync. If your environments are not in sync, then you may need to create multiple baselines, which is described in the section below.
What if my environments are in different states?
If possible, it’s easier to synchronize your environments as much as possible. You might need to wait until a release or blow away dev/test environments and re-create them. If this is not the case, then create different baseline scripts using our Comparison Tools for each of the target databases. Example:
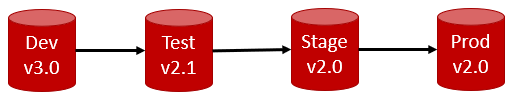
Generate the Baseline and initial Versioned Migration Scripts
- Using Flyway Desktop, create a baseline script using the lowest version as the source. In this example, Stage or Prod since they are both at v2.0. Flyway Desktop will create a Baseline Migration Script that if executed will bring an empty database to the current state of Production (v2.0). Users are filtered out from this script by default since they should be handled outside of version control. You can give your Baseline script a version number and description (e.g. B2.0__InitialDatabaseState.sql). You can also edit the script if any seed data or static data should be included.
- Using the Comparison Tool, generate a deployment script that will be a Versioned Migration Script to go from v2.0 to v2.1. In this case, your Test DB would be the source and your target would be the Production DB. This is saying what's changed in v2.1 that isn't in v2.0. Make sure you filter out any users. You may even want to reuse the filter and option files from your project. Name this to match the target version and give it a description (e.g., v2.1__NewFeatureXYZ.sql). Save this file in the migrations directory in your project.
- Repeat step 2 again to go from source v3.0 to target v2.1. This will capture all the changes since v2.1 was released. Save this file in the migrations directory in your project.
Your migrations folder should look like: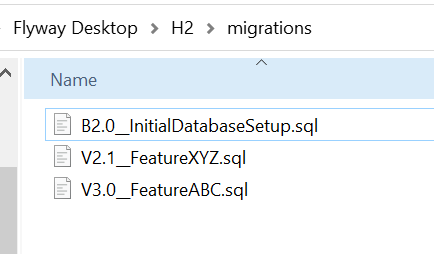
Next, Baseline the downstream environments
- Using Flyway Desktop or the Flyway commandline as described above, baseline the downstream environments:
- For your Test database, set the --baselineVersion argument to 2.1. This will still run any scripts bigger than 2.1 against your Test database. So, it will correctly apply v3.0 to your Test database.
- For Staging and Production, set the --baselineVersion argument to 2.0. The next time you deploy to Prod, Flyway will apply the v2.1 and then the v3.0 migration scripts.
This documentation contains proprietary information and is protected by copyright law.
Copyright © 2026 Red Gate Software Limited. All rights reserved


