OAuth Email Notifications for Exchange
Published 26 August 2025
This feature is currently unavailable in Redgate Monitor SaaS
Our application can send email notifications through your organization’s Office 365 (Exchange Online) account.
This configuration uses Microsoft’s Send As App (SMTP.SendAsApp) feature, which allows the application to send email securely on behalf of a designated mailbox (e.g. noreply@yourdomain.com).
Benefits of this approach:
- Secure - Uses OAuth2 authentication, no stored user passwords.
- Consistent - Emails are sent from your own domain/mailboxes.
- Flexible - Any shared or user mailbox can be used as the sender.
Prerequisites
You will need:
- Access to the Azure Portal with admin rights.
- Permission to configure mailboxes in Exchange Online.
Setup Steps
1. Register an App in Azure AD
- In the Azure Portal, go to Azure Active Directory → App registrations → New registration.
- Enter a name (e.g.
Redgate Monitor). - Choose Accounts in this organizational directory only.
- Click Register
- On the new application page, copy and retain:
- Application (client) ID
- From this point onward, this field will be referred to as <CLIENT_ID>
- Directory (tenant) ID for future steps when required.
- From this point onward, this field will be referred to as <TENANT_ID>
- Application (client) ID
2. Create a Client Secret
- Open the app you just registered.
- Go to Manage → Certificates & secrets → New client secret.
- Add a description, select an expiry period, and save.
- Copy the secret value - it will not be shown again
- Retain this value to provide when client secret is required.
- From this point onward, this field will be referred to as <CLIENT_SECRET>
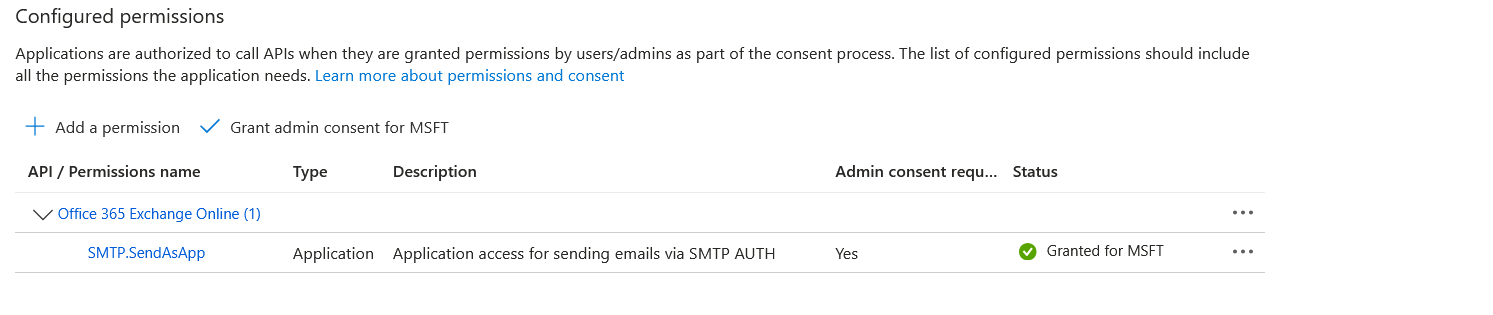
3. Add Permissions
- Go to Manage → API permissions → Add a permission.
- Select APIs my organization uses → Office 365 Exchange Online → Application permissions.
- Add:
SMTP.SendAsApp
- Click Grant admin consent.
4. Enterprise Object ID
For the next steps, we need to keep track of the enterprise object ID to provide during configuration.
- In the Azure Portal, go to Microsoft Entra ID
- Navigate to Enterprise Applications
- Go to your configured application from step 1.
- Copy and retrain the Object ID.
- From this point onward, this field will be referred to as <ENTERPRISE_OBJECT_ID>
5. Configure Authenticated SMTP
To ensure mail can be sent using your mailbox, Authenticated SMTP must be configured.
In the left menu, go to Users → Active users.
Find and click the mailbox user you want to send Email Notifications as.
From this point onward, this field will be referred to as
<MAILBOX_ADDRESS>
In the user pane, go to Mail → Manage email apps (sometimes called Email apps or Mail apps).
You’ll see a list of check-boxes for different protocols (Outlook, IMAP, POP, etc.).
Check Authenticated SMTP.
Click Save changes.
6. Configuration of Mailbox Permissions with Powershell
To ensure mail can be sent using your mailbox, Authenticated SMTP must be configured.
This step requires an <ADMIN_ADDRESS> with rights and privileges to configure mailbox permissions.
Run the following command in Powershell to have access to required commands. Ensure the selected principal has access to configure mailbox permissions.
Connect-ExchangeOnline -UserPrincipalName <ADMIN_ADDRESS>
- Once authenticated after the previous command, you should be able to configure a service principal with the following command:
New-ServicePrincipal -AppId <CLIENT_ID> -ObjectId <ENTERPRISE_OBJECT_ID>
Finally, the selected mailbox can be configured to allow full access:
- Add-MailboxPermission -Identity <MAILBOX_ADDRESS> -User <ENTERPRISE_OBJECT_ID> -AccessRights FullAccess
7. Configure in Redgate Monitor
In the email notifications settings in Redgate Monitor, you can select OAuth for Exchange:
SMTP server:
smtp.office365.com (or your configured SMTP server)Port:
587 (or your configured port)Require a secure (SSL or TLS) connection
Tenant ID (from Azure app)
- Your <TENANT_ID>
Client ID (from Azure app)
- Your <CLIENT_ID>
Client Secret (from Azure app)
- Your <CLIENT_SECRET>
Mailbox address (e.g.
notifications@yourdomain.com)- Your <MAILBOX_ADDRESS>
The application will then authenticate securely with Microsoft and send notifications from this mailbox.
Common Issues
If you encounter an problems sending a test email, you can further identify issues in the Redgate Monitor logs.
- Authentication failed - Verify the app has
SMTP.SendAsApppermission and that admin consent was granted. - Not authorized to send as this user - Ensure the
Add-MailboxPermissionstep has been applied for the mailbox. - Token expired - Regenerate the client secret if it has expired. When the token expires, a red banner will be visible in Redgate Monitor to indicate an issue with sending an email, at which point a client secret must be regenerated and notifications should be re-configured
This documentation contains proprietary information and is protected by copyright law.
Copyright © 2026 Red Gate Software Limited. All rights reserved


