Working with file paths, extensions, and processing options
Published 06 February 2015
SQL Virtual Restore is pre-configured with a comprehensive set of default file paths, extensions, and associated processing options.
The worked examples show how with these default settings, you can start using SQL Virtual Restore to mount your backup files as live databases immediately (including compressed and encrypted backup files), with minimal changes to your existing restore procedures.
The SQL Virtual Restore wizard makes virtually restoring databases even easier, by automatically updating SQL Virtual Restore's configuration for you, so it is unlikely that you will need to make configuration changes.
Any changes you do make take effect as soon as you confirm them, and are applied to any applicable operations you perform.
Default file path and extension settings for SQL Virtual Restore
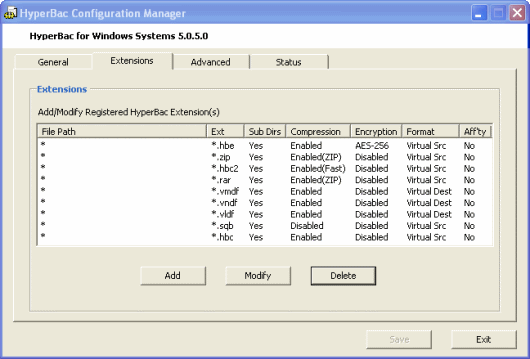
SQL Virtual Restore is pre-configured to process data for the following file paths and extensions:
Path | Extension | Processing | Format |
all paths (*) | *.hbc | compression (standard) | Virtual restore source |
all paths (*) | *.hbe | encryption (AES-256) | Virtual restore source |
all paths (*) | *.hbc2 | compression (fast) | Virtual restore source |
all paths (*) | *.rar | compression (ZIP) | Virtual restore source |
all paths (*) | *.zip | compression (ZIP) | Virtual restore source |
all paths (*) | *.sqb | none | Virtual restore source |
all paths (*) | *.bak | none | Virtual restore source |
all paths (*) | *.vmdf | none | Virtual restore destination |
all paths (*) | *.vndf | none | Virtual restore destination |
all paths (*) | *.vldf | none | Virtual restore destination |
Paths and extensions that have the "Virtual restore source" format, correspond to the types of backup file that SQL Virtual Restore will recognize during restore operations.
Paths and extensions that have the "Virtual restore destination" format, will be used for virtually restored databases' data files and log files. These files are needed to maintain a virtually restored database's consistency and integrity.
Adding a file path, extension, and processing options
To add a new file path, extension, and associated processing options:
- Start HyperBac Configuration Manager (from the Start Menu, select All Programs > Red Gate > HyperBac > HyperBac Configuration Manager), and select the Extensions tab.
- To add a new file path and extension, click Add, then OK to confirm.
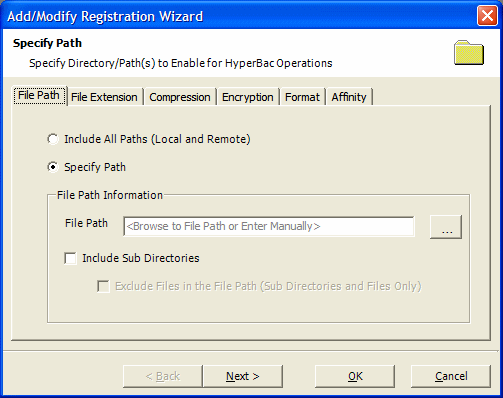
The Add/Modify Registration Wizard is displayed, with the File Path tab selected. - Adjust the settings in the File Pathtab as required:
If you want SQL Virtual Restore to operate with the file extension on any path (globally), select Include All Paths (Local and Remote).
If you select this option you must also use the Specify File Extension option in step 4.
- Alternatively, select Specify Path, and type or browse for a specific file path in the File Path box. (File paths can include '*' and '?' wildcards.) SQL Virtual Restore will operate on files that use this specific path (and extension, if you specify an extension in step 4).
Optionally, select Include Sub Directories if you also want SQL Virtual Restore to operate on files within subdirectories of the specified path.
As a further option, select Exclude Files in the File Path to prevent SQL Virtual Restore from operating on files located in the root of the specified path, while still operating on files within subdirectories.
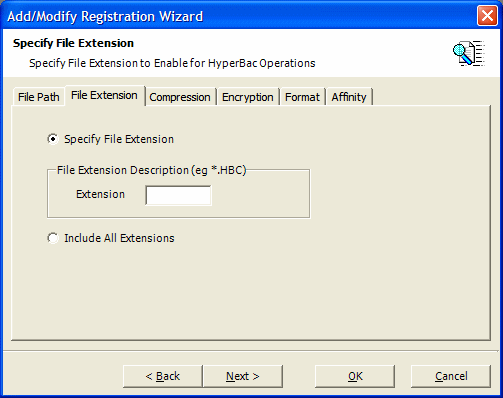
- Click Next to select the File Extension tab:
If you want SQL Virtual Restore to operate on any file extension within the path you specified in step 3, select Include All Extensions.
If you select this option you must also use the Specify Path option in step 3.
- Alternatively, select Specify File Extension, and type the extension in the Extension box, using the format '.*xxx'.
(The Extension value can also include the first part of the filename, and '*' and '?' wildcards. For example, 'sales20??_*.bak' will match files named 'sales2009_Feb.bak' and 'sales2010_Jan.bak'.)
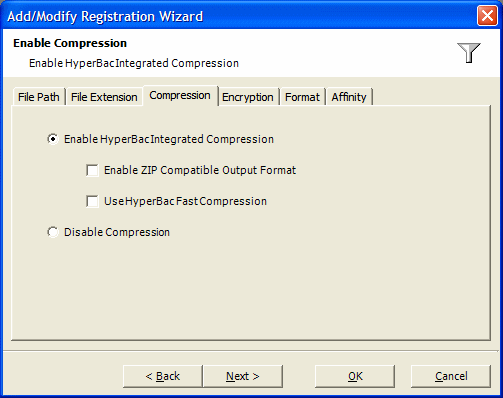
- Click Next to select the Compression tab:
If you want SQL Virtual Restore to work with compressed data for the file extension and path you specified in steps 3 and 4, select Enable HyperBac Integrated Compression.
The remaining settings control the type of compression that SQL Virtual Restore will use. If you don't select one of these settings, the standard SQL HyperBac compression algorithm is used instead. If you want SQL HyperBac to work with encrypted data as well (step 6), you must use standard compression.
Select Enable ZIP Compatible Output Format to specify a compression format that is compatible with many third-party compression tools (such as WinZip, WinRAR, and PKZip).
Select Use HyperBac Fast Compression to reduce the CPU resources used during compression. This algorithm also results in less compression than SQL Virtual Restore's standard or ZIP-compatible compression.If your system is I/O-bound, while writing to disk for example, the fast compression setting may result in longer backup times.
ZIP-compatible compression and fast compression cannot be used together.
- Alternatively, select Disable Compression to prevent SQL Virtual Restore from using compression on data for the file extension and path you specified in steps 3 and 4.
- Click Next to select the Encryption tab:
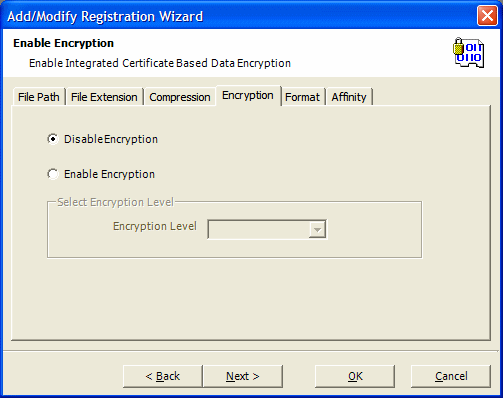
You can specify that SQL Virtual Restore works with encrypted data, independently of the compression settings you chose in step 5.- If you want SQL Virtual Restore to use AES-encryption with data for the file extension and path you specified in steps 3 and 4, select Enable Encryption, and choose an Encryption Level from the list.
You cannot specify encryption if you have already selected ZIP-compatible compression in step 5.
If you are working with encrypted backup data, it is essential that you understand how SQL Virtual Restore uses _key files _(the files that act as your "password" for accessing encrypted backups).
Read Working with encrypted backup files for important information about how to manage your key files. - Alternatively, select Disable Encryption to prevent SQL Virtual Restore from using encryption on data for the file extension and path you specified in steps 3 and 4.
- If you want SQL Virtual Restore to use AES-encryption with data for the file extension and path you specified in steps 3 and 4, select Enable Encryption, and choose an Encryption Level from the list.
- Click Next to select the Format tab:
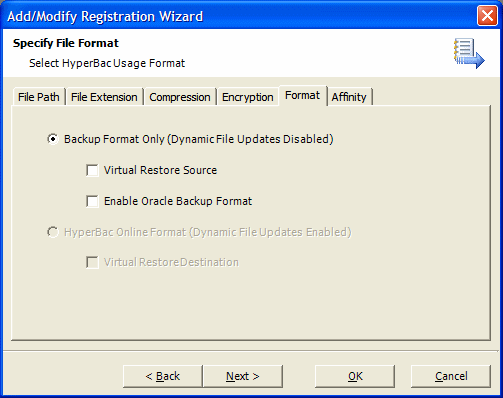
- To specify that SQL Virtual Restore works with the extension as a "Virtual restore source" file (that is, a backup file), select Virtual Restore Source under Backup Format Only
- To specify that SQL Virtual Restore works with the extension as a "Virtual restore destination" file, select the check box under HyperBac Online Format
Click Next to select the Affinity tab:
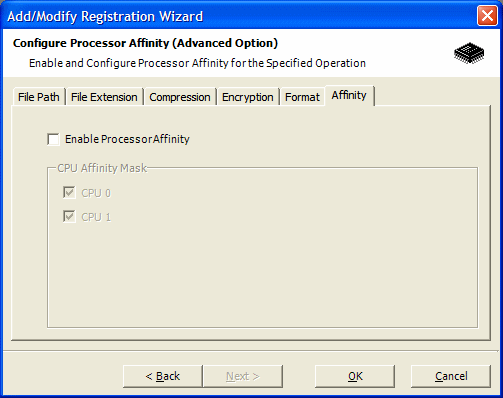
If you are using a multi-processor server, you can specify which processors are used during SQL Virtual Restore operations on data for the file extension and path you specified in steps 3 and 4.
To do this, select Enable Processor Affinity, and then select the required CPUs to use for SQL Virtual Restore operations from the CPU Affinity Mask list.Applying CPU affinity to SQL Virtual Restore operations can prolong operations in some circumstances, so you should use processor affinity settings with care.
Click OK, then Yes to confirm your edits.
The new file path, extension, and other settings, are passed to the HyperBac Control Service.There may be up to a 30 second delay before the service begins to act on the updated settings.
- Click Save, then, if you've no further changes to make, click Exit to close the HyperBac Configuration Manager.The HyperBac Control Service will continue to run in the background.
Modifying a file path, extension, and processing options
To modify a file path, extension, and associated processing options, follow the steps shown above, but in step 2:
- Select an existing path and extension from the list.
- Click Modify.
Deleting a file path, extension, and processing options
To delete a file path, extension, and associated processing options:
- Start HyperBac Configuration Manager (from the Start Menu, select All Programs > Red Gate > HyperBac > HyperBac Configuration Manager), and select the Extensions tab.
- Select the path and extension you want to delete from the list.
Click Delete, and then Yes on the confirmation dialog.
The path and extension you selected (and the associated processing options) are removed from the list, and this change is passed to the HyperBac Control Service.There may be up to a 30 second delay before the service begins to act on the updated settings.
- If you've no further changes to make, click Exit to close the HyperBac Configuration Manager.
The HyperBac Control Service will continue to run in the background.
