Worked examples - creating a database by virtually restoring backup files
Published 06 February 2015
To access the data in backup files using SQL Virtual Restore, you must perform a restore operation that the HyperBac Control Service recognizes as a virtual restore. Provided the service is configured correctly, it will automatically intercept and process data from your backup files, and create your database.
You can use either of the following methods to create a database by virtually restoring backup files:
- Use the SQL Virtual Restore wizard, which guides you through each step, and also ensures that the HyperBac Control Service is configured correctly.
- Use native T-SQL commands to virtually restore backup files. This method is more flexible (enabling you to virtually restore to a specific point in time using transaction log backup files, for example), but you must ensure that the HyperBac Control Service is configured correctly, and write the necessary T-SQL RESTORE commands yourself.
Each method is described in the following sections.
Worked example: creating a database using the SQL Virtual Restore wizard
For this worked example, we'll virtually restore from a full backup of the sample "AdventureWorks" database.
SQL Virtual Restore works with backup files in SQL HyperBac format, SQL Backup format (version 6 and above), and native SQL Server format. The backup file in this example was created using SQL Backup, but you can follow this example using a backup file in any supported format.
Before you start, check that the HyperBac Control Service is running on the SQL Server you want to virtually restore to. See Working with the HyperBac Control Service for more information.
From the Start menu (on the SQL Server you want to virtually restore to), select All Programs > Red Gate > HyperBac > SQL Virtual Restore Wizard
You can also start the SQL Virtual Restore wizard directly from SQL Server Management Studio, by selecting Tools > SQL Virtual Restore from the main menu:
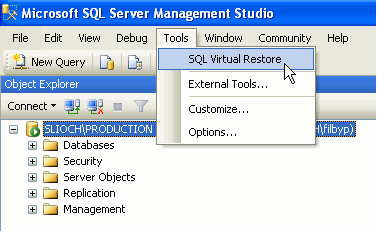
This option is only available if you have already connected to a SQL Server instance.
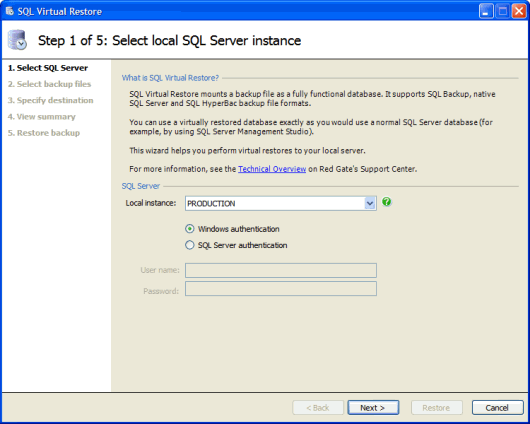
If you start the SQL Virtual Restore wizard in this way, step 1 above is skipped. The wizard uses the instance that you are already connected to in SQL Server Management Studio, and you can continue to add files, as described in step 3 below.- Select the name of the local instance that will host the virtually restored database (in this case, "PRODUCTION"), specify the authentication details, and click Next.

- Click Add Files to browse and select the backup files you want to virtually restore.You can select:
- A single, full backup file (SQL HyperBac format, SQL Backup format (version 6.0 or later), or native SQL Server format)
- Multiple backup files that comprise a single full backup
- A full backup, differential backup, and (optionally) transaction log backup files
Each file you add is checked to ensure that it is valid for virtual restore.
In this example, we select a file in SQL Backup format, "FULL_PRODUCTION_AdventureWorks_20101130_120148.sqb":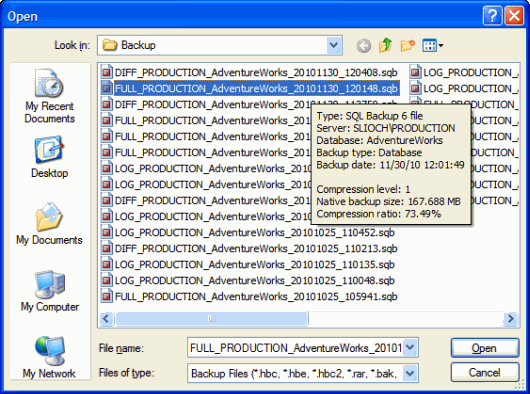
- Click Next to specify information about the destination database (that is, the database you are going to create or overwrite when you run the virtual restore process):
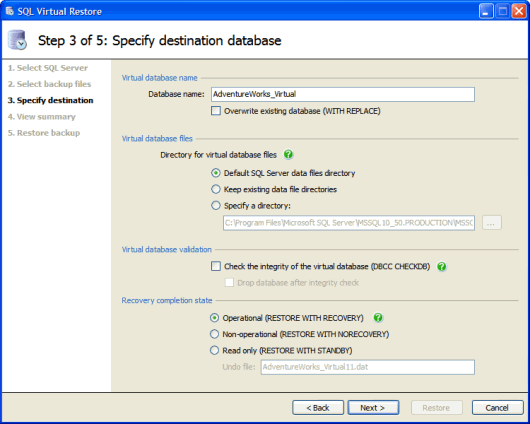
- By default the Database name is set to "<Original database name>_Virtual"
You can change this to any valid database name. - The data files and log files that are created during the virtual restore process will be given *.vmdf and *.vldf extensions by default.
These extensions are pre-configured for use with SQL Virtual Restore.In this example, we leave the destination database settings at their default values.
- By default the Database name is set to "<Original database name>_Virtual"
- Click Next to view a summary of the details you've specified so far:
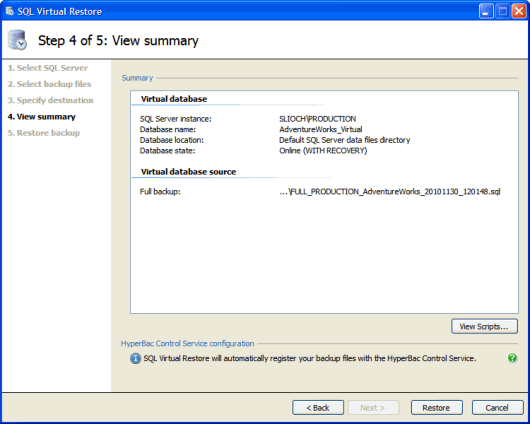
- The wizard checks that the HyperBac Control Service is running, and is configured correctly for the virtual restore operation you are about to perform.
If the service is not configured correctly, the wizard will automatically adjust the service configuration for the duration of the virtual restore operation.
For example, if you are virtually restoring a backup file with an extension that is not included in SQL Virtual Restore's default configuration, the wizard will add this extension to enable the virtual restore operation to proceed. - View Scripts displays the T-SQL RESTORE commands that will be run when you click Finish
- The wizard checks that the HyperBac Control Service is running, and is configured correctly for the virtual restore operation you are about to perform.
Click Restore.The virtual restore process begins:
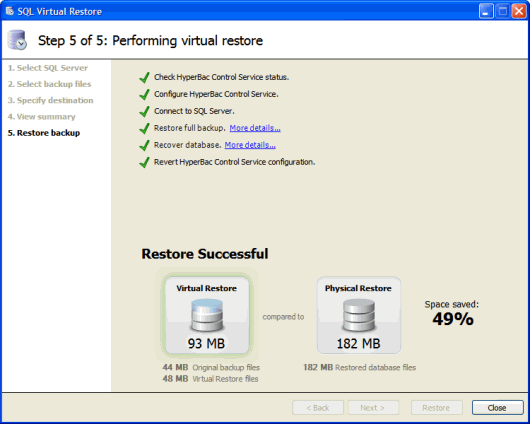
Once the virtual restore process has completed successfully, the disk space saved in comparison to a physical restore is shown.
You should now be able to access your virtually restored database using native SQL Server tools and scripts.
For example, in SQL Server Management Studio, the new AdventureWorks_Virtual database is now visible in the Object Explorer:
Worked example: creating a database using native T-SQL commands
Although the SQL Virtual Restore wizard, used in the previous example, makes it very easy to virtually restore backup files, there are some situations where you may need the greater flexibility provided by using native T-SQL commands. For example, the SQL Virtual Restore wizard does not enable you to specify an exact point in time for your virtual restore operation.
For this worked example, we'll virtually restore the sample "AdventureWorks" database to a specific point in time, from a combination of full, differential, and transaction log backups. The backup files used in this example were created using SQL Server, but SQL Virtual Restore also works with SQL HyperBac and SQL Backup (version 6.0 or above) backup files.
Before you start, check that the HyperBac Control Service is running on the SQL Server you want to virtually restore to. See Working with the HyperBac Control Service for more information.
Scenario
The AdventureWorks database is operating using the 'Full' recovery model, and we have been backing the database up with regular full backups, and interim differential and transaction log backups.
We would like to examine some data in the AdventureWorks database from a specific point in time (21:31:00, 21st July 2010).
By virtually restoring the relevant backup files, SQL Virtual Restore will enable us to access this data without having to perform a full restore of the database, which would require considerable disk space.
We will be working with the following native SQL Server backup files:
- 'D:\Backups\AdventureWorks_Full_1.bak' taken 15th July 2010, 00:00
- 'D:\Backups\AdventureWorks_Diff_1.bak' taken 21st July 2010, 12:00
- 'D:\Backups\AdventureWorks_Log_1.bak' taken 21st July 2010, 22:00
Configuring the HyperBac Control Service
When you install SQL Virtual Restore, a number of file paths and extensions are pre-configured so that the HyperBac Control service will recognize virtual restore operations for common extensions, and automatically process SQL Server data reads and writes. (These pre-configured file paths and extensions are listed in Working with file paths, extensions, and processing options.)
The "*.bak" extension that our backup files use is not pre-configured, so we must add this to the HyperBac Control Service configuration before proceeding with the virtual restore:
- Start HyperBac Configuration Manager (from the Start Menu, select All Programs > Red Gate > HyperBac > HyperBac Configuration Manager), and select the Extensions tab.
- To add a new file path and extension, click Add, then OK to confirm.The Add/Modify Registration Wizard is displayed, with the File Path tab selected.
- Select Specify Path, then, in the File Path box, type 'D:\Backups'.This setting will restrict the HyperBac Control Service to operating on *.bak files located in D:\Backups only.
- Click Next to select the File Extension tab.In the Extension box, type '*.bak'.
- Click Next to select the Compression tab.Select Disable Compression.
- Click Next to select the Encryption tab.Select Disable Encryption.
- Click Next to select the Format tab:Select Backup Format Only and Virtual Restore Source.This setting is necessary to ensure that the HyperBac Control Service processes our *.bak files correctly when we use T-SQL RESTORE commands on the files.
- Click OK, then Yes to confirm your edits:
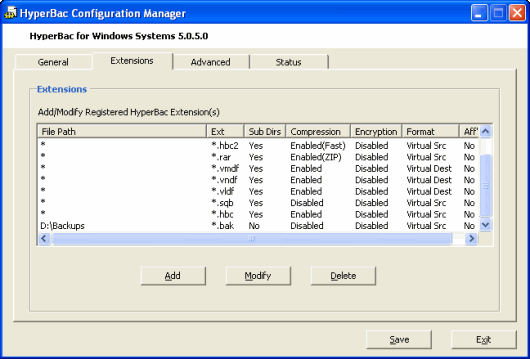
The new file path, extension, and other settings, are passed to the HyperBac Control Service. - Click Exit to close the HyperBac Configuration Manager.The HyperBac Control Service will continue to run in the background.
Running T-SQL RESTORE commands to virtually restore from the backup files
Now that we've added the *.bak extension to the HyperBac Control Service, we are ready to run the standard RESTORE commands that will virtually restore our AdventureWorks database.
SQL Virtual Restore is pre-configured with *.vmdf and *.vldf extensions. These extensions are set to operate as "Virtual Destination" files, which are necessary to maintain consistency and integrity in virtually restored databases.
Run the following T-SQL RESTORE commands to virtually restore the AdventureWorks database to AdventureWorks_Virtual, and recover to 21:31:00, 21st July 2010:
RESTORE DATABASE AdventureWorks_Virtual
FROM
DISK='D:\Backups\AdventureWorks_Full_1.bak'
WITH
MOVE 'AdventureWorks_Data' TO 'C:[...]\AdventureWorks_Data.vmdf',
MOVE 'AdventureWorks_Log' TO 'C:[...]\AdventureWorks_Log.vldf',
NORECOVERY
RESTORE DATABASE AdventureWorks_Virtual
FROM
DISK='D:\Backups\AdventureWorks_Diff_1.bak'
WITH
NORECOVERY
RESTORE LOG AdventureWorks_Virtual
FROM
DISK='D:\Backups\AdventureWorks_Log_1.bak'
WITH
RECOVERY,
STOPAT='2010-07-21T21:31:00'
The AdventureWorks_Virtual database will now be fully available for querying, and updating.


