Restoring backups - destination database
Published 13 February 2013
Restoring backups > Select backups > Destination database > Restore options > Review summary
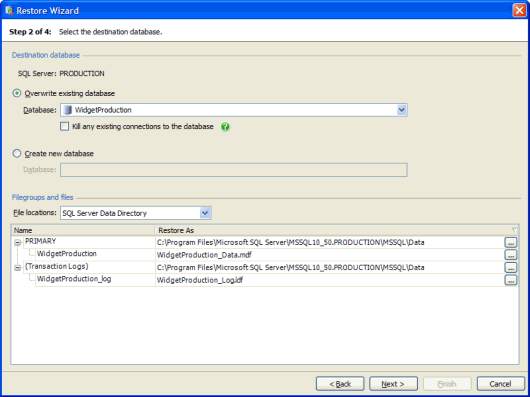
On step 2 of the wizard, specify the destination database and the location of the database files.
Overwriting an existing database
To restore the backups to an existing database, select Overwrite existing database and select the database.
If you are restoring a full database backup or a filegroup backup, you can select any existing database. If you are restoring a differential database backup or a transaction log backup, only those databases that are in an "unrecovered" or "standby" state are available for selection.
The restore process will fail if there are existing connections to the destination database. To automatically kill any existing connections to the destination database before starting the restore process, select Kill any existing connections to the database. If you do not select this option, you will need to kill existing connections manually before restoring.
Transaction log tail
If you select a database that is not in an "unrecovered" or "standby" state but uses the Full or Bulk-Logged recovery model (full or filegroup backups only), when you click Next SQL Backup prompts you to back up the tail of the transaction log. Backing up the tail of the transaction log ensures that you capture all the transaction log records that have not already been backed up before overwriting the database.
To back up the tail of the transaction log, select Back up the transaction log before proceeding with the restore and then click Back Up Now.
If there are existing connections to the destination database, and you have not selected Kill any existing connections to the database in the previous step of the wizard, the transaction log backup (and subsequent restore) will fail. Either kill connections manually before backing up the transaction log, or return to step 2 of the wizard and select the option. This will kill existing connections before the transaction log is backed up.
A wizard is displayed for you to enter the backup settings you require. See Creating backups for details. The script to back up the tail of the transaction log is displayed only in this wizard. When you click Finish on the wizard, the transaction log is backed up. Click Close on the message box, and then click Next to proceed with the Restore wizard.
- If you do not want to back up the tail of the transaction log, select Discard transactions in the tail of the transaction log and click Next to proceed with the Restore wizard.
There is no requirement to back up the tail of the transaction log before restoring if you have selected an existing database that is:
- in an "unrecovered" or "standby" state
- or is not in an "unrecovered" or "standby" state, but uses the Simple recovery model (full or filegroup backups only)
This is equivalent to using WITH REPLACE in a T-SQL RESTORE statement. Refer to your SQL Server documentation for full details.
Filegroups and files
The data and log files (and any full text catalogs or filestream data) will be restored to the default SQL Server data and log directories unless you specify other locations:
- To restore the data and log files to the locations specified in the backup, select Original database data and log directory from the File locations list.
- To restore the data files or log file to different locations or file names, click next to the file or folder and specify the new location or file name.
Creating a new database
If you are restoring a full database backup, you can select Create new database to restore to a new database. Type a name for the database in the box.
Filegroups and files
The data and log files (and any full text catalogs or filestream data) will be restored to the default SQL Server data and log directories unless you specify other locations:
- To restore the data and log files to the locations specified in the backup, select Original database data and log directory from the File locations list.
- To restore the data files or log file to different locations or file names, click next to the file or folder and specify the new location or file name.


