Mapping owners
Published 04 June 2013
When you create a comparison project and you have selected your data sources, SQL Compare automatically maps objects with the same name and the same owner (SQL Server 2000) or schema (SQL Server 2008 and SQL Server 2005) for you.
If you want to compare objects with the same name, but those objects have different owners or belong to different schemas, you can map the owners or schemas as required. For example, if you want to compare objects in a test database that are owned by sales with objects in a production database that are owned by support, you can map sales to support.
- If you map the owners (or schemas) sales and support, this enables SQL Compare to compare the stored procedures [sales].[editCustomerDetails] and [support].[editCustomerDetails]. SQL Compare can then rename other objects that are referenced by the stored procedure. For example, if the [support].[editCustomerDetails] stored procedure references the table [support].[customerDetails], the stored procedure is updated to reference the table [sales].[customerDetails]. The same applies to functions, DML triggers, DDL triggers, views, defaults, and rules.
- If you are comparing stored procedures, functions, DML triggers, views, defaults, or rules that contain WITH elements, they are flagged as different unless the Ignore WITH element order option is selected in your comparison project.
- You cannot perform the comparison if an existing schema or owner is not mapped. For example, if you unmap the schemas Sales and Support, and then map Support to Sales, the comparison will fail if you do not also map Sales to another schema.
Editing the owner mappings
The Owner Mapping tab of the Project Configuration dialog box enables you to edit mappings:
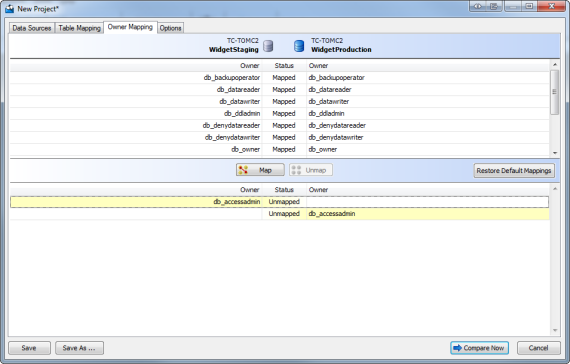
The upper pane displays a list of schemas, database roles, and database users that SQL Compare has automatically mapped for you; the lower pane displays a list of schemas, database roles, and database users that are not mapped.
- To undo a mapping, in the upper pane, select the mapping, and click
 Unmap.
 - To create a mapping, in the lower pane, select item A from the source, then select item B from the target, and click
 Map.
Map.
Next, select item B from the source, then select item A from the target, and click Map.
For example, to map sales to support, you create a mapping for sales to support and then you create a mapping forsupport to sales.
To reset the mappings to the defaults, click Restore Default Mappings.
This documentation contains proprietary information and is protected by copyright law.
Copyright © 2026 Red Gate Software Limited. All rights reserved


