Using filters
Published 19 June 2013
You can use filters to define which objects are displayed in the upper (Results) pane. For example, you may be interested in only tables, or in only some of the stored procedures owned by a specific schema. You can set up a filter to show you only the objects matching these conditions.
You can set up a filter for object types, and edit the filter rules to restrict which specific objects are included in or excluded from the upper pane.
The default filter is Nothing Excluded. If you edit this filter, Custom* is shown in the Filter box. An asterisk is displayed next to the name of any filter you edit, to show that there are unsaved changes.
You can save your filters for use in multiple projects. To choose a different filter, in the Filter box select the filter you want to use; if the filter is not listed, select Open filter from file and browse to the filter.
Filter rules
You can define which object types the filter includes in the comparison results using the object type check boxes in the Filterpane.
You can also create rules to control the specific objects that a filter includes or excludes. To edit the filter rules:
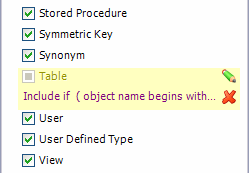
When you create a filter rule, its conditions are displayed under the name of any object types it applies to.
To edit the filter rule for an object type, move the mouse pointer over it and click the (Edit) button that becomes available:
To clear the filter rule for an object type, move the mouse pointer over it and click the (Clear) button that becomes available.
You can clear all current filter rules by selecting the filter Nothing Excluded from the Filter box.
Saving and deleting filters
Saved filters are available in subsequent projects, and can be selected from the Filter box. Saved filters have the file extension .scpf
- To save the current filter, on the Filter pane, click Save
In the Save Filter dialog box, type the name for the filter.
When you save an edited filter, you can either save it with the same name to overwrite it, or change the name to create a new filter.
- To delete the current filter, on the Filter pane, click Delete
You will be prompted to confirm. When you delete the current filter, Custom* is shown in the Filter box, and the conditions for the filter you just deleted remain set until you select another filter or make any changes.
Note that any unsaved changes to a filter are lost when you select another filter.
Copying or moving filters
Filters are saved in your %USERPROFILE%\Documents\SQL Compare\Filters folder. All files in this folder with the .scpfextension will be displayed in the Filter drop-down list.
To migrate filters to another computer, copy them from the %USERPROFILE%\Documents\SQL Compare\Filters folder to the corresponding folder on that computer. Note that you must copy filters to the folder of the user who will be using SQL Compare on that computer.
Using filters from the SQL Compare command line
To use a filter from the command line, use the /filter switch and specify the filter you want to use, including the .scpfextension. For example:
SQLCompare.exe /s1:server1 /db1:widgetlive /s2:server1 /db2:widgetdev /filter:myfilter.scpf
You can use this switch to call any filter that you have saved in SQL Compare. It will also look for filters in the current working directory of your command prompt. To use a filter that you have set up on another machine, copy or move the filter as described in 'Copying or moving filters', above.
You can also specify a filter by absolute or relative path. For example, using the working directory C:\SQLCompare, you can call the filter myfilter.scpf from C:\SQLCompare\filters\myfilter.scpf with a relative path:
C:\SQLCompare>SQLCompare.exe /s1:server1 /db1:widgetlive /s2:server1 /db2:widgetdev /filter:filters\myfilter.scpf
Or using an absolute path:
SQLCompare.exe /s1:server1 /db1:widgetlive /s2:server1 /db2:widgetdev /filter:C:\SQLCompare\filters\myfilter.scpf
Filters and Find
A filter defines which objects are displayed in the upper (Results) pane; using Find changes how those objects are grouped. If an object matches the term in the Find box and is excluded by a filter, it is not displayed in the upper pane.
Find groups results by whether they match or do not match the term typed in the Find box. Objects not matching the Find term are still displayed in the upper pane, but this group is shown as collapsed by default.
Only objects displayed in the upper pane can be selected for synchronization.
Example: excluding objects by type
If you want to view comparison results for only Tables and Views:
- On the Filter pane, clear the All object types included check box.
This ensures that no objects are displayed in the upper (Results) pane.
- Select the View and Table check boxes.
The filter is applied. Only tables and views are displayed in the upper pane.
Example: excluding objects from a specific schema
If you want to view comparison results that exclude any objects owned by the schema Marketing:
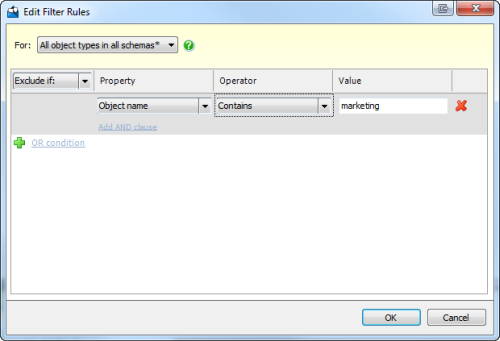
- On the Filter pane, click the Edit Filter Rules button.
The Edit Filter Rules dialog box is displayed.
- In the For box, ensure that All object types in all schemas is selected.
- In the box, select Exclude if.
- Under Property, select Schema name.
- Under Operator, select Equals.
- Under Value, type Marketing.
- Click OK.
The filter is applied. No objects owned by the schema Marketing are displayed in the upper pane.
Example: including only those tables with a specific name or a particular owner
If you want to view comparison results for all the tables that have names beginning with Marketing, as well as all those owned by the schema Marketing, regardless of their names:
- On the Filter pane, clear the All object types included check box.
This ensures that no objects are displayed in the upper pane.
- Click the button for Table.
The Edit Filter Rule dialog box is displayed.
- In the box, select Include if.
- Under Property, select Object name.
- Under Operator, select Begins with.
- Under Value, type Marketing.
- Click
A new OR condition becomes available.
- Under Property, select Schema name.
- Under Operator, select Equals.
- Under Value, type Marketing.
- Click OK.
The filter is applied. Only objects owned by the schema Marketing, or with names that begin with Marketing are displayed in the upper pane.
Filters and synchronization
The current filter affects which objects you can select for synchronization:
- When you use the filter to exclude an object or object type, it is removed from the upper pane and cannot be selected for synchronization.
- If you select an object for synchronization and later set up a filter that excludes it, the object is not synchronized.
Objects excluded by the filter are only included in the synchronization as dependencies. If an excluded object is referenced by an object you selected for synchronization, you will be notified of this dependency, and can choose to synchronize the affected object on the Review Dependencies page of the synchronization wizard.


