Using the TFS MSBuild scripts
Published 31 May 2016
This example describes how to set up a database deployment pipeline using TFS and Redgate tools.
You'll use the DLM Automation TFS MSBuild scripts to build, test, sync and publish a NuGet package to your release management tool.
Most of this tutorial describes how to set up TFS and SQL Source Control. If you're only interested in how the DLM Automation TFS Build plugin works, start from step 7, Configure the properties files.
1. Install software and download demo files
Make sure you have the following:
- Access to Team Foundation Server (TFS) 2010, 2012, 2013 or 2015. This tutorial series uses TFS 2012.
Visual Studio 2010, 2012, 2013 or 2015. This tutorial series uses Visual Studio 2012.
For details of which TFS and Visual Studio versions can work together, see Compatibility between Team Foundation clients and Team Foundation Server (MSDN article).If you want to publish test results in MSTest format, you'll need to have Visual Studio Premium, Ultimate or Test Pro installed on the machine running your build agent.
- SQL Server Management Studio (SSMS) 2008 (RTM, SP1, SP2, R2, R2 SP1, and R2 SP2), 2012, or 2014 (CTP2)
- Access to a SQL Server 2012 or 2014 instance with common language runtime (CLR) integration enabled. For more information, see Enabling CLR integration (MSDN article). This tutorial uses SQL Server 2012.
- Redgate SQL Source Control installed on the same machine as SSMS. See SQL Source Control
- The WidgetShop demo files. Download the WidgetDevelopmentDatabaseCIDemo.zip file, and extract the contents.
- .NET 4.5 installed on your local machine. This program is installed automatically with Visual Studio 2012 and 2013.
If you're using Visual Studio 2010, you'll need to install it manually. See Microsoft .NET Framework 4.5 (Microsoft Download Center) - DLM Automation, installed on the machine running the build agent. See Installing (DLM Automation documentation).
- Redgate's DLM Automation TFS MSBuild scripts copied to the machine running the build agent. See Setting up the TFS MSBuild scripts.
2. Create a team project in TFS
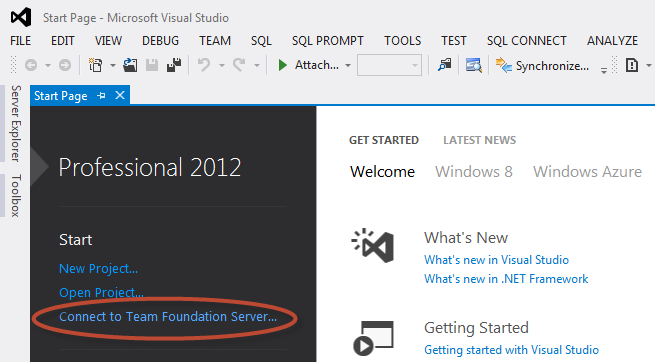
- In Visual Studio, click Connect to Team Foundation Server:
- Select or add your TFS server and then click Connect.
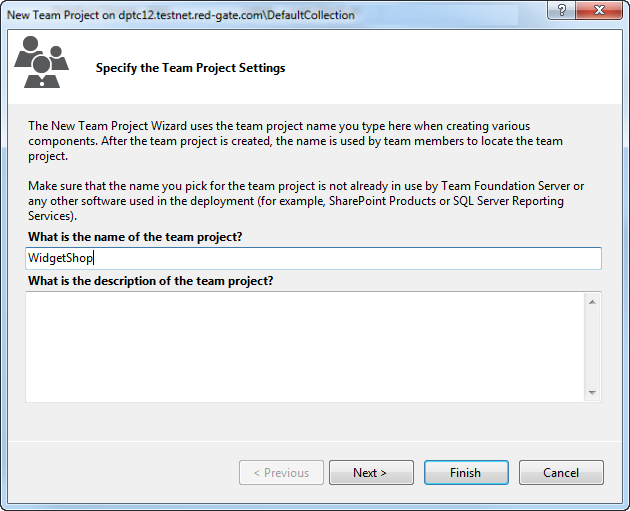
For details of how to connect to an instance of TFS for the first time, Connect to Team Projects in TFS (MSDN article) From the File menu, select New > Team Project. The Specify Team Project Settings page is displayed.
- Enter the project name WidgetShop:
- Click Next.
- On the Select a Process Template page, leave the default process template selected and click Next.
- On the Specify Source Control Settings page, select Create an empty source control folder and click Next.
- On the Confirm Team Project Settings page, click Finish to start creating the project.
Once creation is complete, the Team Project Created page is displayed. - Click Close.
3. Set up version control for the project
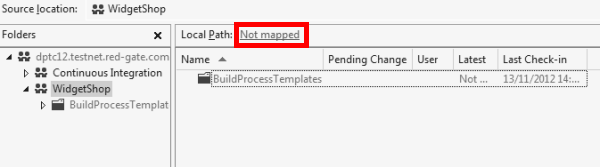
- In Visual Studio, open Source Control Explorer and select WidgetShop.
- Click Not mapped to create a workspace mapping:
The Map window is displayed. - Select a local folder to map the $/WidgetShop root to, for example D:\tfs\WidgetShop:
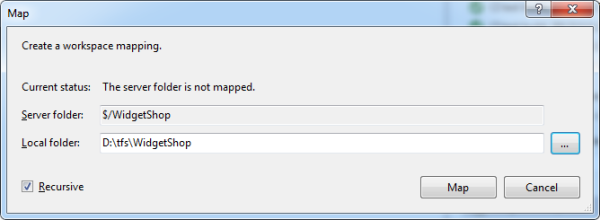
- Click Map. The following message is displayed:
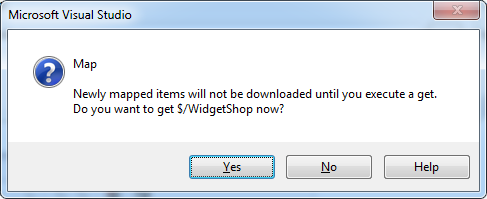
- Click Yes to check out the contents of the WidgetShop project to your local folder.
- Open the local folder you mapped the version control location to, and copy the downloaded WidgetShop folder to it (extracted from the downloaded WidgetDevelopmentDatabaseCIDemo.zip you installed at the start).
This folder contains the database scripts folder that's been created for you using SQL Source Control (WidgetShop > Database > ScriptsFolder). You'll create the DLM Automation project file in this folder later.
- In Visual Studio, use the Source Control Explorer to add the files you've just copied to version control. To do this, right-click on WidgetShop and select Add Items to Folder.
- On the Add to Source Control dialog, select every item, and click Next.
- Select every item on the Items to add and click Finish.
The added folders are listed in Source Control Explorer. - Right-click on WidgetShop and select Check In Pending Changes.
- In Team Explorer, click Check In:
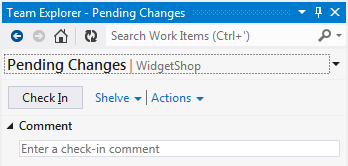
The files you need are now in TFS version control and using SQL Source Control.
If your TFS build agent is on a different machine, you'll need to install DLM Automation on that machine.
4. Create databases
Create two databases:
the WidgetDevelopment database that you'll use for shared development in this tutorial.
a blank database called WidgetCI. Once you've configured the sync step, WidgetCI will be updated automatically every time a change is made to the WidgetDevelopment database.
Create the development database:
Open SQL Server Management Studio (SSMS).
From the File menu, select Open > File.
Browse to the WidgetDevelopment.sql file (extracted from the WidgetDevelopmentDatabaseCIDemo folder) and click Open.
Click Execute to create the WidgetDevelopment database.
Create the WidgetCI database on a local server:
In SSMS, click New Query.
Execute the following SQL query to create the WidgetCI database:
CREATE DATABASE WidgetCI
GO
USE WidgetCI
GO
ALTER DATABASE WidgetCI SET TRUSTWORTHY ON
5. Link the development database to version control
Use SQL Source Control to link the WidgetDevelopment database to TFS version control. We're using the dedicated developer model, so each developer has their own copy of the database. For more information, see Database development models.
- In SSMS Object Explorer, right-click on the WidgetDevelopment database and select Link database to source control.
- On the Link to source control page under Source control system, select Team Foundation Server (TFS).
- Enter the server URL, for example: http://mytfsserver/tfs
- In the database folder text box, browse to the scripts folder located at WidgetShop > WidgetShop > Database > ScriptsFolder
- Under Development model, select Dedicated database.
- Click Link.
- Once the link to source control has been confirmed, click OK.
- Click the Commit changes tab. We want to check in every object in the list, so select the check box at the top of the list:
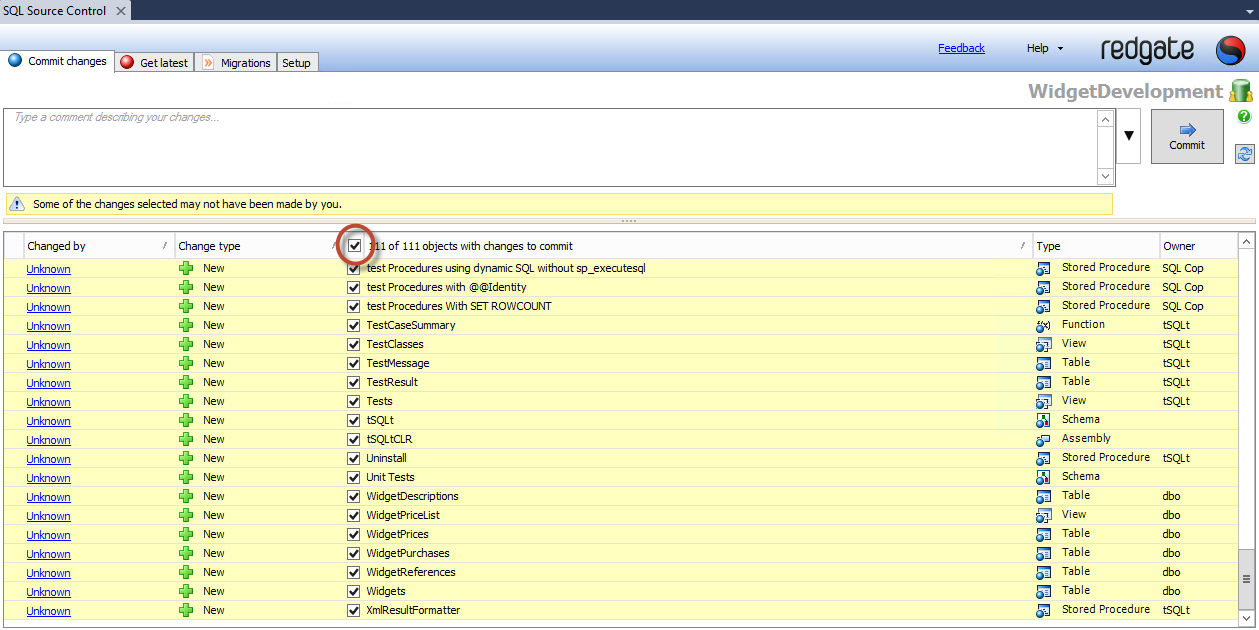
- Enter a comment to describe the changes you're about to check in, for example, new database files added.
- Click the Commit button. After a few seconds, a message confirms that changes are committed.
6. Set up the build in Visual Studio
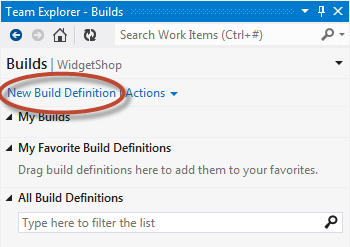
- In Team Explorer, click
 Home and then click Builds.
 - Click New Build Definition:
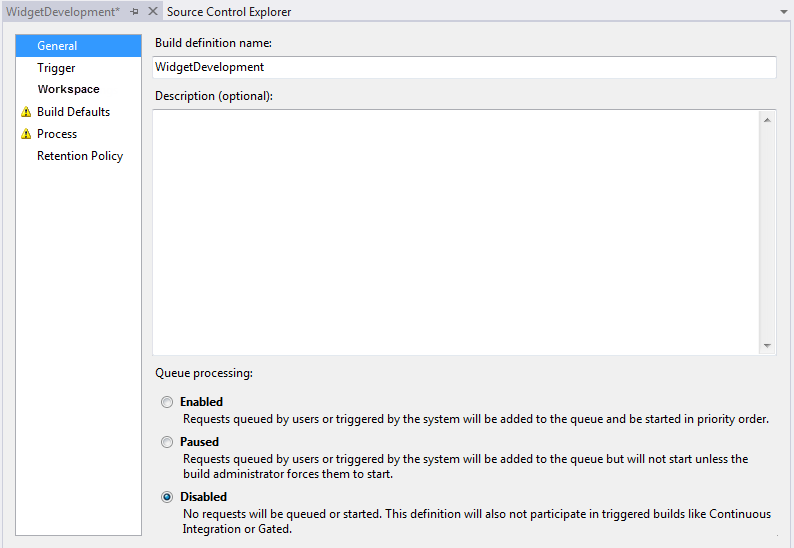
- On the General tab:
- in the Build definition name text box, type WidgetDevelopment.
under Queue processing, select Disabled. We'll enable this once configuration is complete.
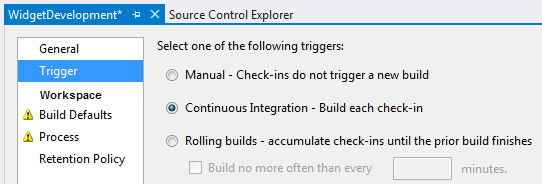
- Click Trigger and select Continuous Integration:
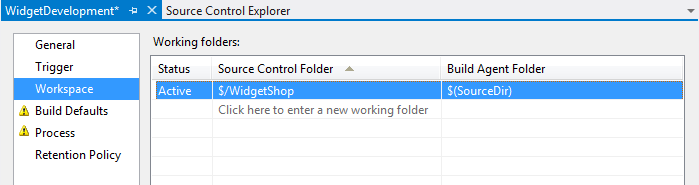
- Click Workspace. Make sure the $/WidgetShop source control folder is displayed. If it isn't:
- Click in the Source Control Folder field, and then browse to and select the WidgetShop folder.
- Click OK.
Click Build Defaults. Under Staging location, select Copy build output to the following drop folder and enter the shared location that you want to use as your drop folder.

Click Process. You need to configure a number of build process parameters on this page.
Under 1. Required > Items to Build > Projects to Build, click the browse button. Click Add and select DLMAutomation.proj, then click OK on each of the two dialogs.
If you can't see the project file, select MSBuild Project files (*.*proj) from the Items of type drop-down list.- Under 2. Basic > Build Number Format, replace the default format with 1.0$(Rev:.r)
This means your builds will be numbered 1.0.1, 1.0.2, 1.0.3, and so on. The second '.' is added automatically before the final digit, because it's defined in (Rev:.r). - Under 3. Advanced > Agent Settings, click the
 expand arrow. Click Name Filter and select the TFS server name from the drop-down list, for example, dptc12 - Agent1.
 Scroll down to the 3. Advanced properties list and click MSBuild Platform. Select X86 from the drop-down list.

- Press Ctrl+S to save the build definition.
Under Default Template near the top of the page, click Show details. The build process XAML file and version control path are displayed:
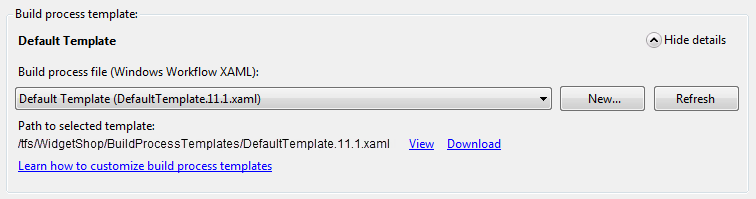
You need to configure the XAML file so that TFS passes the build number and binaries directory as variables. To do this, complete the instructions in Passing TFS Build properties to MSBuild using TFS 2010 or later.
The build definition is now set up.
7. Configure the properties files
Properties files contain commands that configure your TFS build steps. The properties files are:
- DLMAutomation.global.properties
- DLMAutomation.build.properties
- DLMAutomation.test.properties
- DLMAutomation.sync.properties
- DLMAutomation.publish.properties
In this example, we're going to configure the global and build properties files.
Configure the global properties file
Global commands are required by every TFS build step. You can use most of the default option settings.
In Visual Studio, go to Source Control Explorer and open $\WidgetShop\dlmAutomation-steps\DLMAutomation.global.properties.
Set WidgetPackage as the package ID. For example,
<packageId>WidgetPackage</packageId>
This is the name of the package you're going to create.At the licenseSerialKey option, enter your DLM Automation license key if you have one. For example,
<licenseSerialKey>123-456-789012-ABCD</licenseSerialKey>
If the license has been activated on this machine already, the key is displayed. If you don't have a serial number, leave this option blank and a 28 day free trial will start automatically.- Press Ctrl+S to save the file.
Configure the build properties file
Build commands create and validate the SQL creation script used to generate the NuGet package. For more information, see Build step command options.
If you're using Redgate's DLM Dashboard (version 1.4.4.313 or later), you can send information to it about the packages DLM Automation builds. Once the packages are deployed, they're displayed on the dashboard as recognized schema. For more information, see DLM Automation integration (DLM Dashboard documentation).
- Open $\WidgetShop\dlmAutomation-steps\DLMAutomation.build.properties.
- At the scriptsFolder option enter the path to the database scripts folder in source control relative to the project file. For example:
<scriptsFolder>.\WidgetShop\Database\ScriptsFolder</scriptsFolder> - If you're using DLM Dashboard:
at the dlmDashboardHost option enter the name or IP address of the machine hosting DLM Dashboard. For example:
<dlmDashboardHost>localhost</dlmDashboard>at the dlmDashboardPort option, enter the port number. Ignore this if you're running the DLM Dashboard on default port 19528.
If you want to include SQL Doc database documentation in the NuGet package, at the includeDocs option, change the value from False to True so that it looks like this:
<includeDocs>True</includeDocs>Including database documentation will increase the size of the NuGet package and the time it takes to build, particularly for large databases.
The documentation is stored in db > docs > main.html in the NuGet package. If you're using DLM Dashboard version 1.6.3 or later and have set up DLM Dashboard integration, you can also view the documentation directly from DLM Dashboard. See DLM Automation integration (DLM Dashboard documentation). For help understanding SQL Doc documentation, see What's in the documentation?
Press Ctrl+S to save the file.
In this example, the temporaryDatabaseServer option will use LocalDB by default. If you didn't install LocalDB on the build agent or you want to use a different temporary server, you'd need to specify it here. If you want to run full-text queries against your tables, you'll need to use a different temporary server because LocalDB doesn't support Full-Text Search. For example:
<temporaryDatabaseServer>\SqlServer2012</temporaryDatabaseServer>.
You'll also need to enter a username and password for the database.
In Source Control Explorer, select the edited property files, right-click and select Check in Pending Changes.
Configure the test properties file
If you want to publish test results in MSTest format, you'll need to have Visual Studio Premium, Ultimate or Test Pro installed on the machine running your build agent.
Test commands generate test data using SQL Data Generator and run tSQLt tests (such as static analysis, unit or integration tests) against a temporary version of your database. You'll use the WidgetTestData.sqlgen file extracted from the downloaded WidgetDevelopmentDatabaseCIDemo.zip file. For more information, see Test step command line options.
The database schema for WidgetShopDevelopment includes four basic SQL Cop tests that will check for:
- procedures named SP_
- procedures using dynamic SQL without sp_executesql
- procedures with @@Identity
- procedures with SET ROWCOUNT
To configure the file:
- Open $\WidgetShop\dlmAutomation-steps\DLMAutomation.test.properties.
- Set the disabled option to False. For example,
<disabled>False</disabled> - Set the generateTestData option to True. For example,
<generateTestData>True</generateTestData> At the dataGeneratorProjectFile option, enter the path to the SQL Data Generator file in source control relative to the project file. For example,
<dataGeneratorProjectFile>.\WidgetShop\Database\WidgetTestData.sqlgen</dataGeneratorProjectFile>
This will populate the temporary database with test data from the file. For more information about SQL Data Generator, see SQL Data Generator 3 documentation.- Press Ctrl+S to save the file.
Again, the temporaryDatabaseServer option will use LocalDB by default. If you didn't install LocalDB on the build agent or you want to use a different temporary server, you need to specify it here.
Test results are output in JUnit XML format and saved in the drop folder you specified when setting up your build definition.
In Source Control Explorer, select the edited property files, right-click and select Check in Pending Changes.
Configure the sync properties file
Properties files contain commands that configure your TFS build steps. You've already configured the global and build properties files earlier (see Set up the build in Visual Studio).
Sync commands update another database (in this example, the WidgetShopCI database) with the latest version in source control. For more information, see Using the sync command.
In Visual Studio, go to Source Control Explorer and open $\WidgetShop\dlmAutomation-steps\DLMAutomation.sync.properties.
- Set the disabled option to False. For example,
<disabled>False</disabled> - At the databaseServer option, enter the name of the target database server you want to update. This is the server on which you created the WidgetShopCI database earlier. For example,
<databaseServer>StagingServerName</databaseServer> - At the databaseName option, enter the name of the target database you want to update. For example,
<databaseName>WidgetShopCI</databaseName> - At the databaseUserName option, enter your username for SQL authentication.
- At the databasePassword option, enter your password for SQL authentication.
- Press Ctrl+S to save the file.
- In Source Control Explorer, select the edited property files, right-click and select Check in Pending Changes.
Configure the publish properties file
Properties files contain commands that configure your TFS build steps. You've already configured the global and build properties files in the earlier (see Set up the build in Visual Studio).
In Visual Studio, go to Source Control Explorer and open $\WidgetShop\dlmAutomation-steps\DLMAutomation.publish.properties.
- Set the disabled option to False. For example,
<disabled>False</disabled> At the nugetFeedUrl option, enter the fully-qualified URL for your NuGet feed.
If you're using a private NuGet feed, you'll need to specify the nugetFeedApiKey option. For example,
<nugetFeedApiKey>DO8XW4CI7UIROVCFG4TYTC2DXM8</nugetFeedApiKey>If you're using a public NuGet feed, the API key isn't required.In Source Control Explorer, select the edited property file, right-click and select Check in Pending Changes.
Trigger a build
Make a change to the WidgetDevelopment database in SSMS, and use SQL Source Control to commit the change.
A build will start automatically:
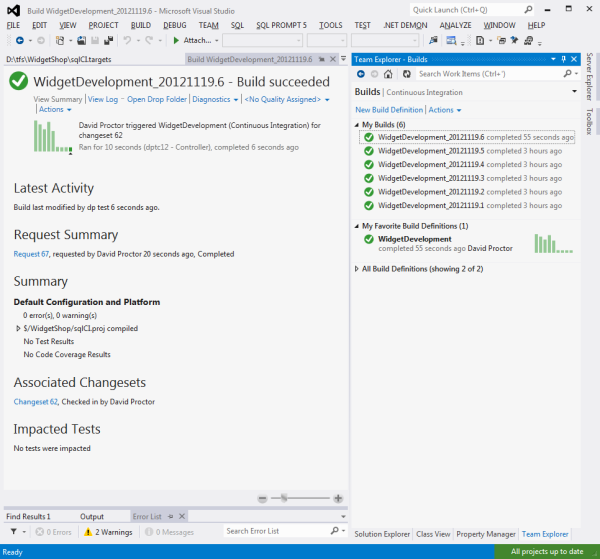
Once the test step is complete, click Open Drop Folder. The NuGet package, test reports file and logs are displayed: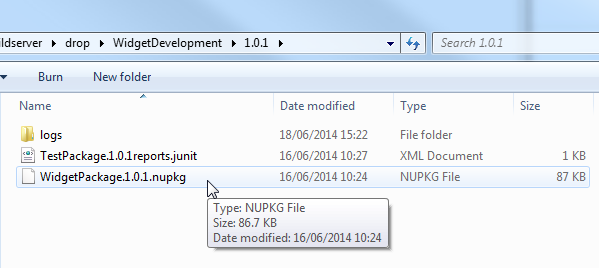
Once the publish step is complete, the package is available on your NuGet feed.
Release management
Now you can deploy your database from the NuGet package to Octopus Deploy using SQL Release.
The easiest way to do this is using DLM Automation step templates.
1. Copy the DLM Automation step templates to your Octopus Deploy library
Once you've copied the DLM Automation step templates to your Octopus Deploy library, they're available whenever you add a process step in an Octopus Deploy project:
- Go to the DLM Automation step templates on the Octopus Deploy library website.
- In this example, we'll use the "Redgate - Create Database Release" and "Redgate - Deploy from Database Release" step templates.
Click on the "Redgate - Create Database Release" template. - Click Copy to clipboard:

You're now ready to paste the script from your clipboard into your Octopus Deploy library:
- In Octopus Deploy, at the top of the page, click Library.
- On the Step templates tab, click Import.
- In the Import window, paste the copied template into the empty field.
- Click Import.
- Click Save.
- Repeat steps 1 to 5 to copy the "Redgate - Deploy from Database Release" step template in the same way.
2. Create an Octopus Deploy project
- In Octopus Deploy, click Projects and All.
- Click Add project.
- In the Name field, enter Widget Deployment.
- Click Save.
You'll now add a series of deployment process steps to your Octopus Deploy project.
3. Add the "Download and extract database package" step
This step picks up the NuGet package of the database schema you're going to deploy.
- Set up your NuGet package feed by doing one of the following:
- register your existing external NuGet package feed with Octopus. For more details, see Adding external package feeds.
- configure your build server to push packages to the Octopus built-in repository. For more details, see Using the built-in repository.
- In the Widget Deployment project, on the Process tab, click Add step and select Deploy a NuGet package.
- In the Step name field, enter Download and extract database package.
- In the Machine roles field, enter db-server and press Enter.
This must match the role you assigned to the Tentacle. - In the NuGet feed field, select either the name of the external feed you registered when you set up your NuGet feed, or the Octopus Server (built-in) repository.
- In the NuGet package ID field, enter the name of the package without the version number. For example, if the package was called WidgetShopLatest.0.1.nupkg, you'd only enter Widget.
When the package is generated, NuGet package manager automatically adds a number. If we included it here, Octopus would only deploy the package that matched that name and version number. By removing the number, we're telling Octopus to always look for the latest package with that name. - In the Environments field, select Production.
If you leave this blank, the step will be accessible to all environments. - Click Save.
4. Add the "Create database release" step
This step creates the database deployment resources, including the Update.sql script.
- On the project Process tab, click Add step and Redgate - Create Database Release.
- In the Machine roles field, enter db-server and press Enter.
This must match the role you assigned to the Tentacle. - In the Export path field, enter the path the database deployment resources will be exported to.
This path will later be used in the "Deploy from Database Release" step. It must be accessible to all tentacles used in database deployment steps. - In the Database package step field, select Download and extract database package.
- In the Target SQL Server instance field, enter the fully qualified SQL Server instance for the database you're deploying to.
- In the Target database name field, enter the name of the database you're deploying to.
- In the Username (optional) and Password (optional) fields, enter the SQL Server username and password used to connect to the target database.
If you leave these blank, Windows authentication will be used to connect to the target database. - In the Environments field, select Production.
If you leave this blank, the step will be accessible to all environments. - Click Save.
5. Add the "Review database deployment resources" step
This step pauses deployment to let you review the database deployment resources, including the Changes.html report, before allowing deployment to go ahead.
- On the project Process tab, click Add step and select Manual intervention required.
- In the Step name field, enter Review database deployment resources.
In the Instructions field, copy and paste this text:
Please review the schema and static data changes, warnings and SQL change script in 'Changes.html'.
In the Environments field, select Production.
If you leave this blank, the step will be accessible to all environments.Click Save.
6. Add the "Deploy from database release" step
This step uses the database deployment resources to deploy the database changes.
- On the project Process tab, click Add step and select Redgate - Deploy from Database Release.
- In the Machine roles field, enter db-server and press Enter.
This must match the role you assigned to the Tentacle. - In the Export path field, enter the path the database deployment resources will be exported to.
This must match the export path you entered in 4. Add the 'Create database release' step. - In the Database package step field, select Download and extract database package.
- In the Target SQL Server instance field, enter the fully qualified SQL Server instance for the database you're deploying to.
- In the Target database name field, enter the name of the database you're deploying to.
- In the Username (optional) and Password (optional) fields, enter the SQL Server username and password used to connect to the target database.
If you leave these blank, Windows authentication will be used to connect to the target database. - In the Environments field, select Production.
If you leave this blank, the step will be accessible to all environments. - Click Save.
You've finished setting up the project steps. The Process tab should look like this: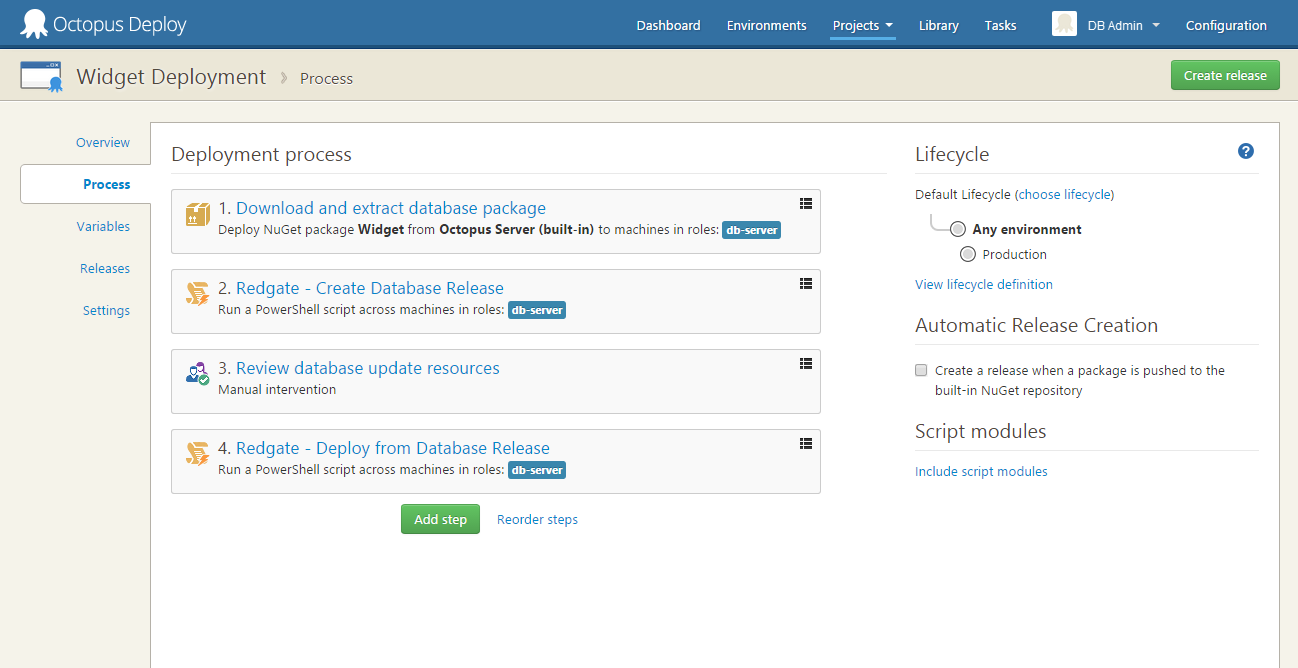
7. Create a release
Now all the steps are set up, you can run your deployment process to create a release:
- Create a blank database called WidgetProduction:
- Open SQL Server Management Studio (SSMS).
- Click New Query.
Execute the following SQL query to create a database:
CREATE DATABASE WidgetProduction
GO
USE WidgetProduction
GO
- In the Widget Deployment project, on the Process tab, click Create release.
This page lets you add an optional release note. - Click Save.
- Click Deploy to Production (or if there's more than one environment, click Deploy and select Production).
- Click Deploy Now.
As the deployment process runs, Octopus Deploy shows the task progress list. The deployment pauses so you can review the database deployment resources: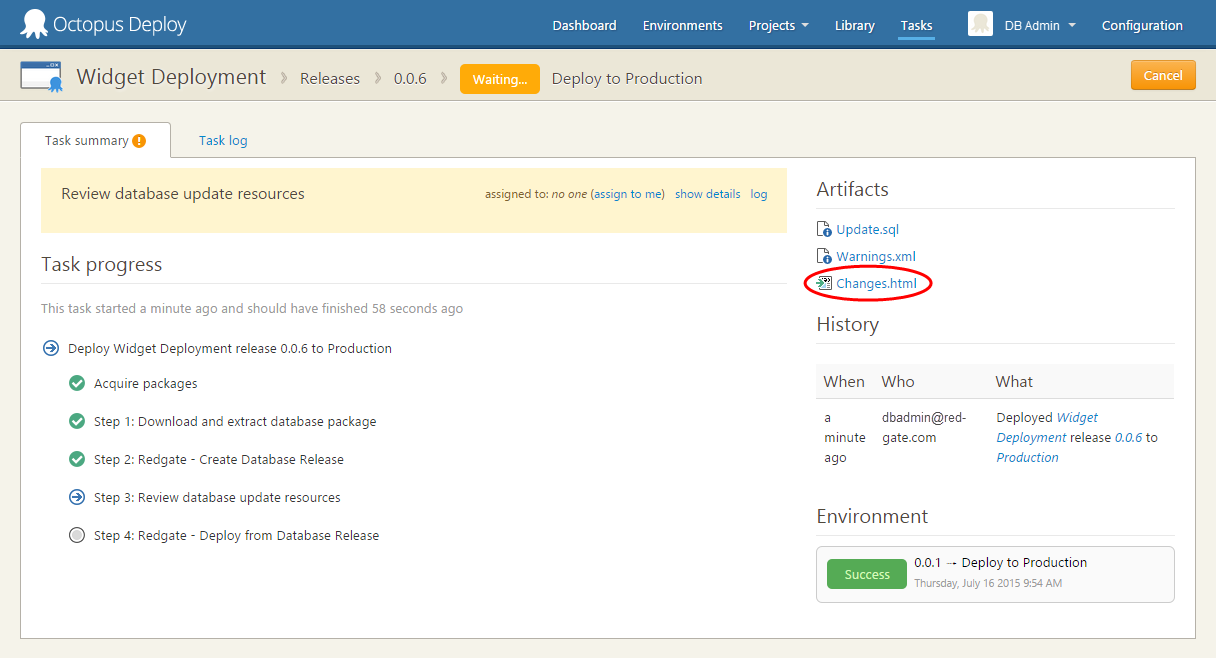
- Click Changes.html to download the Change report.
Use the report to review the update script, warnings, and details of what'll be added, removed or modified if you go ahead with deployment. - In Octopus Deploy, click assign to me and, in Notes, enter a comment to say you've reviewed the database deployment resources.
- If you're happy with the report, click Proceed.
When the deployment is complete, the Task progress page looks like this: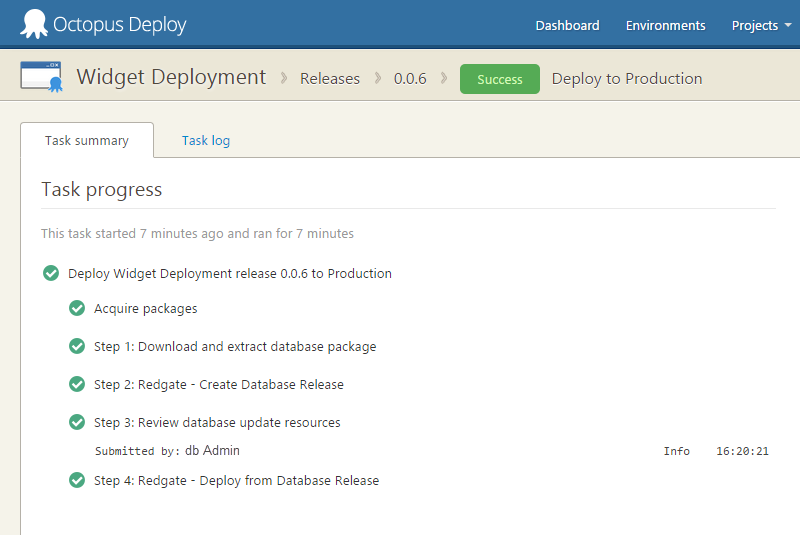
You've now completed the deployment of the database package.
What now?
Other DLM Automation step templates are available on the Octopus Deploy Library website:
- "Redgate - Deploy from Database" deploys the schema of a source database to a target database without a review step.
- "Redgate - Deploy from Package" deploys a NuGet package containing a database schema to a target database without a review step.
For more information, see Octopus Deploy step templates reference.
This documentation contains proprietary information and is protected by copyright law.
Copyright © 2026 Red Gate Software Limited. All rights reserved


