Worked example - restoring from a backup file
Published 05 June 2013
This worked example demonstrates a table-level restore from a backup file. You can also restore specific rows.
In the example, the Magic Widget Company has a SQL Server database running on a test web server. The Magic Widget Company's test team has been testing the new version of the web site.
One of the software testers has updated the Contacts table, intending to update one email address. They did not specify a WHERE clause, and consequently have updated the entire table. During the day some other rows in the Contacts table have been modified. The database administrator has been asked to restore the data from a backup and apply some but not all of the changes that were made to the test server.
You can follow the example on your own system, if you are using the SQL Data Compare Professional edition. You will need access to a SQL Server to do this.
We recommended you follow the Deploying data in two databases worked example before starting this worked example.
This example has four steps:
- Set up the databases
Create the example databases on your SQL Server. - Set up the comparison
Create the example databases, and specify the data sources you want to compare. - Select rows to restore
Review the results and select the rows you want to restore. - Deploy the data sources
Create and run a deployment script.
1. Set up the databases
The worked example uses the following data sources:
- WidgetDev is the development database
- WidgetTest is the testing database
- WidgetLive is the production database
- BeforeEmailUpdate.bak is the backup file
To create the databases on your SQL Server:
- Click here to download the SQL creation script for the databases.
Copy the script, paste it in your SQL editor application, and run it.
If databases named WidgetDev, WidgetTest or WidgetLive already exist on your SQL Server, the script will overwrite them.
The databases are created and populated with data.
To create the backup file, run the following command:
BACKUP DATABASE WidgetLive
TO DISK = 'c:\BeforeEmailUpdate.bak'
WITH INIT,
NAME='BeforeEmailUpdate'
The backup is created at the root of the C drive on the computer running the instance of SQL Server you are connected to.
2. Set up the comparison
To improve performance, and make the comparison results easier to interpret, in this example we will compare only a single column in a single table. To do this, we will specify the data sources, then the table, then the column. No other values are included in the comparison.
Specify data sources
- Start SQL Data Compare if it is not already running.
The Project Configuration dialog box is displayed showing your most recent project.
You can edit the current project, or create a new project.
If you want to create a new project, click Cancel to close the dialog box, and on the toolbar click (New Project).
If you have any existing projects, and the Projects dialog box is displayed instead, click New Project. - On the Project Configuration dialog box, under Source, select Backup:
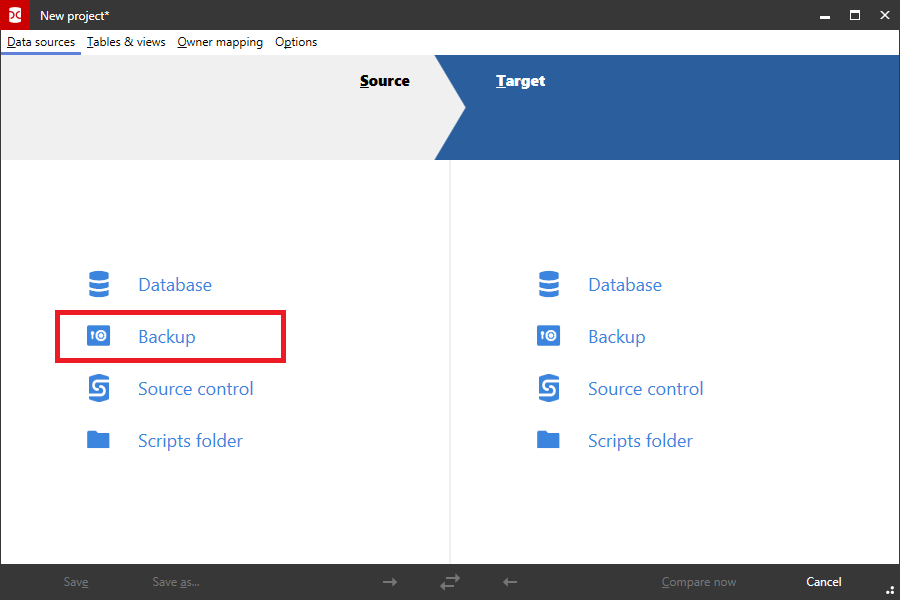
- Click Add Backup Set Files to specify the backup.
The Add Backup set Files dialog box is displayed. - Select the file BeforeEmailUpdate.bak, and click Open.
The BeforeEmailUpdate backup set is displayed in the list of backup sets. - Under Target, select Database.
- In the Server box, type or select the name of the SQL Server where you created the sample databases.
- Type or select WidgetTest in the Database box.
If the database is not displayed in the Database list, right-click the Database box and click Refresh, or scroll to the top of the list and click Refresh. - On the Options tab, click Red Gate Defaults, to ensure the default options are being used.
- Click the Tables & Views tab:
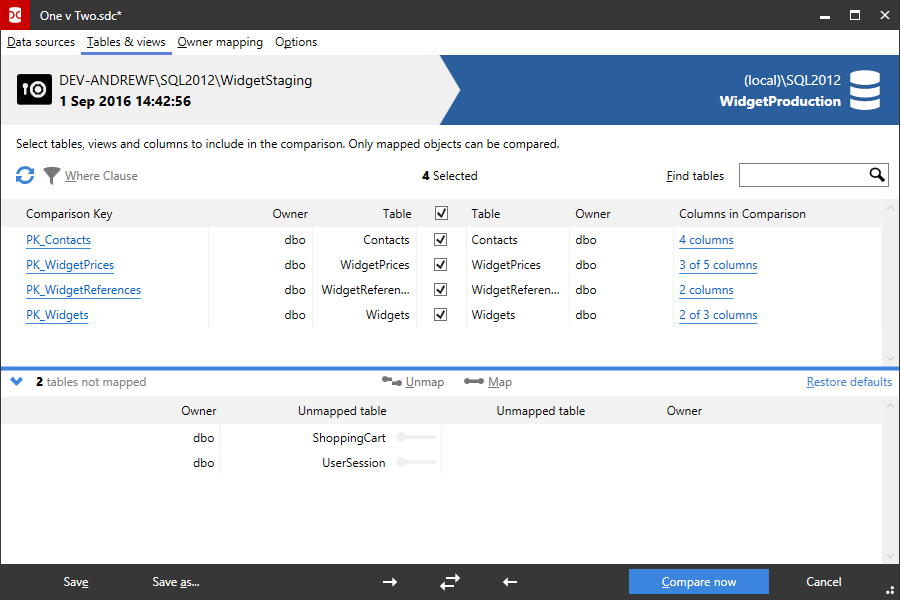
The Tables & Views tab enables you to select the tables you want to compare and which columns you want to compare.
By selecting only the tables that you want to compare, you will improve the performance of SQL Data Compare, as it does not need to read the entire backup file. This is useful for large backup files.Note that if you are using a backup as a data source, you cannot compare views. - Clear all the check boxes and then select only the check box for the Contacts table.
- Click in the Columns in Comparison box for the Contacts table, and on the dialog box, clear the check boxes for all columns except Email, then click Close.
Alternatively, you can right click, click Select None, then select the check box for the Email column.
- Click Compare Now.
SQL Data Compare displays a message dialog box that shows the progress of the comparison. If you select the Close dialog box on completion check box, SQL Data Compare closes this message dialog box automatically the next time that you run a comparison on a project. For this example, leave the setting as it is, and click OK to close the message box.
3. Select rows to restore
The results of the comparison are displayed in the upper (Results) pane:
To view the comparison results, click  or click the object group bar:

The upper pane also shows how many rows of each type exist. There are 0 rows that exist in the backup but not in the WidgetTest database, 1 row that exists in both the backup and the WidgetTest database but have different values, and 2 rows that exist in the WidgetTest database but not in the backup.
In the upper pane, click Contacts to display detailed information about the rows.
ID is the comparison key  . Email values that are different are displayed with a dark shaded background; Email values that do not exist in one data source but do exist in the other are displayed with a shaded, patterned background.
If you scroll through the rows, you can see that all the Email values have been set to Matt.Mitchell@example.com except for the two rows that do not exist in the WidgetTest database and the two rows that do not exist in the backup.
As restoring all rows would over-write those that exist only in the target, we must exclude these rows from the deployment.
In the upper pane, clear the Target Only check box:

To restore specific rows, you can use the Include check boxes in the lower (Row Differences) pane to select the rows you want to deploy. Alternatively, you can filter the comparison with a WHERE clause.
In this example, we will deploy the remaining 100 rows.
Click Deploy.
4. Deploy the databases
On the first page of the deployment Wizard you can choose to create and save a deployment script, or perform the deployment using SQL Data Compare. In this example, we will deploy using SQL Data Compare, and perform a backup before deployment.
Choose deployment method

- Ensure that deploy using SQL Data Compare is selected.
- Ensure that Back up target before deployment is selected.
- Ensure that Save a copy of the deployment script is selected.
- Click Next
Configure backup

- In the Back up using check box, select Native SQL Server
If you have installed SQL Backup on the SQL Server, you can select Red Gate SQL Backup instead.
For more information, see Backing up before deployment - In the Backup folder box, specify the backup location, and in the box on the right hand side, type a file name, for example WidgetTestBackup.
- Click Next
Review
There are three tabs on the Review page:
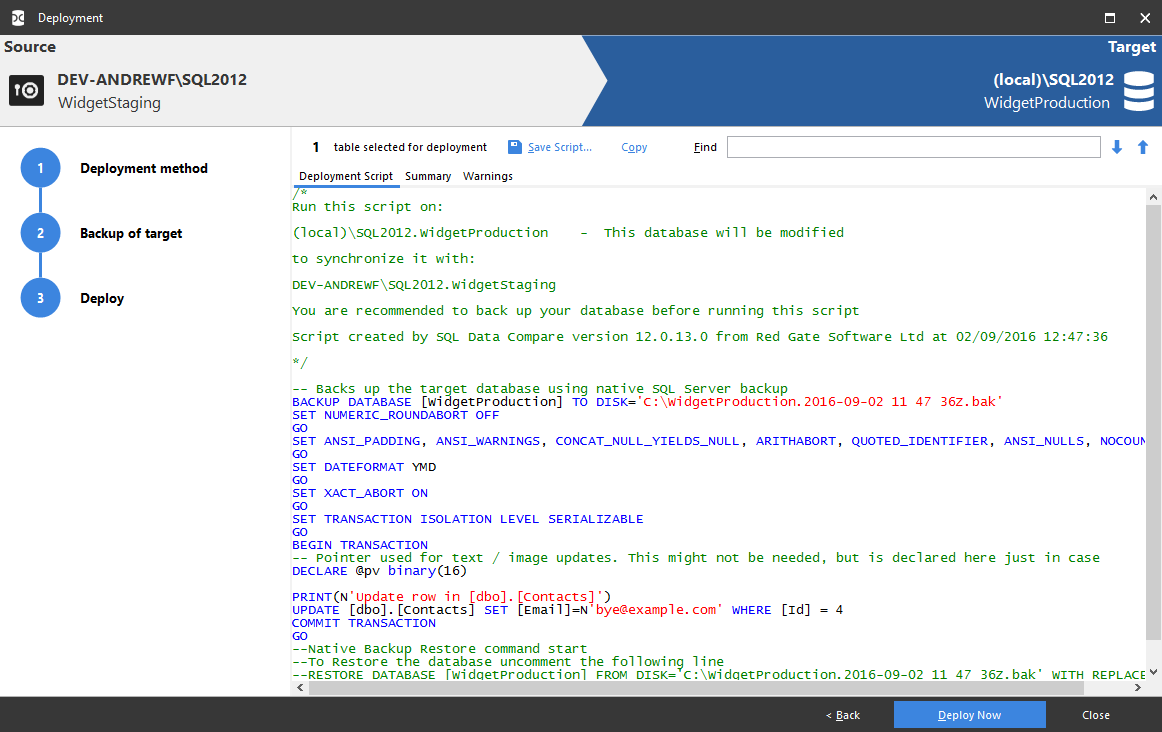
- Deployment script shows the script to deploy the data sources.
You can search the script, save it, or copy it to the clipboard. - Summary shows a synopsis of the actions in the deployment script.
You can view the summary grouped by the objects affected, by the type of modification, or by the order in which the script modifies the target. - Warnings shows a list of any warnings about unexpected behavior that may occur when you deploy the databases.
For more information, see: Deployment warnings.
You can choose to run the SQL script from within SQL Data Compare, launch your SQL editor so that you can modify the script, or save the SQL script without deploying the databases.
In this example, we will choose to run the script, then compare the databases again to check the results, and save a copy of the deployment SQL script (the default)
- Click Deploy Now to run the deployment.
- A confirmation dialog box is displayed. Click Deploy Now to continue.
The backup is created, the deployment is performed, then the data sources are compared.
For this example, leave the setting as it is, and click OK to close the message box.
The comparison results show that the Email values for rows that existed in both the backup and the WidgetTest database have been deployed:


