Worked example: documenting two databases
Published 05 February 2013
This worked example demonstrates how to generate database documentation for objects in two SQL Server databases.
In this example, the Magic Widget Company runs a SQL Server instance to support their website and company activities. This instance contains two databases. The first database, WidgetProducts, contains the company's product information, and some customer information. It is primarily accessed by the company's intranet. The second database, WidgetCustomers, contains customers' credit card information, and access to this database is controlled. The Magic Widget Company's development team have been asked to document these databases.
You can follow the example on your own system. You will need access to a SQL Server to do this.
This example uses SQL Server 2012. If you're using a different version of SQL Server, you can follow the example, but you'll see slightly different results.
The example has six sections:
1. Set up the databases
To create the WidgetProducts and WidgetCustomers example databases on your SQL Server:
- If they already exist, delete the databases WidgetProducts and WidgetCustomers from your SQL Server.
- Download the SQL creation script for the databases.
- Copy the script, paste it into your SQL editor application, and then run it.
The databases and their schemas are created.
2. Set up the documentation project
To connect to the SQL Server and start a new project:
- Start SQL Doc if it is not already running.
- Click
 New Project to open the Connect to SQL Server dialog box.
 - Specify connection details for the SQL Server instance you created the example databases on.
- Click OK.
SQL Doc displays a list of databases for the SQL Server instance in the left-hand pane. System databases and user databases are in separate groups. At the top of the list, Cover page contains settings for the cover page text and logo, and for the header and footer that will be applied to the generated documentation.
To set up the documentation project:
In the left-hand pane, select Cover page.
- In the right-hand pane, in the Header text box, type Example project, then click
 to save your changes.
This text is included on the header of each page of the generated documentation. - In the Project title box, type Widgets, then click to save your changes.
- Beneath the Project logo box, click Choose File, and browse for an image file to add to the cover page.
- In the Project description box, type Example project, then click to save your changes.
The project title, project logo, and project description are included on the cover page of the generated documentation. - In the Author box, type your name, then click to save your changes. Leave the Copyright text and Created boxes with their default values.
These details are included on the footer of each page of the generated documentation.
Your cover page should now look something like this: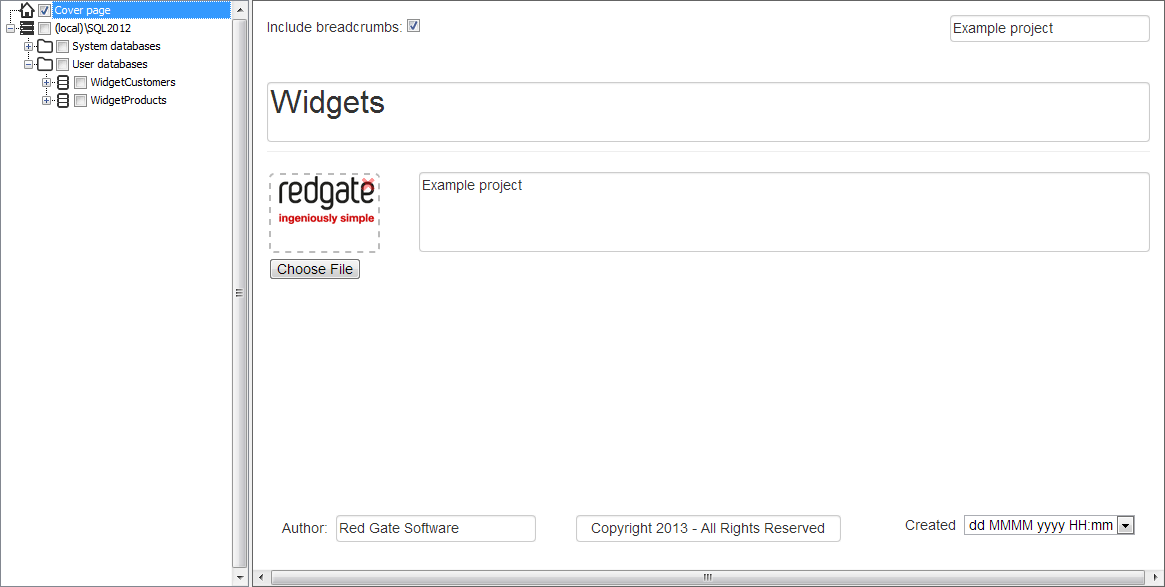
3. View database objects and edit object descriptions
To view the objects in the WidgetProducts database, click  to expand the database. SQL Doc displays a progress bar while it collects information from the database and analyses its structure.

To see a list of objects of a particular type, click the object type.
For example, click Tables:
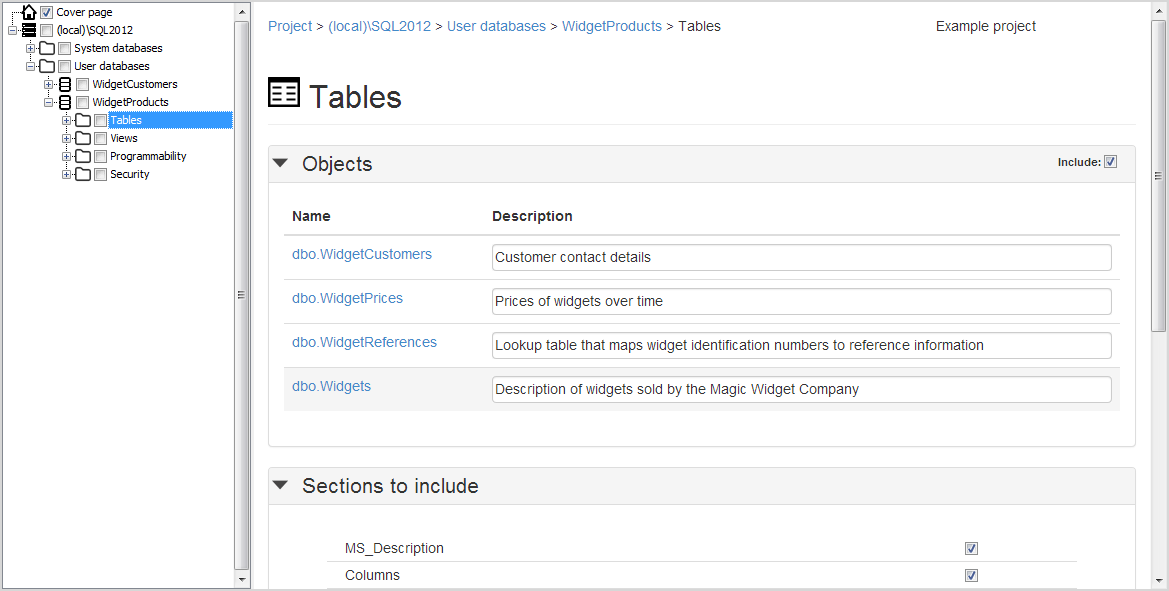
- the right-hand pane shows a preview of the documentation that will be generated for your selection (tables in the WidgetProducts database)
- the four tables in the WidgetProducts database are shown under the Objects heading, with their descriptions.
- the description text is taken from the MS_Description extended property stored in the database. You can edit object descriptions directly in SQL Doc, and your changes are applied to the database. Editing an object description is explained in more detail below.
- the items listed under the "Sections to include" heading are useful if you need to customize the documentation. Customization is explained in section 4 of this worked example.
To see the documentation preview for a specific object, click to display individual objects, then click the object's name. SQL Doc displays a preview of the documentation for the object you select.
For example, click WidgetCustomers:
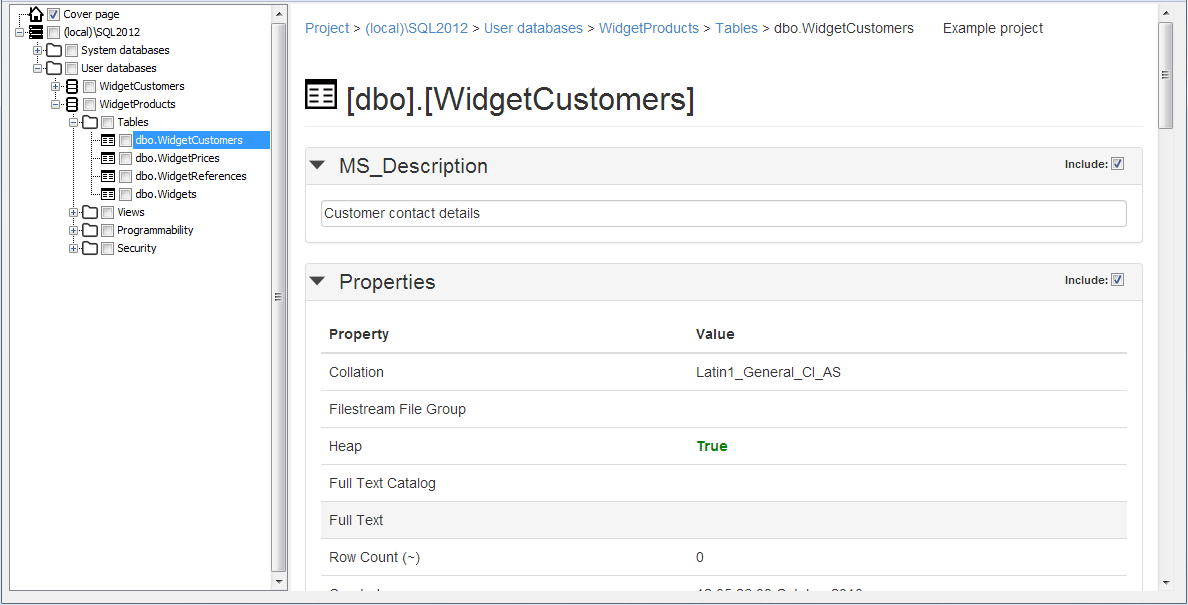
- the documentation preview shows individual sections for different types of table data, including the table's description, column details, and index details.
- you can hide the details for a section by clicking the section heading
 ; to display the details, click the heading again
Hiding the details for a section doesn't exclude the section from the documentation. You can exclude a section by customizing the documentation as explained in section 4 of this worked example.
Find out more about what information is included in the documentation
Editing an object description
In the WidgetCustomers preview, the MS_Description section shows the extended property value from the database. You can edit this data without leaving SQL Doc.
When you edit MS_Description data, any changes you save are written directly to the SQL Server database.
To edit the description of the WidgetCustomers table:
- In the preview for the WidgetCustomers table, in the MS_Description section, click the text box.
- At the end of the description, type 2012.
- Click
 to save your change.
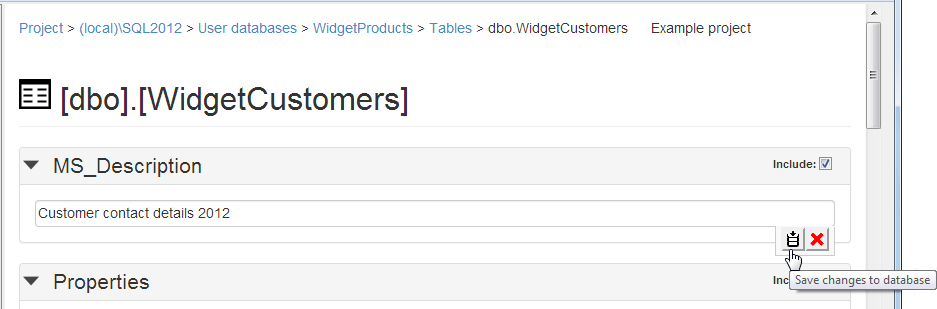
SQL Doc updates the MS_Description extended property in the WidgetProducts database.
MS_Description data is also shown in other parts of the documentation preview. Column names, index names, lists of objects, and database summaries all include editable description data.
4. Customize the documentation
The documentation preview for each object shows the individual sections and properties that will appear in the documentation. For example, the preview for the WidgetCustomers table comprises eight sections, each with its own heading: Description, Properties, Columns, Indexes, Permissions, SQL Script, Uses, and Used By. The Properties section contains eight properties.
You can customize the documentation by excluding specific sections and properties; to do this, you clear the Include check box for the relevant section headings and property values.
By excluding sections or properties from the documentation at different levels (for example, for individual objects, or for an entire database), you can fine-tune the documentation to suit your needs. Exclusions made at a higher level are inherited by child objects. For example, a section or property excluded at database level will also be excluded for all table objects in the database. You can break this inheritance for individual child objects by re-including any sections or properties that were excluded by a parent object.
For this example, you'll customize the documentation to:
- exclude dependency sections (Uses, and Used By) for all tables in the WidgetProducts database, except the WidgetPrices table
- exclude SQL Script sections for all objects in the WidgetCustomers database, except the sp_getcardforcustomer stored procedure
In the left-hand pane, click Tables.
At this stage, it doesn't matter whether you also select the Tables check box. You'll choose the databases and objects to document in section 5 of this worked example.
- In the documentation preview, scroll down to show the complete Sections to include table, then clear the Uses and Used By check boxes.
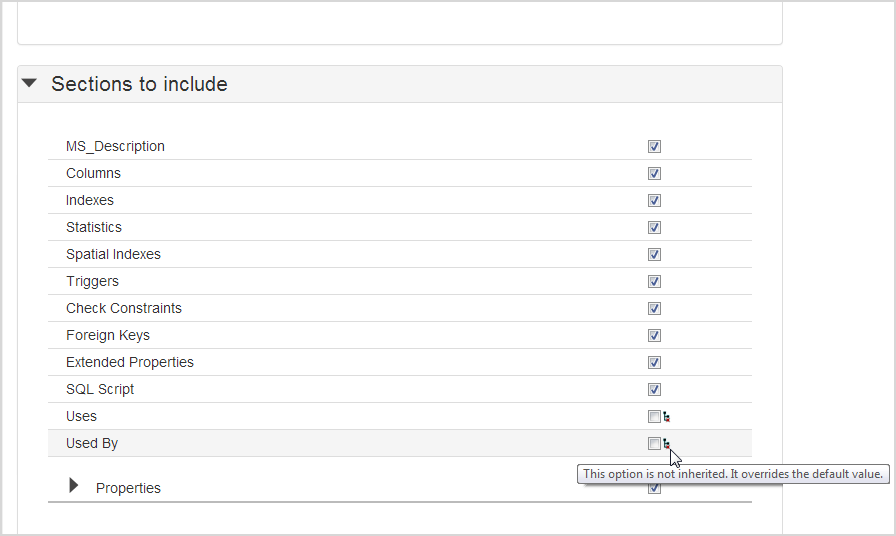
A "not inherited" icon is added to the Uses and Used By check boxes, showing that you have overridden the default value for the project. More information is provided by the icon's tooltip.
 - In the left-hand pane, click to display individual tables, then click WidgetPrices.
- In the documentation preview, scroll to the bottom of the page to show the Uses and Used By sections.
Both sections are dimmed, with cleared Include check boxes, showing that the customizations you made in step 2 above have been inherited by the WidgetPrices table.
However, for this example, we need to reinstate these sections in the documentation, for the WidgetPrices table only. - Select the Include check boxes in the Uses and Used By section headings.
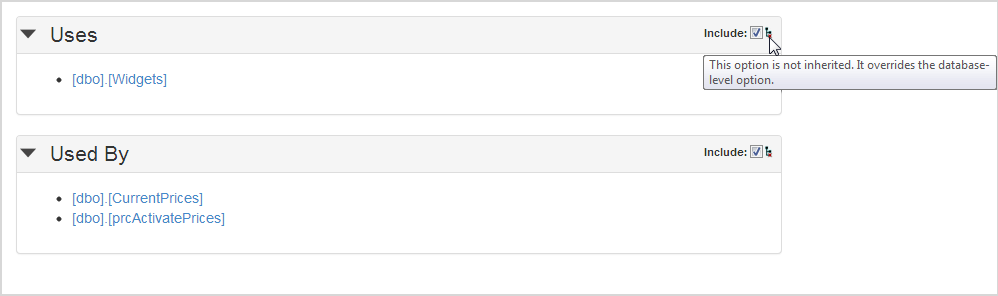
A "not inherited" icon is added to the Uses and Used By check boxes, showing that you have overridden the option for the database made in step 2. More information is provided by the icon's tooltip. - To complete this part of the worked example, you need to customize the documentation to exclude SQL Script sections for all objects in the WidgetCustomers database, except the sp_getcardforcustomer stored procedure. To do this:
- Select the WidgetCustomers database.
- In the Sections to Include table, clear the SQL Script check box.
- Select the sp_getcardforcustomer stored procedure inside the WidgetCustomers database.
- In the SQL Script section, select the Include check box.
5. Select the databases and objects to document
Having customized the sections that will appear in the documentation, you're ready to choose the objects to document. You do this by selecting the appropriate check boxes in the left-hand pane.
For this worked example, you'll include the following objects in the documentation:
- all the objects in the WidgetProducts database
- only the sp_getcardforcustomer and sp_getnamesforcard stored procedures in the WidgetCustomers database
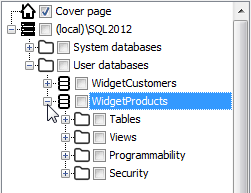
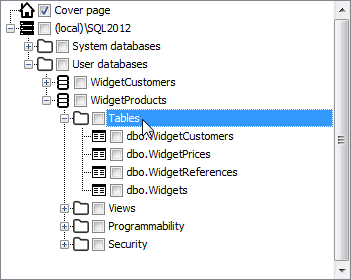
- In the left-hand pane, select the check box for the WidgetProducts database; all the objects in the database are also selected.
- Now select the check box for the WidgetCustomers database, then immediately clear the check box.
This ensures that no check boxes are currently selected for any object in the WidgetCustomers database. - If necessary, use the buttons to display the Stored Procedures in the WidgetCustomers database, then select the check boxes for sp_getcardforcustomer and sp_getnamesforcard.
- Ensure that the check box for Cover page is also selected.
This will create a front cover for the generated documentation, which includes the information you provided in section 2 of this worked example.
Your left-hand pane should now look like this: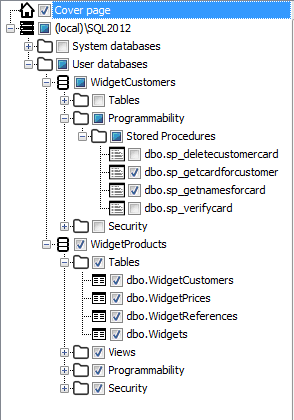
You can navigate the object tree in the left-hand pane using the arrow keys on your keyboard: up arrow to move up the list; right arrow to expand an object with a button; left arrow to collapse an object with a  button; down arrow to move down the list. To select an object or to clear a selection, press space.
6. Generate the documentation
The documentation project is now set up, and you can generate the documentation.
Click
 Generate Documentation.
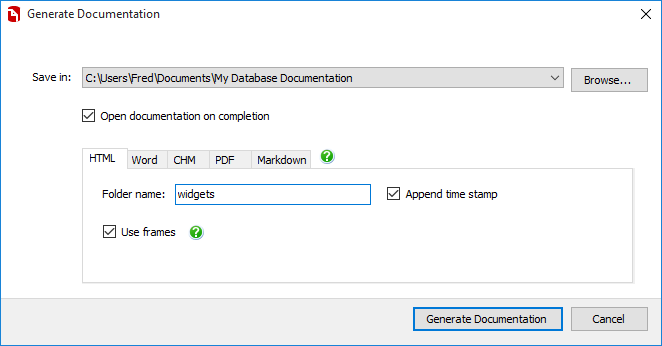
- On the Generate Documentation dialog box, in the Save in box, specify the location where you want SQL Doc to create the documentation.
- Select a documentation type by clicking the appropriate button. For this example, use the HTML documentation type.
- In the Folder name box, type Widgets.
- Select the Append time stamp and Use frames check boxes if they are not already selected.
- Click Generate Documentation to start generating the database documentation.
- Click OK to close the Generated Documentation message box.
SQL Doc opens a browser window, and displays the generated documentation. - Return to the SQL Doc application window, and click
 Save Project on the SQL Doc toolbar to save the project. The project configuration, customization, object-selection, and generation settings are stored so they are available next time you open the project.
Viewing the documentation
Return to the browser window to explore the documentation SQL Doc has generated:
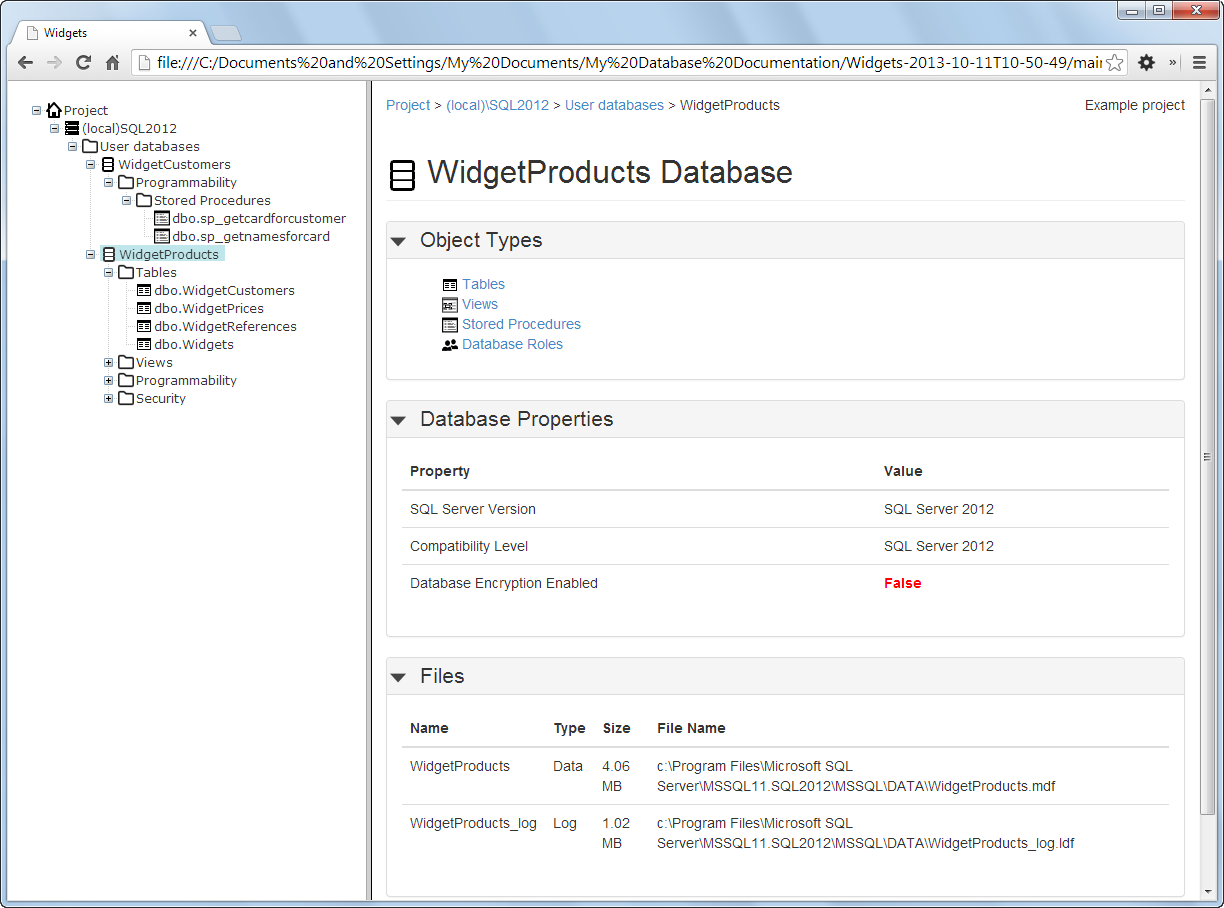
If JavaScript is not enabled by your web browser, you will not be able to use the navigation on the left of the window.
Find out more about what information is included in the documentation
This documentation contains proprietary information and is protected by copyright law.
Copyright © 2026 Red Gate Software Limited. All rights reserved


