SQL Monitor 10

What to try if you hit connection problems

SQL Monitor collects data from your monitored servers by using WMI and SQL. If you're having connection problems in SQL Monitor, you can investigate where the problem is by testing each connection type independently.

You need to run these tests on the SQL Monitor Base Monitor host machine.

Check the Monitoring Status and the SQL Monitor logs

Go to Configuration > Monitored Servers in the web interface:

Test the WMI Connection

If you're having connection problems in SQL Monitor, the first thing to do is to make sure that you can interrogate, via WMI, each of the machines which you wish to connect to and monitor. You can do this by hand, logging in to each machine remotely, using the credentials you provided to SQL Monitor. You can then try "remoting" to the machine in PowerShell to check that the transport for WMI that you’ve chosen (DCOM or WinRM) is working. However, it will be more efficient to test various aspects of the connection using PowerShell.

Testing WMI connections manually

You need to run these tests on the SQL Monitor Base Monitor host machine.

To test each data channel, you first need to open a command prompt as an administrator:

  1. Log in to the machine that's running the SQL Monitor Base Monitor service. For details about which machine is running the Base Monitor service, see the About page (Configuration > About).
  2. Run the command prompt as an administrator.
  3. At the command prompt, run: wbemtest
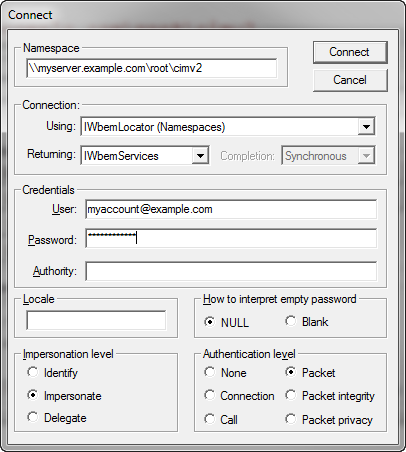
  4. In the Windows Management Instrumentation Tester dialog box, click Connect.
  5. In the Namespace box, type \\myserver.example.com\root\cimv2 where myserver.example.com is the name of the Windows server you are attempting to monitor.
  6. Under Credentials, enter the Windows account you are using to monitor the server and the password. This is the account listed under Credentials on the Monitored servers page in SQL Monitor (Configuration > Monitored servers).
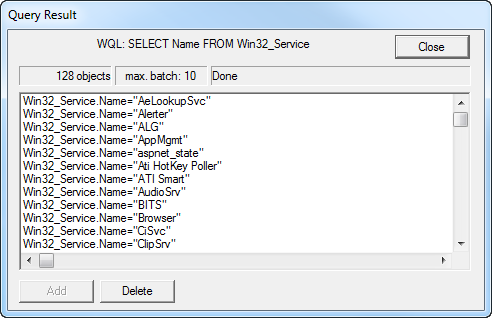
  7. Click Connect. Click Query and enter the following query:

    SELECT Name FROM Win32_Service

  8. Click Apply. You should see a list of results similar to those shown below:

  9. If connection fails and an "Access Denied" error message is displayed:
    1. Try further investigation of the problem using the PowerShell scripts supplied below in Testing WMI Connections using PowerShell.
    2. For general advice, see WMI Troubleshooting and WMI Isn't Working!

Testing WMI connections using PowerShell

The following PowerShell scripts will allow you to interrogate various aspects of the WMI connection, over DCOM or WMI. The first one in the list is especially useful as a starting point and should tell you the extent of the work you need to do. If you cannot get WMI to work at all, the first port of call is the article Connecting to WMI on a Remote Computer. 

This PowerShell script will test WMI over both DCOM and WinRM. If possible start by using a single account with full Administrative rights on each server to which the Base Monitor needs to connect. You’ll need to change the names in the list ‘Shadrach’, ‘Meshach’, ‘Abednego', ‘Daniel’ to the names of your servers! Note that these are the network names of the monitored machines, not the instances.

Assuming this works, then run the script again on the Base Monitor machine, using the account that the Base Monitor service will use to connect to each monitored machine. It will verify that the specified computer name is valid, that the computer is accessible to WMI over the network, and that a firewall exception for the WinRM service is enabled and allows access from the Base Monitor computer to the machine being monitored. 

Testing WMI connections

@('Shadrach','Meshach','Abednego','Daniel')|
  foreach {
  $Server=$_;
  $Errormessage=''
  if ((ping $Server) -like 'Ping request could not find host*'){$message="$server can't be found"} 
  else {$message="$server is there but cannot do WinRM or DCOM";
  try
  {$null=New-CimSession -ComputerName $server -SessionOption (New-CimSessionOption -Protocol Dcom) -ErrorAction Stop;$CanDoCOM=$true}
  Catch
  {$CanDoCOM=$false}
  try
  {$null=Test-WSMan -ComputerName "$Server" -ErrorAction Stop;$CanDoWinRM=$true}
  Catch
  {$Errormessage="the DCOM error was '$_'"; $CanDoWinRM}
  try
  {$null=Test-WSMan -ComputerName "$Server" -Authentication default -ErrorAction Stop; $CanDoAuthWinRM=$true}
  Catch
  {$Errormessage="the WinRM error was '$_'"; $CanDoAuthWinRM=$false}
  }
  Write-warning "$Server Can do $(
     if ($CanDoAuthWinRM -and $CanDoCOM){' both authorised WinRM and DCOM'} 
     elseif ($CanDoCOM){'just DCOM'} 
     elseif ($CanDoAuthWinRM) {'Just authorised WinRM'} 
     else {if ($CanDoWinRM){'nothing but unauthorised WinRM' } else {'neither DCOM or WinRM'} }). $Errormessage"
}

A good early check, if you are using DCOM, is that that Port 135 (Remote Procedure Call -RPC) is open. Also, you can use the same technique to check that all the ports for TDS (1433, etc.) are allowed through the firewall.

Is Port 135 open (RPC)?

Get-NetFirewallPortFilter –Protocol TCP | 
Where { $_.localport –eq '135' -and $_.displayName -like '*' }|
  Get-NetFirewallRule|Where {$_.displayName -like 'Windows Management Instrumentation*'}

Getting WinRM working can be more complicated. Various things can go wrong. You may have a public network on a workstation. This needs to be removed and made private because, by default, the WinRM firewall exception for public profiles limits access to remote computers within the same local subnet. This applies to both ends of the communication. This script will do it if you use it in an Administrator Powershell window.

Setting a public connection profile to private

Get-NetConnectionProfile -|foreach{
$done=$false;
if ($_.networkCategory -eq 'Public') 
{SetConnectionProfile Set-NetConnectionProfile -name $_.Name -NetworkCategory Private;$done=$true}
if ($done) {write-warning "changed connection profile $($_.Name) to Private"}
}

Is the WinRM firewall rule there and enabled? This is easy to check.

Testing WinRM Firewall rule

Get-NetFirewallPortFilter –Protocol TCP | Where { $_.localport –eq '5985' }| Get-NetFirewallRule

If it isn’t, then add it. For Windows Firewalls, you can use this command to allow access to the WinRM listener.

Add firewall rule allowing access to WinRM listener

netsh advfirewall firewall add rule name="WinRM-HTTP" dir=in localport=5985 protocol=TCP action=allow

You can also check on the more sensitive settings of WinRM security:

Check WinRM security settings

@{'TrustedHosts'=((Get-Item WSMan:\localhost\Client\TrustedHosts).value);
'ClientBasicAuthentication'=((Get-Item WSMan:\localhost\client\auth\Basic).value);
'ServiceBasicAuthentication'=((Get-Item WSMan:\localhost\service\auth\Basic).value);
'AllowEncrypted'=(= (((et-Item WSMan:\localhost\service\allowUnencrypted).value)}

WinRM can be used via HTTP, but this is a security risk. A secure WinRM connection should be made via HTTPS. The most frustrating part of doing this is getting the necessary security certificate.

Of these settings, the TrustedHosts setting lists the hosts that can be connected to. However, this is only used if you use a raw IP address rather than a network name, which seems a scary thing to do. It is fine to set authentication to basic within a DMZ, though.

Testing the SQL connection

You can test SQL connectivity using SQL Server Management Studio.

  1. From the Start menu, select All Programs > Microsoft SQL Server 2005/2008/2012 > SQL Server Management Studio.
  2. At the Connect to Server dialog, enter the fully qualified name of the SQL Server instance you are attempting to monitor in the Server name box.
  3. Select SQL Server Authentication.
  4. Enter the SQL Server login and password you are using to connect to the SQL Server instance and click Connect.
  1. From the Start menu, select All Programs > Microsoft SQL Server 2005/2008/2012 to display a submenu.
  2. Hold down the Shift key, right-click on SQL Server Management Studio and select Run as different user.
  3. At the Windows Security dialog, enter the Windows username and password you are using to connect to the SQL Server instance and click OK.
  4. At the Connect to Server dialog, enter the fully qualified name of the SQL Server instance you are attempting to monitor in the Server name box, and click Connect.

If connection fails, one of the following error messages is displayed:

  • Timeout expired.
  • An existing connection was forcibly closed by the remote host.
  • No process is on the other end of the pipe.
  • Login failed for user <x>.

A connection failure may also occur if the system administrator privileges used to access the database engine are inadvertently deleted. To resolve these issues, see: Troubleshooting Database Engine Connectivity.

Setting up a lab environment

If you run into difficulties connecting to network-based devices, it is best to create a "lab" environment, entirely unconnected to the Internet and isolated from your main network and containing servers as similar as practically possible to production. You can now temporarily relax the most stringent precautions built into firewalls, servers, WMI and WinRM, and quickly get to a point where everything is working. Then you can put back the security devices one by one until something breaks. Then fix the issue and carry on. Once you have connections and production-level security, you can then assume that the only likely source of other potential problems are firewall-related.
Do you have any feedback on this documentation?

Let us know at sqlmonitorfeedback@red-gate.com


Didn't find what you were looking for?