Creating access key for Microsoft Azure
Published 09 February 2026
1. Register an Application in Azure
- Go to the Azure Portal, navigate to Microsoft Entra ID
- Under Manage, select App registrations
- Click New registration
- Give it a name (e.g Redgate Monitor Azure Integration)
- Select Single tenant as the support account types
- Don't add a redirect URI
- Click register
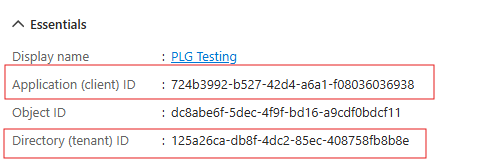
After registration:
- Make note of the Application (client) ID and Directory (tenant) ID
For detailed instructions, refer to Microsoft's documentation on registering an application.
2: Create a Client Secret
- Under Manage, select Certificates & secrets
- Click New client secret
- Give it a description and expiration (when it expires you can rotate and update the value in Redgate Monitor)
- Make note of the Value (Client Secret)
For full steps, see Microsoft's documentation on adding client secrets.
3. Assign Permissions (Roles) to the App Registration
- Navigate to your target Subscription under Azure resources.
- In the left pane, select Access control (IAM).
- Click Add > Add role assignment.
- Search for and select the following Azure built-in roles:
- In "Members," choose your newly created App registration as the assignee.
- Click Review + assign to complete the process.
For more details on role assignments, see the official Azure role assignment documentation.
Custom Role Option
If you need to limit the permissions further, you can create a custom role with (at least) these permissions:
For steps on creating custom roles, see Microsoft’s custom role documentation.
Store the client secret securely. You cannot retrieve it again after you leave the page.
When the secret expires, you can rotate it by creating a new one and updating Monitor's configuration.
This documentation contains proprietary information and is protected by copyright law.
Copyright © 2026 Red Gate Software Limited. All rights reserved


