Configuring Redgate Monitor database using PostgreSQL with TimescaleDB
Published 31 March 2025
See Also
Troubleshooting PostgreSQL with TimescaleDB Data Repository
Supported platforms for minimum supported versions
Configure the Redgate Monitor database
For the Redgate Monitor database, you can either:
- Use an existing empty database
or - Use a database created by Redgate Monitor through the installer (which will be called RedGateMonitor by default).
If your TimescaleDB is self-managed, ensure that:
- The timescaledb extension is installed: installation guide
- The timescaledb-toolkit extension is installed: installation guide
- TimescaleDB tune has been run: TimescaleDB tuning tool
If your TimescaleDB is a TigerData Cloud instance then select "tsdb" as your existing, empty database to use.
Using an existing PostgreSQL with TimescaleDB database
1. Resume Installing the Base Monitor.
Specify the PostgreSQL host, port, database name, user, and password in the POSTGRES_REPOSITORYCONNECTIONSTRING.

Specify the PostgreSQL host, port, database name, user, and password:
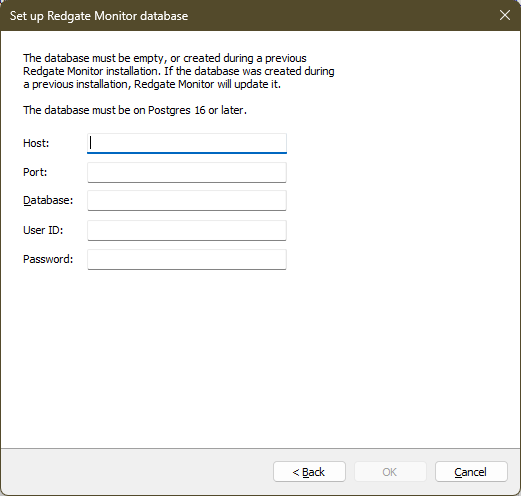
Note that you need to choose either an empty database or a database that was created during a previous Redgate Monitor installation. Click OK.
Create a new PostgreSQL database with TimescaleDB database
1. Create a new database in postgres for Redgate Monitor use as a data repository:
Create data repository
CREATE DATABASE RedGateMonitor
Note the database name will be redgatemonitor since postgres automatically lowers the case of all database names.
2. Once the TimescaleDB and TimescaleDB toolkit extensions have been installed, Tune the new RedGateMonitor database.
3. Resume Installing the Base Monitor.
Specify the PostgreSQL host, port, database name, user, and password in the POSTGRES_REPOSITORYCONNECTIONSTRING
1. Click Select database and choose Create a new database. Then click Next:
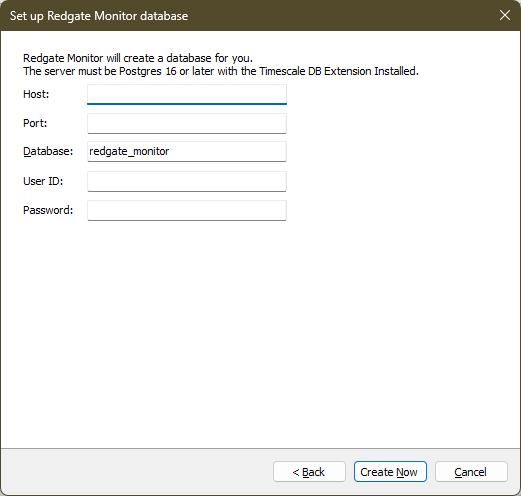
2. Specify the credentials used to create the database.
Specify the PostgreSQL host, port, database name, user, and password.
3. Click Create now.
Using a dedicated PostgreSQL user for Redgate Monitor
Redgate Monitor connects to the repository using Password authentication. This user is responsible for creating the database (if required), running migrations, and managing schema objects.
Permission required for dedicated user on a new database
- In Windows-based installations, the installer will create the repository database. In this case, the dedicated user must temporarily have the CREATEDB privilege:
CREATE USER redgatemonitoruser WITH PASSWORD '******' CREATEDB;
After installation is successfully completed, the elevated privilege can be removed:ALTER USER redgatemonitoruser NOCREATEDB;
- Linux Installation:
CREATE USER redgatemonitoruser With PASSWORD '******' NOCREATEDB;
CREATE DATABASE redgatemonitor OWNER redgatemonitoruser;
Existing Database Installation
- When using an existing database, grant the user connection access:
ALTER DATABASE redgatemonitor OWNER TO redgatemonitoruser;
- Grant the required permissions on all existing schemas in your Redgate Monitor database:
DO $$
DECLARE
    s TEXT;
BEGIN
    FOR s IN
        SELECT schema_name
        FROM information_schema.schemata
        WHERE schema_name NOT IN ('pg_catalog', 'information_schema', 'pg_toast')
    LOOP

	    -- Grant schema access
        EXECUTE format('GRANT USAGE, CREATE ON SCHEMA %I TO redgatemonitoruser;', s);

        -- Grant permissions on existing objects
		EXECUTE format('GRANT SELECT, INSERT, UPDATE, DELETE ON ALL TABLES IN SCHEMA %I TO redgatemonitoruser;', s);
        EXECUTE format('GRANT USAGE, SELECT ON ALL SEQUENCES IN SCHEMA %I TO redgatemonitoruser;', s);
        EXECUTE format('GRANT EXECUTE ON ALL FUNCTIONS IN SCHEMA %I TO redgatemonitoruser;', s);

		-- Set default privileges for future objects
        EXECUTE format('ALTER DEFAULT PRIVILEGES IN SCHEMA %I GRANT SELECT ON TABLES TO redgatemonitoruser;', s);
        EXECUTE format('ALTER DEFAULT PRIVILEGES IN SCHEMA %I GRANT SELECT ON SEQUENCES TO redgatemonitoruser;', s);
        EXECUTE format('ALTER DEFAULT PRIVILEGES IN SCHEMA %I GRANT EXECUTE ON FUNCTIONS TO redgatemonitoruser;', s);

    END LOOP;
END $$;
Next steps
When you click Next, Redgate Monitor will summarize the install, and you can click Install to start it.
- If you're installing the Base Monitor and Web Server on one machine, then this will complete the installation.
- If you're installing the Base Monitor on a separate server, then:
This documentation contains proprietary information and is protected by copyright law.
Copyright © 2026 Red Gate Software Limited. All rights reserved


