Step 2 - Installation pre-requisites checks
Published 31 March 2022
This page provides the pre-requisites checks necessary to deploy Redgate Clone.
This should be run after you have your requirements in place.
| Embedded install steps | ||||
|---|---|---|---|---|
|
|
|
|
||
Contents
Pre-requisites checks
In order to ensure a smooth installation process, you should first verify that you have an environment that will be able to accommodate Redgate Clone.
You can do so by running our pre-requisite check script with the following command:
curl -sSL https://rd.gt/3RL6ioU | sudo bash
This script will verify:
- Disk requirements
- External network access
- File share setup
- TLS setup
- Kernel configuration
You can also check your environment manually by following the steps outlined below.
Checking disk requirements
Redgate Clone has very specific requirements for disks and associated data storage.
System (OS) disk requirements
Requirements
Our primary node needs a system disk with the following requirements:
- A block device disk – e.g. an Azure managed disk or AWS EBS – with enough storage (as per system requirements).
- The partition table should be labelled as GPT (GUID Partition Table) and not MBR (Master Boot Record).
How to verify
We've provided you with a script that can help you identify your ceph storage disk.
You can download it Ceph storage disk helper.
Here is what to do to verify it manually and understand what to look for.
sshinto the primary node host machine where you will be installing Redgate Clone.- Run
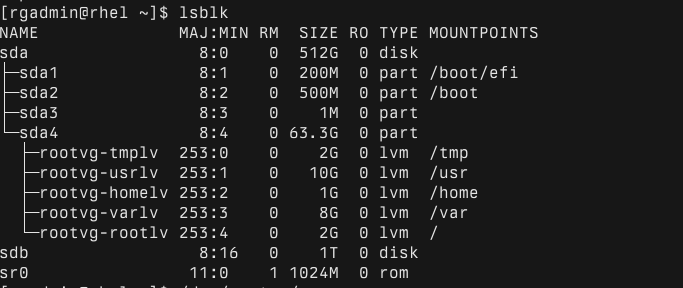
lsblkto find out where your system disk is. The following example shows our system disk is 128GB in size and mounted tosda(there is also a 1TB disk volume storage disk mapped tosdb).
- Run
sudo parted -lto get the type of partition table being used in the volume mount for the system disk. Here's an example of a system disk mapped tosdaand using GPT::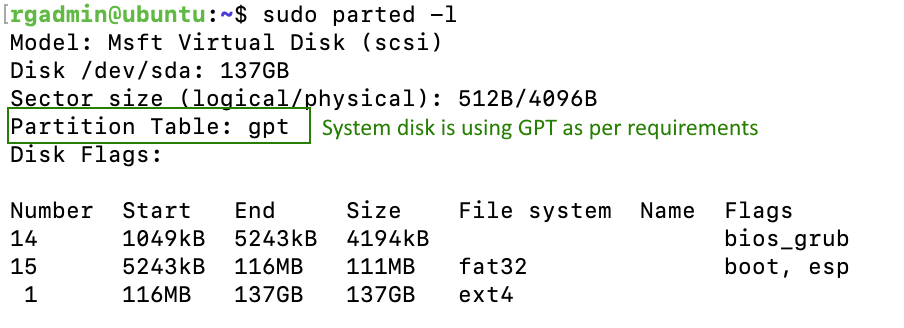
Note for logical volume partitions (e.g. VMs created with RHEL LVM images)
How do you know if LVM is installed: Run "lvm pvdisplay" as root (or with sudo), it will show any physical volumes you have which are setup with LVM.
If you are running an LVM based image you may have your filesystems partitioned inside volume groups, which will show up as below when running lsblk :
By default there should be enough space allocated to your root filesystem directories, but it's important that there is adequate space available for the /var directory as that is most likely to grow to above 30GB with an install.
In order to resize these you can run the following commands:
sudo growpart /dev/sda <partition number>– If you have free space unallocated on the physical disk (in this case /dev/sda has 512G but only ~64GB is being allocated to /dev/sda4), then you can use this command to grow the partition and use up the unallocated space. The partition number is whatever partition has your root filesystem, in this case 4.sudo lvresize -L 50G /dev/rootvg/varlv- This will resize the logical volume/dev/rootvg/varlvto have 50GB of space. You can allocate more depending on your free space. You will likely need to have around 5-10GB for the other logical volumes in a typical use case (usrlv,tmplv,homelv, androotlv).sudo xfs_growfs /dev/rootvg/varlv- This will grow the filesystem itself so that it can use the free space on the underlying logical volume. You will need to do this for all of the volumes you have edited in step 2.
Attached storage disk requirements
Requirements
The requirements for attached storage disks are:
- Empty block device disk – e.g. an Azure managed disk or AWS EBS.
- Empty means a raw device without a filesystem but that can have raw partitions (although this is not recommended as they will be wiped out automatically). In short either:
- A raw device (no partitions or formatted filesystems); or
- A raw device with one or more raw partitions (but no formatted filesystem)
- Assigned volume mount – e.g.
sdb(this will be needed for the installation below)
How to verify
- Attach a raw block device disk to your target machine.
- Take hold of the size of the disk you attached.
sshinto the machine with the attached disk.- Check the assigned volume mount.
- Run
lsblkin the terminal. - Find the disk you just attached (using the size as a hint), taking note of its mapping in the form of
sd[a-z]. Below is an example showing a 128GB system disk mapped tosdaand a 1TB disk volume storage disk mapped tosdb.- NOTE: You should also have the system disk in the list, so take care not to confuse the two.

- NOTE: You should also have the system disk in the list, so take care not to confuse the two.
- Run
- Confirm the volume storage disk has no associated file system.
- Run
lsblk -fin the terminal. - If the
FSTYPEfield is not empty, there is a filesystem on top of the corresponding device. We cannot use this volume storage disk if that is the case. In the example below, our volume storage sdb disk can be safely used: 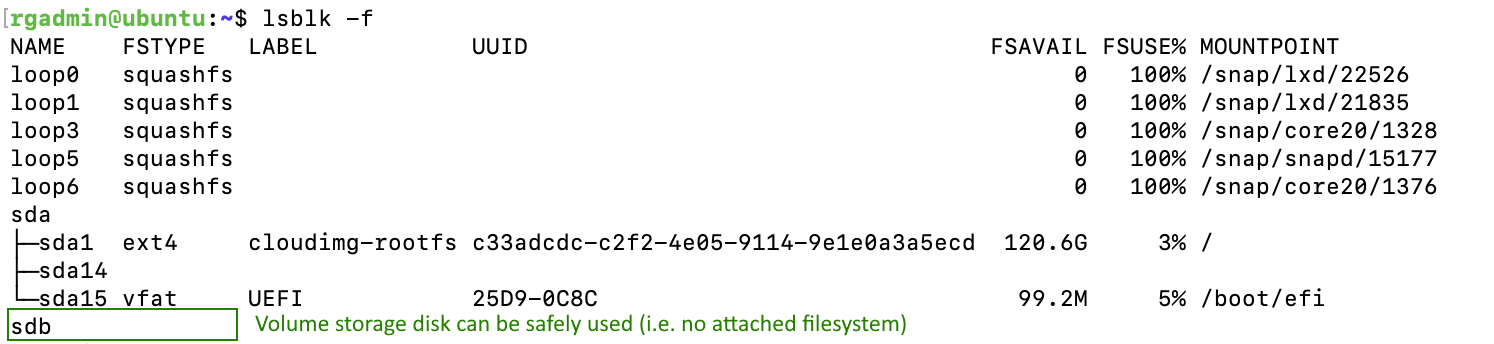
- Run
Checking external network access
Requirements
Access to external network (or at least the ports specified in the Step 1 - Installation requirements.
Problems with external network access could be down to certificates, proxy servers, etc.
How to verify
sshinto the primary node host machine where you will be installing Redgate Clone.- Confirm you can access an external site:
curl -i https://kurl.sh/
File share setup
The file share is where you place the database backups (.bak) that it uses to create images. Redgate clone will only read backup files from a file share that you configure during installation and does not recognize any other file location.
Requirements
In order to be able to create data images from database backups you will need to setup a file share (SMB or NFS) and provide the credentials to our configuration tool during or after the install.
If you don't have one setup, you will still be able to use the product but only to create empty data images, which can be a limiting factor.
Please check our Backup Storage page for more information (i.e. what details will be required).
How to verify
Follow verifying SMB file share connection parameters guide, to understand how to verify the SMB file share credentials.
Kernel configuration
Requirements
We have observed some issues with kernel level configuration on the host machine causing errors in the cluster (for example Insufficient async disk I/O kernel resources, "Too many open files").
In order to avoid this it may be necessary to increase some values in the system configuration.
How to verify
- Run
sysctl fs.aio-max-nrand make sure the value is at least 1048576. - Run
sysctlfs.inotify.max_user_instancesand make sure the value is at least 512.
If the values are not correct, then you can follow the instructions in the troubleshooting documentation for the errors linked above to increase them.
Where to next?
Please proceed to Step 3 - Installing Redgate Clone.
This documentation contains proprietary information and is protected by copyright law.
Copyright © 2026 Red Gate Software Limited. All rights reserved


