Using SmartAssembly with MSBuild
Published 02 January 2013
You can integrate SmartAssembly in your build process.
You set up your project in SmartAssembly once, and you can then build your assembly in your normal MSBuild process. The settings you chose in the SmartAssembly project are applied without needing to run SmartAssembly separately.
Note that the SmartAssembly task should be the last stage of your build process. Because of the way SmartAssembly changes your assembly, running other tasks after SmartAssembly is not supported. (An exception to this is assembly-signing tools, if you choose not to sign your code with SmartAssembly).
To integrate SmartAssembly directly into the build process, follow these steps:
- Create your project in SmartAssembly (see Working with projects) and set the project options (see Working with project settings).
- Open your application's .csproj or .vsprojfile in an XML editor.
The .csproj or .vsproj file is actually a MSBuild XML file that you can edit to add SmartAssembly to the build tasks. For more information about the MSBuild XML schema, see the MSBuild documentation on MSDN. - Add references to SmartAssembly to your C# or VB.NET project file, as follows.
Note that the
<UsingTask>element includes SmartAssembly's major version number. This page has been written for SmartAssembly 6.x. If you are using a different version of SmartAssembly, you will need to change the version number specified in the<UsingTask>element. For example, if you use SmartAssembly 5.5, change the version to Version=5.0.0.0<Project DefaultTargets="Build" xmlns="http://schemas.microsoft.com/developer/msbuild/2003"> <PropertyGroup> ... </PropertyGroup> ... <ItemGroup> ... </ItemGroup> <Import Project="$(MSBuildToolsPath)\Microsoft.CSharp.targets" /> <UsingTask TaskName="SmartAssembly.MSBuild.Tasks.Build" AssemblyName="SmartAssembly.MSBuild.Tasks, Version=6.0.0.0, Culture=neutral, PublicKeyToken=7f465a1c156d4d57" /> <Target Name="AfterBuild" Condition=" '$(Configuration)' == 'Release' "> <SmartAssembly.MSBuild.Tasks.Build ProjectFile="c:\path\to\project.saproj"/> </Target> </Project> - Edit the following line (near the bottom of the XML which you just added to the project), setting the
ProjectFileattribute to the path to your *.saproj file:<SmartAssembly.MSBuild.Tasks.Build ProjectFile="c:\path\to\project.saproj"/> If required, add any of the following optional attributes to the same element:
OverwriteAssemblySet to True if you want to overwrite the original assembly with the obfuscated one.
If this option is not set, or set to False, SmartAssembly uses the destination file name from the .saproj project.
If you set this option to True, SmartAssembly ignores the OverwriteAssembly attribute, if set.
InputIf this option is set, SmartAssembly will process the assembly specified as this attribute's value.
If this option is not set, SmartAssembly will process the assembly specified in the .saproj project is used.
This is useful if you want to build an assembly using exactly the same settings as those you chose for a different assembly.
OutputIf this option is set, SmartAssembly will use this attribute's value as the file name when saving the built assembly.
If this option is not set, SmartAssembly will use the file name in the .saproj file when saving the built assembly.
This attribute is ignored if the OverwriteAssembly property is set to True.
This option is useful if you want to save a test build to a different path from other builds.
MarkAsReleased(Deprecated)
This option was used in SmartAssembly 6.2 and earlier to preserve map files (see About map files).
SmartAssembly 6.5 stores map files permanently, so this option is ignored.
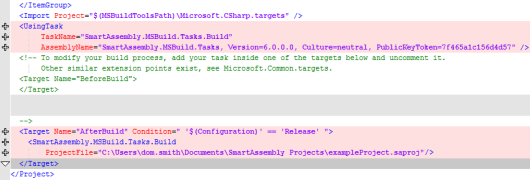
A diff showing the added lines in a .csproj file is shown below.
Build your assembly with MSBuild. SmartAssembly is run automatically, using the settings in your SmartAssembly project file.
If you use a .mdb file for your SmartAssembly database, ensure that Visual Studio is run as an administrator when running MSBuild.
This documentation contains proprietary information and is protected by copyright law.
Copyright © 2026 Red Gate Software Limited. All rights reserved


