Assigning a strong name key
Published 31 December 2012
Signing your assembly with a strong name key protects the assembly's name, and prevents modification of the assembly.
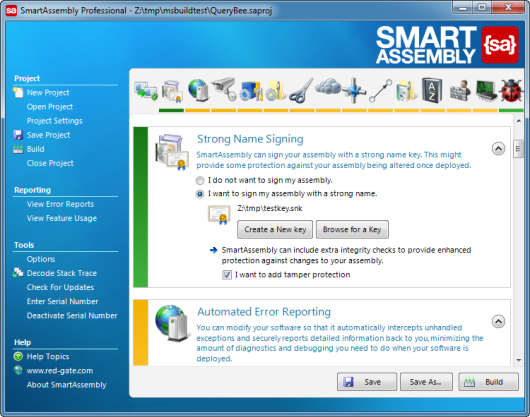
To use strong name key signing, in the Project Settings window, go to Strong Name Signing or click the icon in the toolbar.
When strong name signing is enabled and set correctly, the colored bar under the toolbar icon and to the left of the feature options are green. If it is disabled, the bars are orange. If the bars are red, there is a problem with the settings and you should check them.
You can't use strong name key signing if you need to modify the assembly with another tool after SmartAssembly.
Assigning a strong name key to your assembly
To assign a strong name key, select I want to sign my assembly with a strong name. You can choose whether to create a new key or browse for an existing key.
It is recommended that you sign the assembly with the same strong name key in both SmartAssembly and Visual Studio. You must use the same strong name key if you are protecting a WPF assembly or if you want to be able to change dependent DLLs later.
Adding tamper protection
In SmartAssembly Professional and Developer editions, you can enable additional integrity checks to provide enhanced protection. To do this, select I want to add tamper protection. Enabling tamper protection makes your assembly slightly slower to load. We highly recommend that you also enable strings encoding if you enable tamper protection; see Encoding strings.
You can't use tamper protection with assemblies using any version of Windows Phone 7.x XNA, Xbox XNA.
Troubleshooting strong name key signing
If you have a non-signed dependency (a dependency without a strong name) and the main assembly is signed, the CLR may refuse to load the dependency. This is done for security reasons. For this reason:
- if you wrote the DLL, you need to sign it too.
- if it is a third-party DLL, you need to request a signed version of the DLL.


