Log shipping - restore settings
Published 13 February 2013
Log shipping > Specify databases > Backup settings > Network share > Restore settings > Schedule > Review summary
In SQL Backup Pro 7.0 and 7.1, this is step 3 of the Log Shipping wizard.
On step 4 of the wizard, configure settings for restoring the transaction log backups.
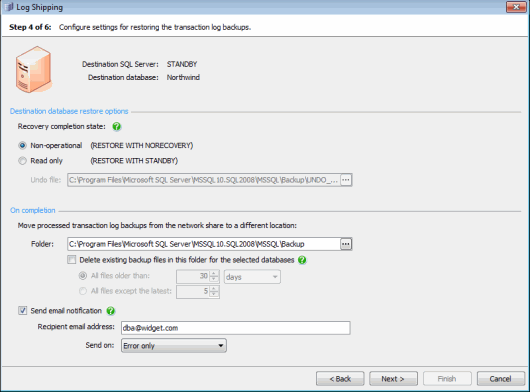
Destination database restore options
Select the state in which you want the destination database to be left on completion of the restore operation. Which state you select depends on how you intend to use the destination database:
- Non-operational This is equivalent to using the SQL Server
RESTORE WITH NORECOVERYoption. The database is restored but not recovered. Incomplete transactions are not rolled back. The database is not usable and cannot be queried by users. - Read only This is equivalent to using the SQL Server
RESTORE WITH STANDBYoption. The database is restored and recovered. Incomplete transactions are rolled back, but recorded in the Undo file. This allows users read-only access to the data between transaction log restores. This is useful if you want to reduce the load on the primary SQL Server by running queries on the destination SQL Server.
To change the location of the Undo file, in the Undo file box, type the full path on the standby server for the file, or click and specify the file using the File Browser. Note that the file path is relative to the selected SQL Server. For example, if you are restoring a database on a remote SQL Server instance called ServerA and you specify a local path such as C:\Undo, the backup files will be created on the C: drive on ServerA, not on the local server.
On completion
When they have been restored, SQL Backup Pro moves the transaction log backup files from the network share (which you specified in step 3) to another folder, so that they are not processed in the next run. Specify the path for the folder to which the processed transaction log backup files are to be moved.
SQL Backup Pro displays a default path for the files. To change the path, type the full path for the folder, or click and specify the folder using the folder browser. The file path is relative to the SQL Server that you are restoring to. For example, if you are restoring to a remote SQL Server instance called ServerA and you specify a local path such as C:\ProcessedBackups, the processed backup files will be created on the C: drive on ServerA, not on the local machine.
Select the Delete existing backup files in this folder for the selected databases check box if you want SQL Backup Pro to delete existing backup files for the selected database in the specified folder. You can restrict deletion of existing backup files by age or number. To restrict deletion of files by age, select All files older than and type or select the age (in days or hours) of the files that you want to delete. To restrict deletion of files by number, select All files except the latest and type or select the number of the latest backup files to keep.
If you want to receive an email with a copy of the completion log, select Send email notification, and enter the recipient's email address. This option is available only if you have entered your email settings. For more information about setting up email notification, see Email settings.
To send the log to multiple email addresses, type each address separated with a semi-colon (;). For example:
dba01@myco.com;dba02@myco.com
By default, email notifications are sent only when there are errors during the backup process (Error only). If you want to receive an email when an error or warning occurs, select Error or warning; to always receive an email on completion of the backup process (on success or failure), select Any outcome.
This documentation contains proprietary information and is protected by copyright law.
Copyright © 2026 Red Gate Software Limited. All rights reserved


