Deploying a database package using Octopus Deploy
Published 25 May 2016
This example shows you how to use DLM Automation and Octopus Deploy to deploy a new version of a database from a NuGet package.
An alternative way of doing this is to use DLM Automation step templates for Octopus Deploy. Using these makes it easier to set up the deployment process steps as there's less manual configuration.
See Deploying a database package using Octopus Deploy step templates.
Before you start
- Create a NuGet package containing a Redgate database scripts folder.
If you've set up continuous integration for your databases using Redgate DLM Automation, your build server will automatically build a package on every commit. For examples of how to do this using TeamCity or TFS, see Worked examples. - Install the DLM Automation. Click here for more details.
- On the same machine, install Octopus Deploy. Click here for more details.
- Install an Octopus Tentacle and assign the db-server role. Click here for more details.
- Create an environment called Production, and add the machine running the Tentacle agent to it.
- Set up your NuGet package feed by doing one of the following:
- register your existing external NuGet package feed with Octopus. For more details, see Adding external package feeds.
- configure your build server to push packages to the Octopus built-in repository. For more details, see Using the built-in repository.
On this page
Using DLM Automation to build a NuGet package is recommended, but you can build one without it. See Creating a database package without sqlCI.exe.
1. Create a new Octopus Deploy project
- In Octopus Deploy, click Projects and All.
- Click Add project.
- In the Name field, enter Widget Deployment.
- Click Save.
2. Set up the project variables
Variables let you reuse scripts in other deployments, which you couldn't do if you used hardcoded values. For more information, see Variables (Octopus Deploy documentation).
In the Widget Deployment project, on the project Variables tab, add the following variables.
Variables surrounded by <angle brackets> need to be replaced with a real value:
| Variable name | Value |
|---|---|
| BaseDirectory | #{Octopus.Tentacle.Agent.ApplicationDirectoryPath}\#{Octopus.Environment.Name}\#{Octopus.Project.Name}\#{Octopus.Release.Number} |
| DatabaseName | <NameOfYourDatabase> |
| DatabaseServer | <YourSQLServerInstance> |
| DatabaseUpdateResourcesDirectory | #{BaseDirectory}\DatabaseUpdateResources |
| Octopus.Action.Package.CustomInstallationDirectory | #{PackageExtractDirectory} |
| PackageExtractDirectory | #{BaseDirectory}\DatabasePackage |
| SQLServerUsername | <YourSQLServerUsername> |
| SQLServerPassword | <YourSQLServerPassword> |
If you leave the SQLServerUsername and SQLServerPassword values blank, Windows authentication will be used to connect to the target database.
Click Save.
You'll now add a series of deployment process steps to your Octopus Deploy project.
3. Add the "Download and extract database package" step
This step picks up the NuGet package of the database schema you're going to deploy.
- In the Widget Deployment project, on the Process tab, click Add step and select Deploy a NuGet package.
- In the Step name field, enter Download and extract database package.
- In the Machine roles field, enter db-server and press Enter.
This must match the role you assigned to the Tentacle. - In the NuGet feed field, select either the name of the external feed you registered when you set up your NuGet feed, or the Octopus Server (built-in) repository.
- In the NuGet package ID field, enter the name of the package without the version number. For example, if the package was called Widget.0.1.nupkg, you'd only enter Widget.
When the package is generated, NuGet package manager automatically adds a number. If we included it here, Octopus would only deploy the package that matched that name and version number. By removing the number, we're telling Octopus to always look for the latest package with that name. - In the Environments field, select Production.
If you leave this blank, the step will be accessible to all environments. - Click Save.
4. Add the "Create database update resources" step
This step creates the database deployment resources, including the Update.sql script.
- On the project Process tab, click Add step and Run a PowerShell script.
- In the Step name field, enter Create database update resources.
- In the Machine roles field, enter db-server and press Enter.
This must match the role you assigned to the Tentacle. In the Script field, paste in the following script. This script uses the project variables that you set up earlier:
Create Database Update Resources
# This step uses DLM Automation to create a directory containing the # Database Update Resources: all the artifacts relating to the deployment. # Makes sure the directory we're about to create doesn't already exist. If (Test-Path $DatabaseUpdateResourcesDirectory) { rmdir $DatabaseUpdateResourcesDirectory -Recurse -Force } # Sets up connection string for the target database. $targetDatabase = "Data Source=$DatabaseServer; ` Initial Catalog=$DatabaseName; ` User ID=$SQLServerUsername; ` Password=$SQLServerPassword" # Creates the DatabaseUpdateResources directory. New-DlmDatabaseRelease -Target $targetDatabase ` -Source "$PackageExtractDirectory\db\state" ` -Verbose ` | Export-DlmDatabaseRelease -Path $DatabaseUpdateResourcesDirectory # Exposes the changes report, deployment warnings, and update script # as Octopus artifacts, so you can review them in Octopus. New-OctopusArtifact "$DatabaseUpdateResourcesDirectory\Reports\Changes.html" New-OctopusArtifact "$DatabaseUpdateResourcesDirectory\Update.sql"- In the Environments field, select Production.
If you leave this blank, the step will be accessible to all environments. - Click Save.
5. Add the "Review database update resources" step
This step pauses deployment to let you review the database deployment resources, including the Changes.html report, before allowing deployment to go ahead.
- On the project Process tab, click Add step and select Manual intervention required.
- In the Step name field, enter Review database deployment resources.
In the Instructions field, copy and paste this text:
Please review the schema and static data changes, warnings and SQL change script in 'Changes.html'.
In the Environments field, select Production.
If you leave this blank, the step will be accessible to all environments.Click Save.
6. Add the "Run the update script" step
This is the step that deploys the update to your target database.
- On the project Process tab, click Add step and select Run a PowerShell script.
- In the Step name field, enter Run the update script.
- In the Machine roles field, enter db-server.
This must match the role you assigned to the Tentacle. In the Script field, paste in the following script:
Run the update script
# This step uses DLM Automation to deploy the database update we previously generated and wrote to disk. $targetDatabase = "Data Source=$DatabaseServer; ` Initial Catalog=$DatabaseName; ` User ID=$SQLServerUsername;Password=$SQLServerPassword" Import-DlmDatabaseRelease $DatabaseUpdateResourcesDirectory | Use-DlmDatabaseRelease -DeployTo $targetDatabase- In the Environments field, select Production.
If you leave this blank, the step will be accessible to all environments. Click Save.
7. Create a release
Now all the steps are set up, you can create a release:
- In the Widget Deployment project, on the Process tab, click Create release.
This page lets you add an optional release note. - Click Save.
- Click Deploy to Production (or if there's more than one environment, click Deploy and select Production).
- Click Deploy Now.
As the deployment process runs, Octopus Deploy shows the task progress list. The deployment pauses so you can review the database deployment resources. - Click Changes.html to download the Change report.
Use the report to review the update script, warnings, and details of what'll be added, removed or modified if you go ahead with deployment. - In Octopus Deploy, click assign to me and, in Notes, enter a comment to say you've reviewed the database deployment resources.
- If you're happy with the report, click Proceed.
When the deployment is complete, the Task progress page looks like this: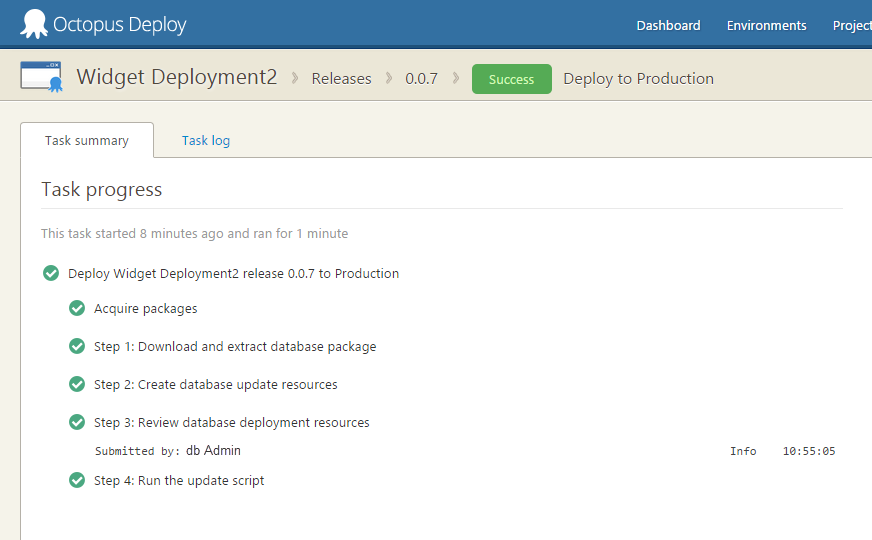
You've now completed the deployment of the database package.
What next?
If you have multiple database environments, such as a Preproduction and Production, you can use DLM Automation and Octopus Deploy to automate the deployment changes to your Preproduction environment before releasing to Production. See Deploying to multiple environments using Octopus Deploy.
This documentation contains proprietary information and is protected by copyright law.
Copyright © 2026 Red Gate Software Limited. All rights reserved


