Managing image permissions
Published 13 November 2023
This page explains how to manage image permissions, including actions like adding and removing users from an image.
Contents
Managing image permissions
This page explains how to manage image permissions, including actions like adding and removing users from an image.
Image owners and image users
There is a distinction between the image owner and an image user.
- The image owner is the person who created the image. Image owners have more permissions than image users (see the table below). Each image has one and only one owner.
- The image user is someone who has been given access to the image by the image owner. Each image can have any number of users, or none at all (excluding the owner).
The table below shows the different permissions available to image owners and image users:
| Add users | Remove users | See users of the same image | Delete image | Leave image | View image | Create clone | Use clone for testing | |
|---|---|---|---|---|---|---|---|---|
| Image owner | ||||||||
| Image user |
Image owners cannot leave an image because each image must have one owner, but they can delete it.
The image details page shows who is the image owner for a specific image. The owner is shown at the top-left of the page.

Managing image permissions (the Permissions window)
You can manage image permissions in the Permissions window.
- Go to the Images page. For step-by-step instructions on how to go to this page see Managing images.
- Find the card for the image.
- Click the body of the card to view the image details screen.
- Click the permissions icon-button at the top-right of the screen to open the Permissions window.

The image below shows the image owner's view of this window: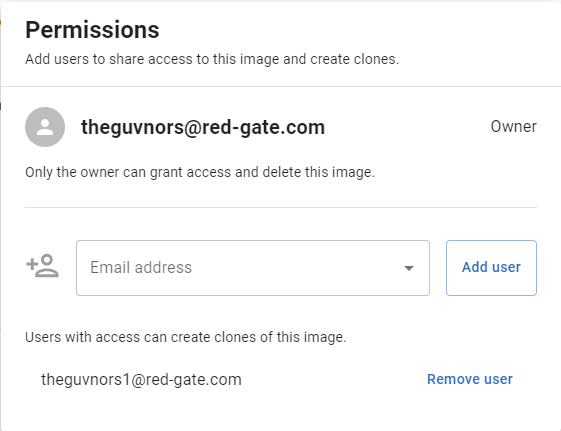
The image below shows the image user's view of this window: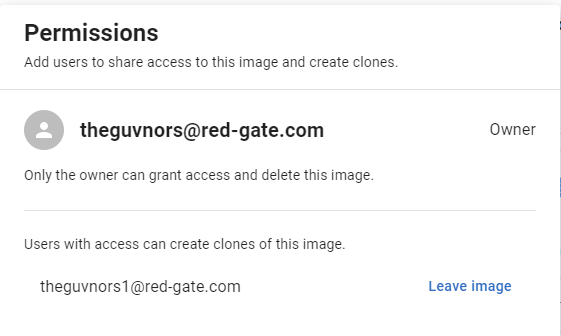
Adding users to an image
Only image owners can add users to an image. Only users who have previously logged into the TDM Hub instance can be shared to.
- Go to the Permissions window for the image, as described above.
- Enter the email address for the new user.
- Click Add user to add the user to the image.
- The user will now have access to view the image and create and use clones from the image.
Removing users from an image
Image owners can remove users from an image. Removing an image user is equivalent to forcing them to leave the image.
- Go to the Permissions window for the image, as described above.
- The window lists all the users for the image. Find the email address for the user that you wish to delete.
- Click Remove user next to that user.
- You will be asked to confirm the removal. Click Remove.
- The user will now no longer have access to the image or its clones through the GUI.
Note that the user will still be able to access the database data, if they have already obtained the connection string as described in Using clones for testing. The image owner can prevent users from accessing the data by deleting the existing clone(s) for the image, removing the user, and then making a new clone. A removed user cannot access data from clones created after that user was removed.
Leaving an image
Image users can leave an image. An image user leaving an image is equivalent to the image owner removing that user. Image owners cannot leave an image but they can delete it: step-by-step instructions are given under Managing images. Once image users have left an image, they can no longer create or view clones for that image.
To leave an image, follow these steps.
- Go to the Permissions window for the image, as described above.
- The bottom of the window will show your details.
- Click Leave image next to your details.
- You will be asked to confirm that you wish to leave. Click Confirm.
- You will now no longer have any access to the image or its clones through the GUI.


