Version control
Published 11 October 2021
Flyway Desktop integrates with existing Git systems (e.g. Azure DevOps Git, AWS CodeCommit, GitHub, GitLab, Bitbucket, etc.). This allows you to keep track of your database scripts in version control and share your changes with the rest of your team. A lot of organizations are already using Git to version control their application code, so this allows you to integrate your database changes into your existing systems and processes.
You can access the Version Control integration from the side panel on the right.
| At a glance, you can see:
|


Expand the side menu by clicking anywhere on it to get more details. You can contract this side panel using the > in the top right corner or clicking anywhere back on the main screen.

If you are not using Git
If you are using a different version control system (e.g., Team Foundation Server, Subversion, etc.), then use Flyway Desktop to save the database changes and migration scripts to disk. You can then use your own version control tool or command line to interact with your version control systems.
Initializing a repository
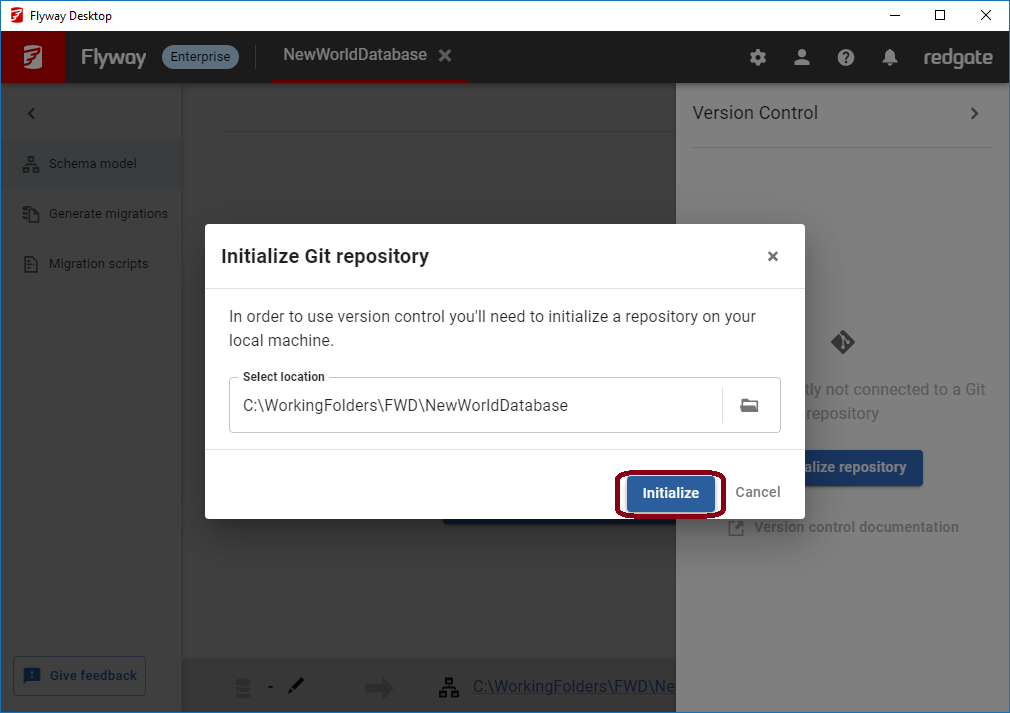
If your project folder is not already part of a Git repository, then you'll have the option to initialize a repository through Flyway Desktop. In the Version Control side panel, click Initialize repository. This defaults to the current project folder and you can browse to a higher level folder, if needed (e.g., you have a "Database" folder within a folder that will contain other files that should all be version controlled.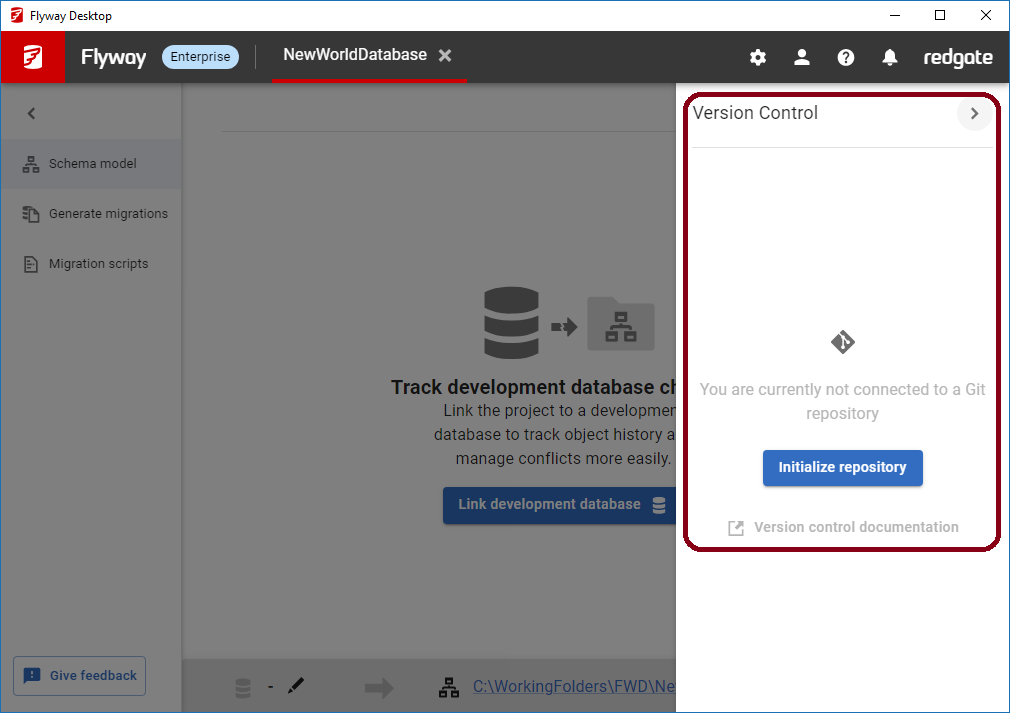 →
→ 
After initializing your local repository, you'll be able to commit changes locally. You'll have to add a remote repository in order to push/pull changes to/from a remote repository and share changes with other team members.
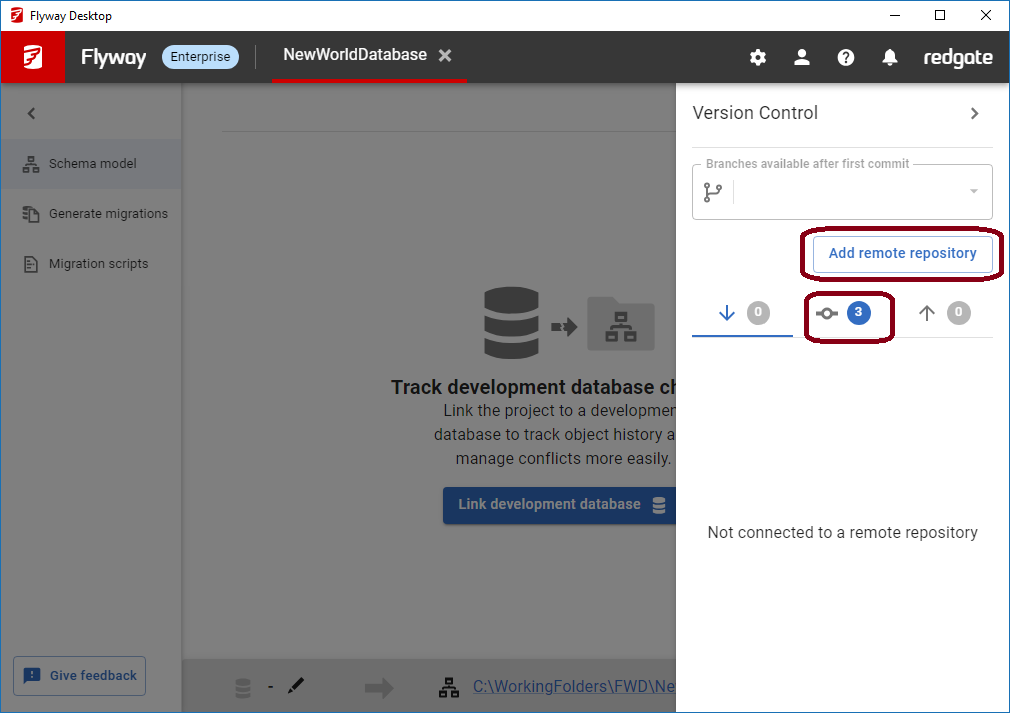
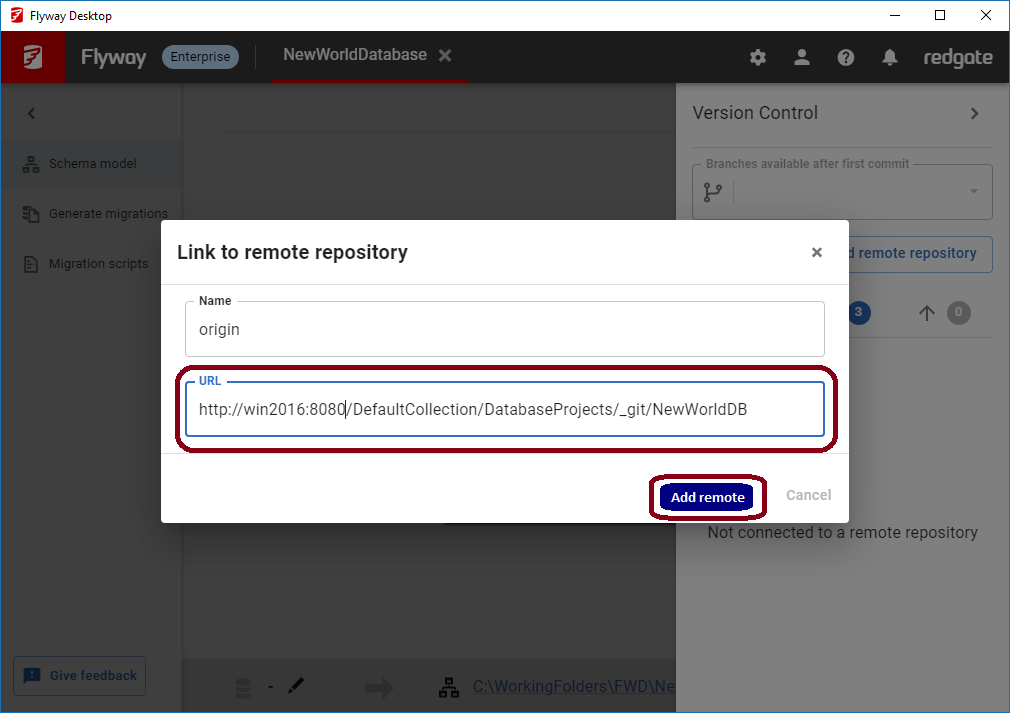
After clicking Add remote repository, enter the URL for the remote repository. By default, we name the remote repository origin, which aligns with Git's defaults. Read more about how to find your remote repository URL.
Your project is now ready to use all the Git integrations. Keep reading to learn more.
Pulling Changes
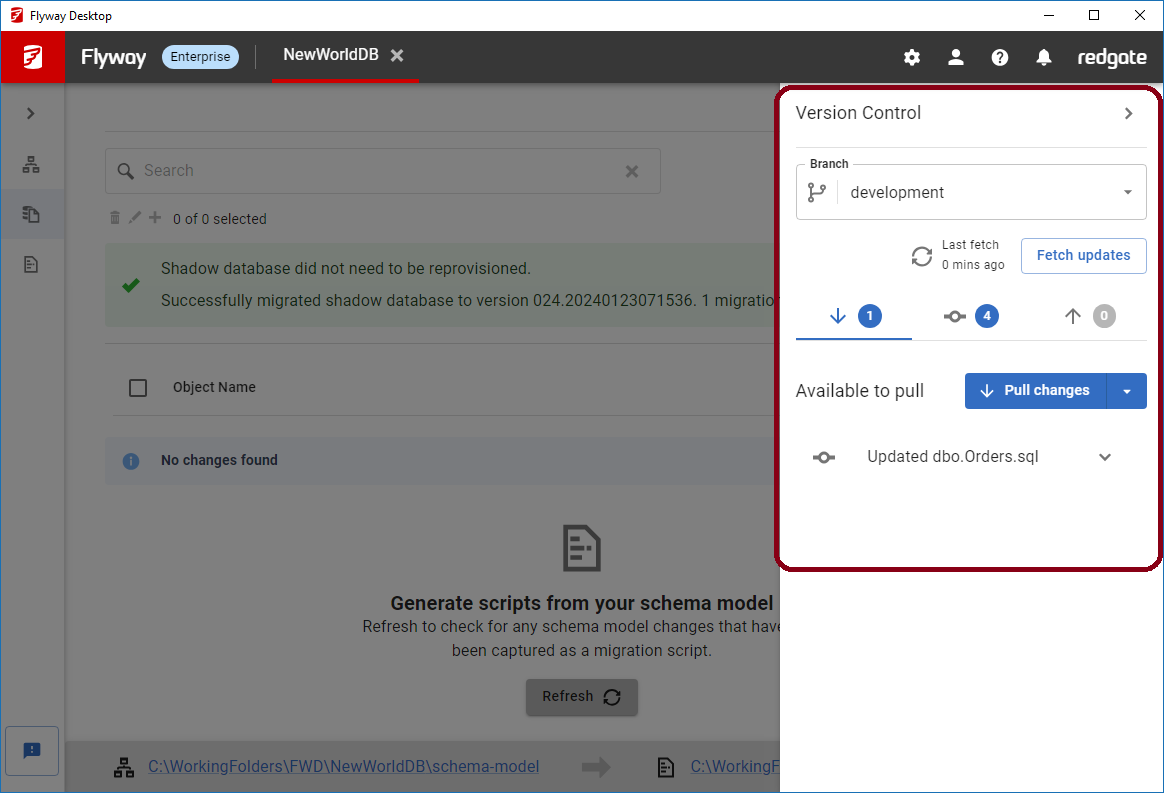
Click the down arrow ![]() to see what changes are in the remote repository that are not in your local repository yet. You can click on each file to view it's contents and see how it has changed. Click Pull changes to get all changes from the currently configured remote branch to your local repository.
to see what changes are in the remote repository that are not in your local repository yet. You can click on each file to view it's contents and see how it has changed. Click Pull changes to get all changes from the currently configured remote branch to your local repository.
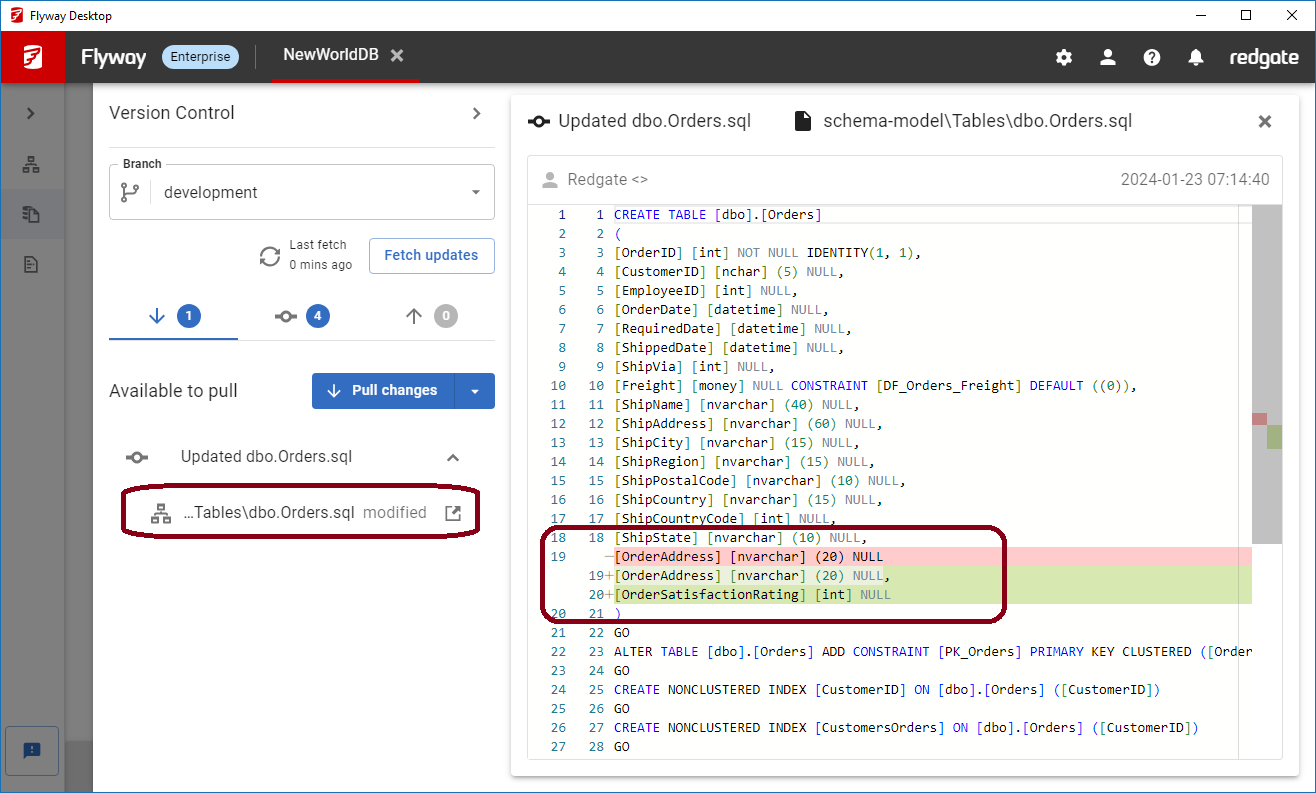
In this example, there is 1 file to be pulled, the dbo.Orders.sql file. If we click on this, we can see it's a table and that one column has been added, the new OrderSatisfactionRating column.
 →
→ 
After clicking Pull changes, you will see there are no changes left to pull. Make sure you then use the Schema Model tab to apply any changes to your development database.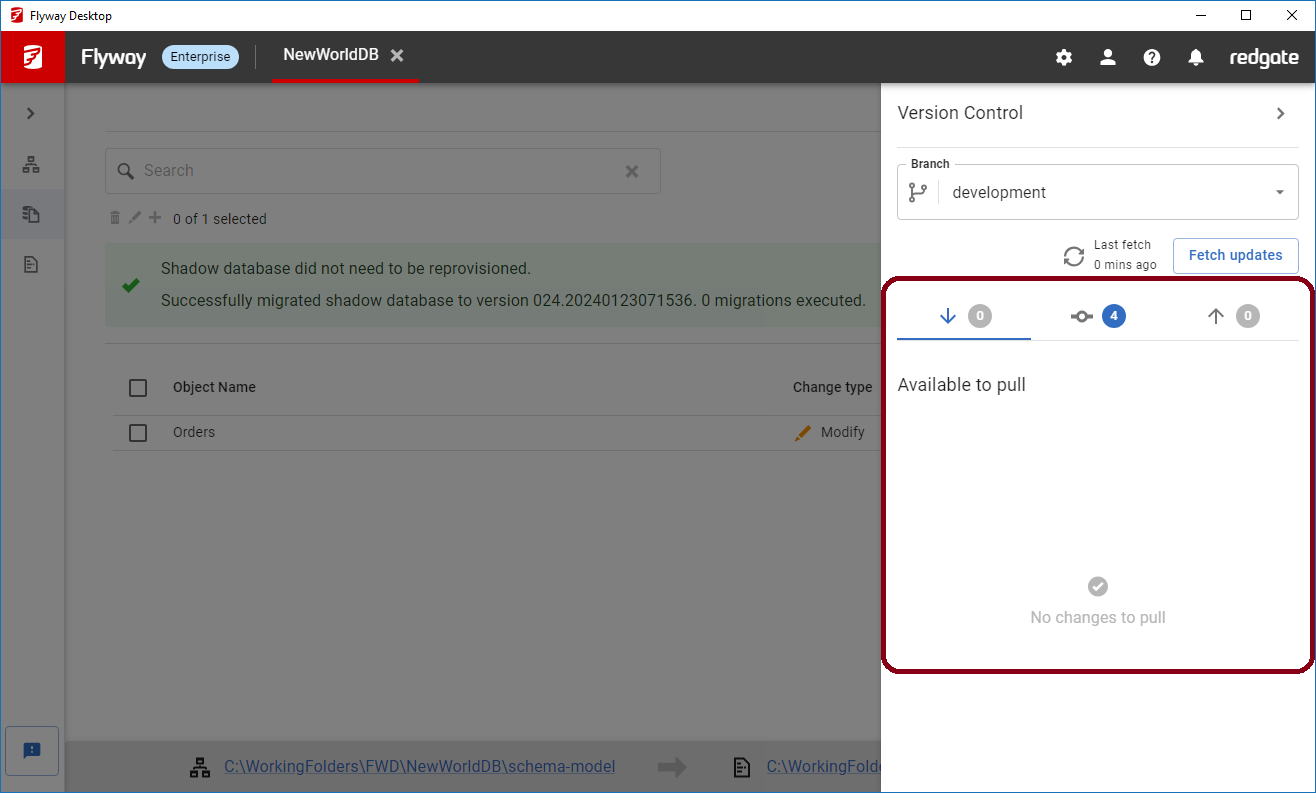
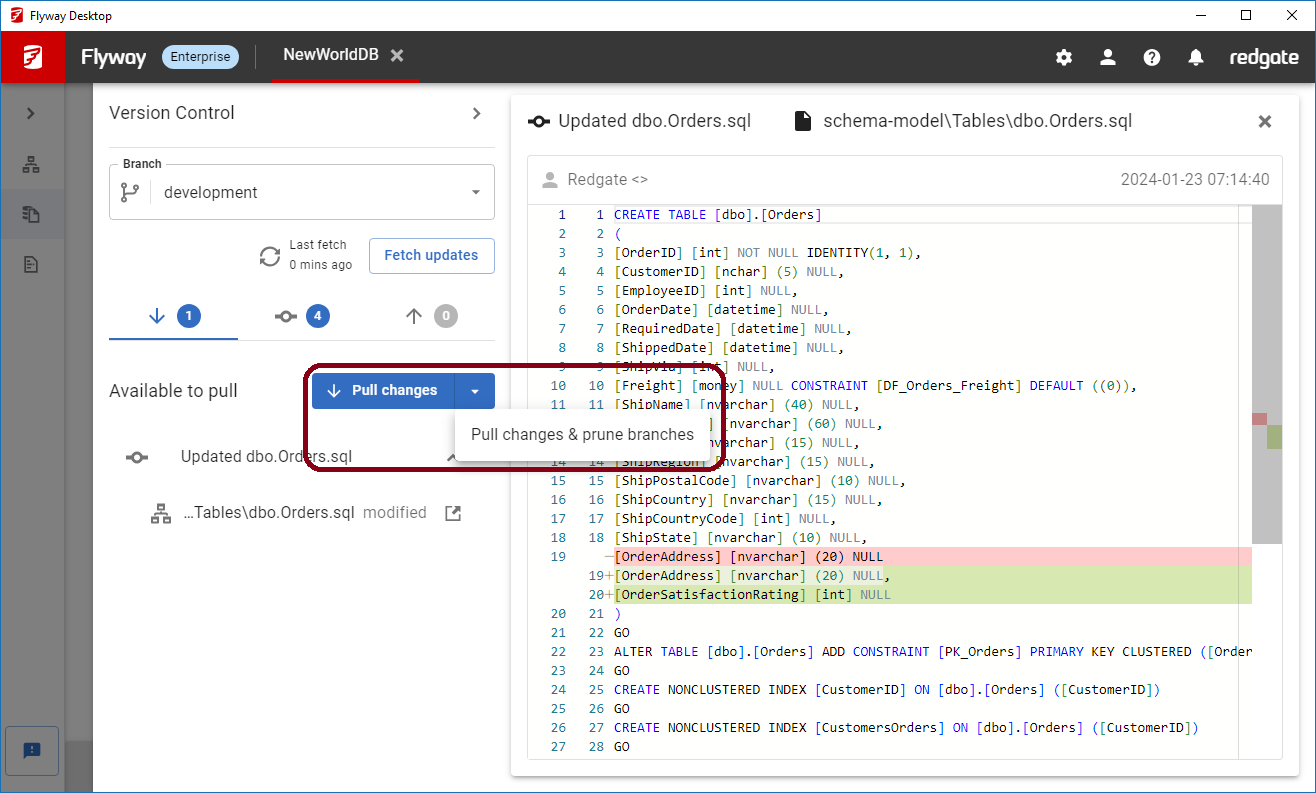
You can also Pull changes & prune branches using the drop down menu. Pruning branches will get rid of any local branches that do not exist on the remote.
Note - Flyway Desktop does not configure what remote branch your local branch points to unless pushing without a tracking configuration set (see below). If you need to clone a repository:
- For existing projects, you can open an existing project from version control.
- For new projects, you'll need to clone the repository using your preferred Git client tool or the Git command line.
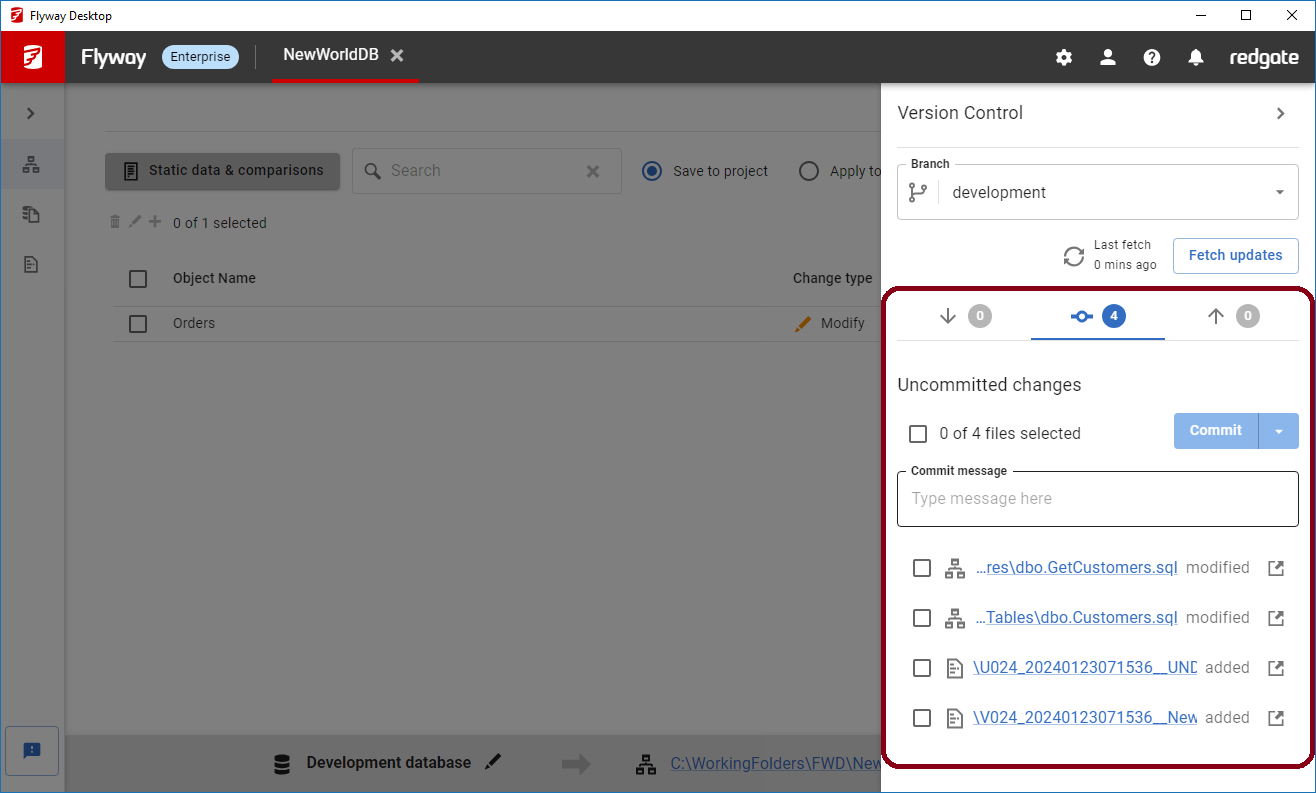
Committing Changes
After you save your database changes to the schema model or save your migration scripts, Flyway Desktop will show that these files need to be committed. ![]() You can see the name of each file, if it was added/modified/deleted, open the file with the hyperlink, and expand it to view the differences.
You can see the name of each file, if it was added/modified/deleted, open the file with the hyperlink, and expand it to view the differences.
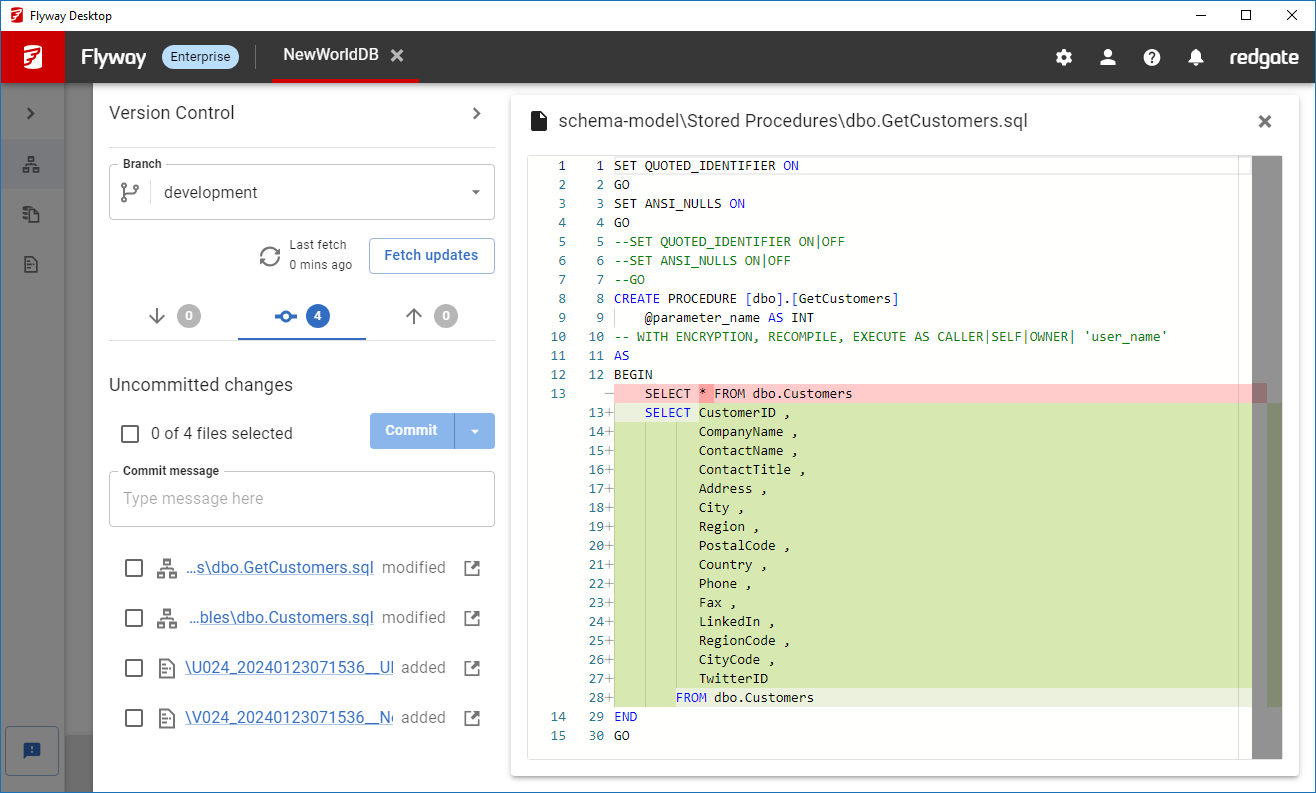
If you wish to commit these changes to version control, then enter an appropriate commit message and click Commit. (If you are familiar with the Git cmdline or other tools, you do not have to stage your changes. Flyway Desktop does that for you automatically. If there are files that you are not ready to commit yet, unselect them from the list.) In this example, there are 4 uncommitted changes shown. Clicking on the expand icon next to dbo.getCustomers.sql, we can see the differences, which shows we've explicitly listed the columns in this stored procedure instead of using SELECT *.
 →
→ 
This commits your changes to your local repository. When you're ready, push these changes to the remote repository to share with the rest of your team or kick off a Continuous Integration process.
Learn more about Associating commits with issues, work items, bug ids.
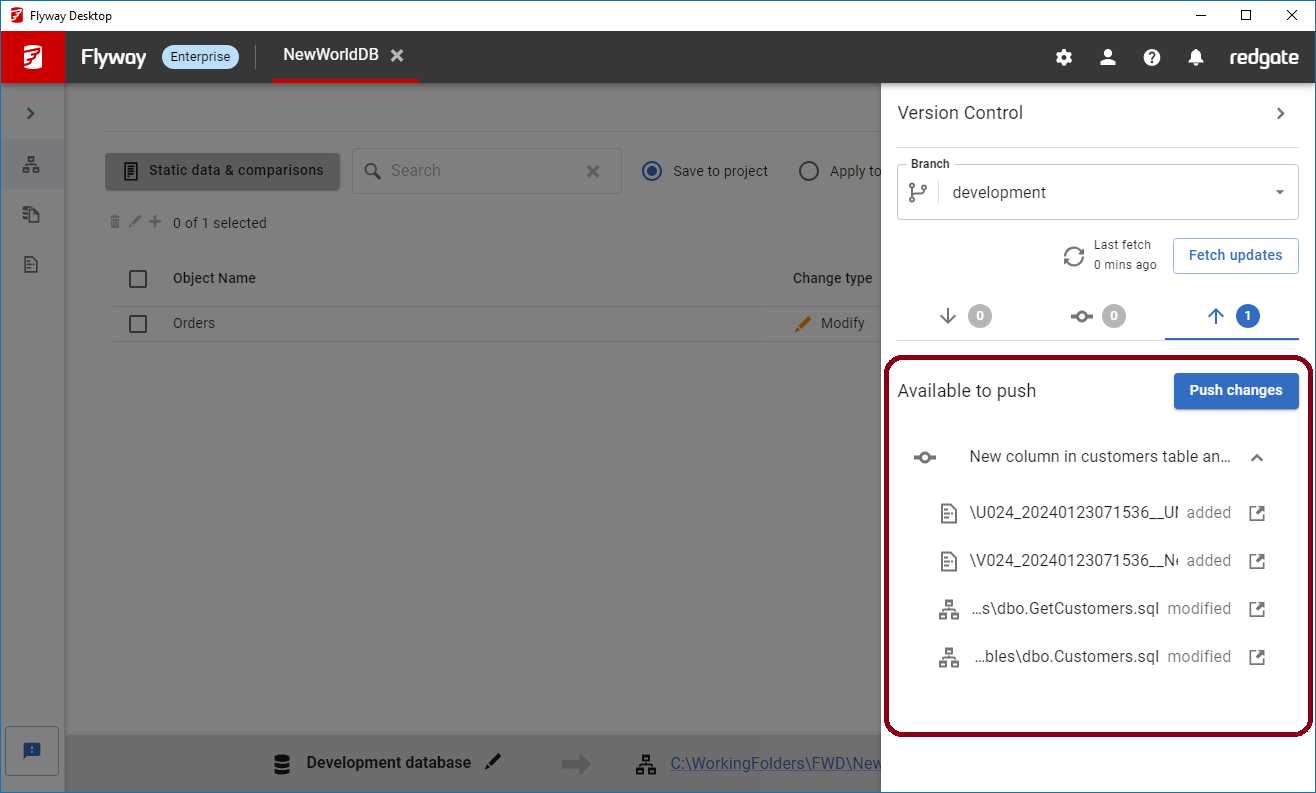
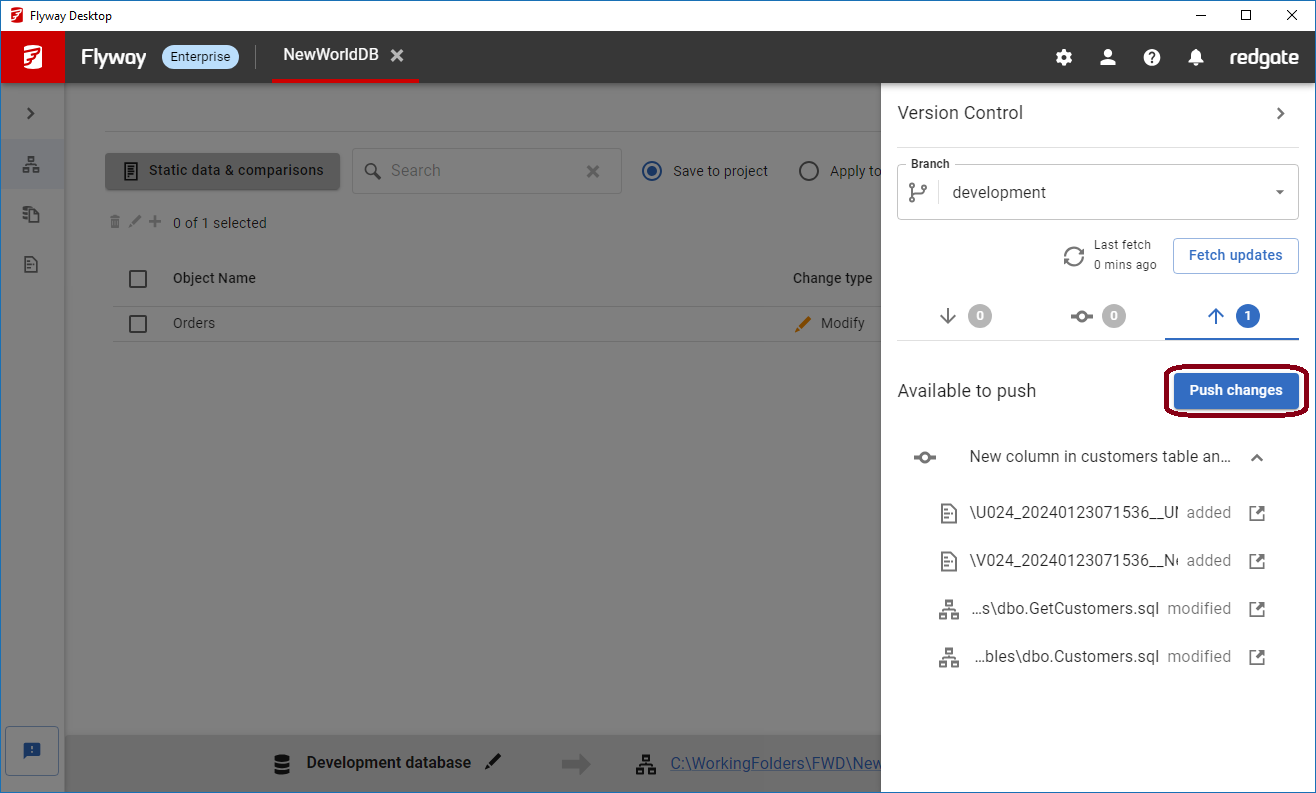
Pushing Changes
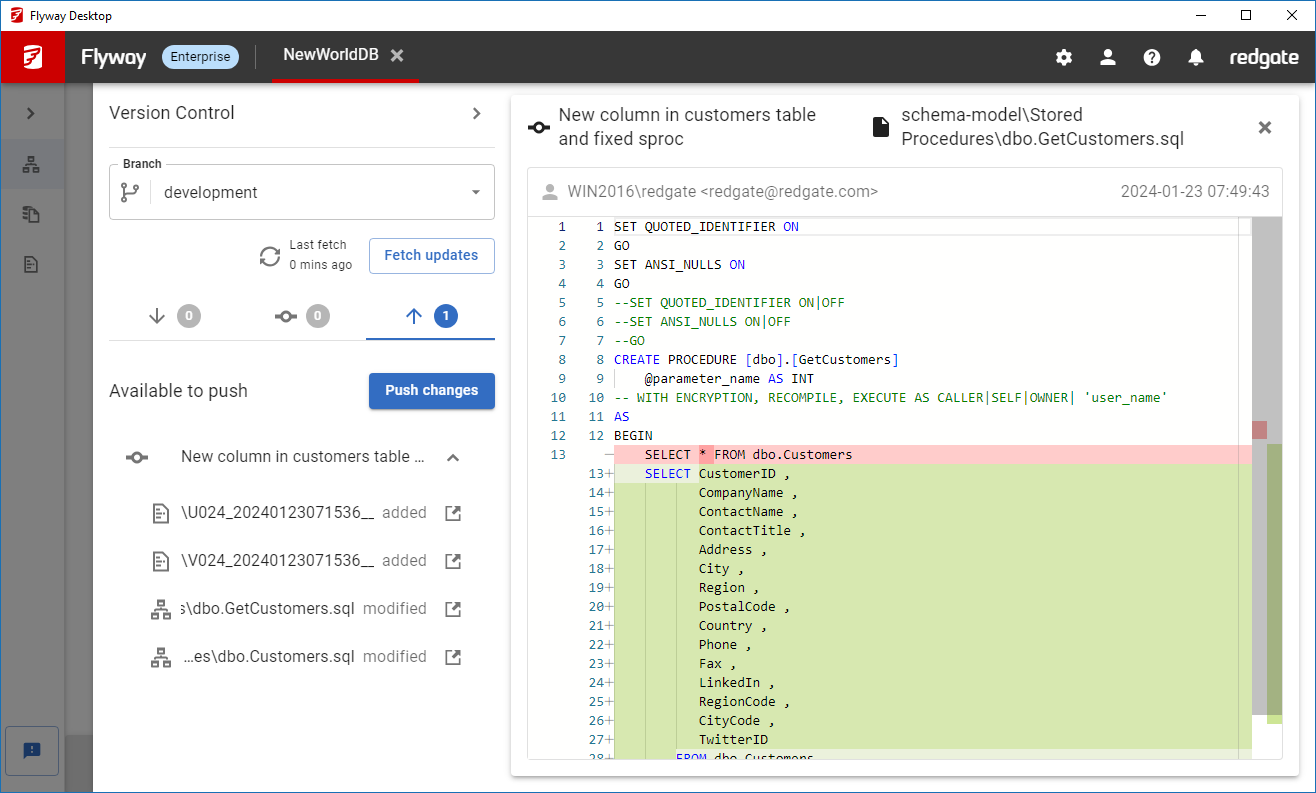
Click the up arrow ![]() to see your local commits that haven't been pushed to the remote repository yet. You can click on each commit to view it's contents. You can view the differences for each file.
to see your local commits that haven't been pushed to the remote repository yet. You can click on each commit to view it's contents. You can view the differences for each file.
 →
→ 
Click Push changes to push all your local commits to the remote repository. This will push all staged commits that currently exist in the local repository to the remote, including commits performed outside of Flyway Desktop if your Flyway project is in a sub-folder.
If the local branch has no currently configured remote branch to track, Flyway Desktop will attempt to create the branch in the remote repository using the command git push --set-upstream origin <branch>.
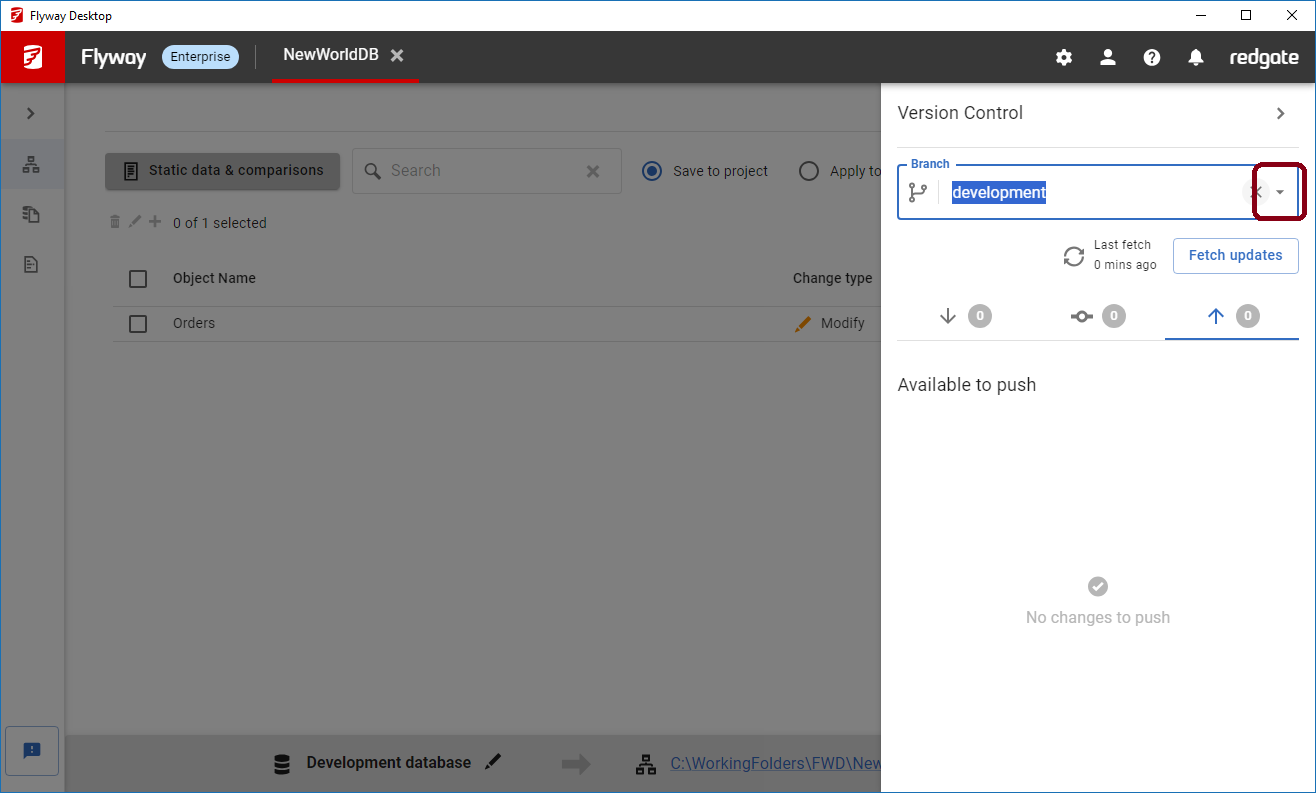
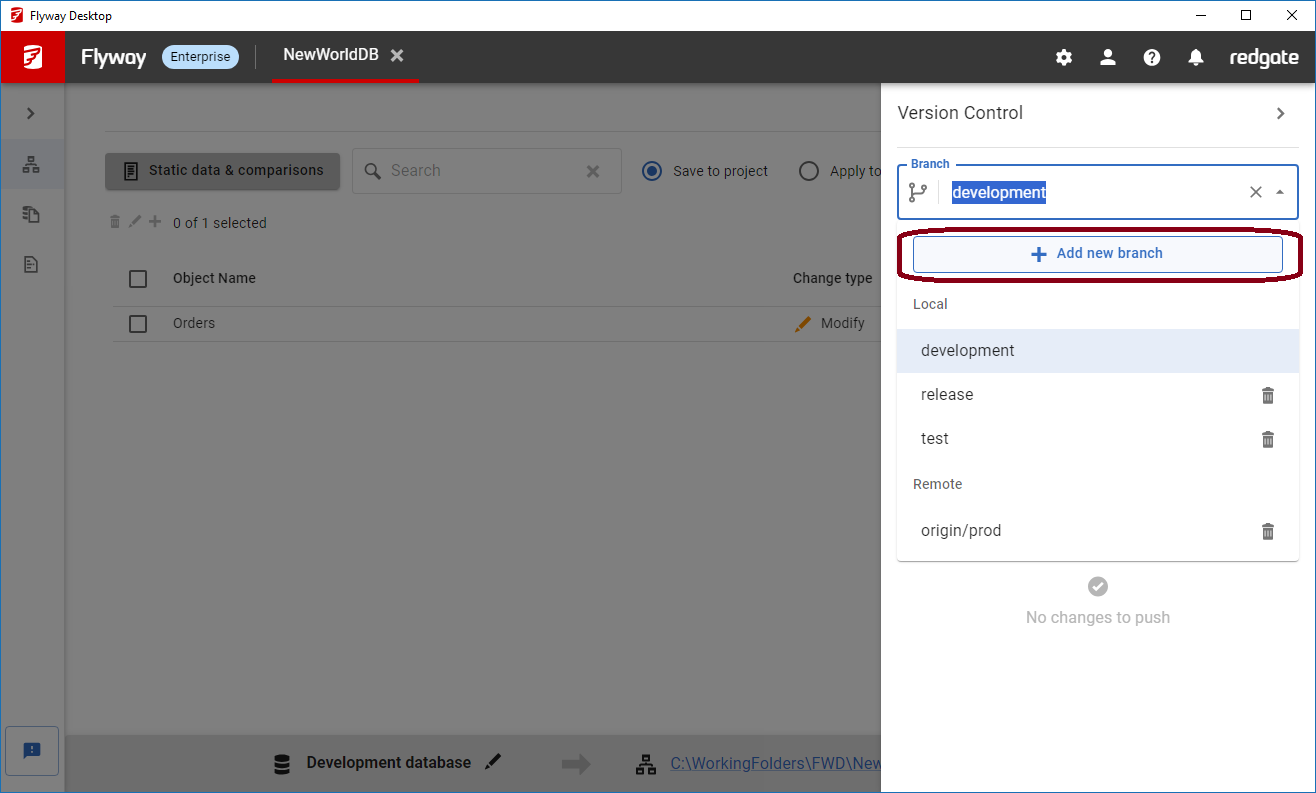
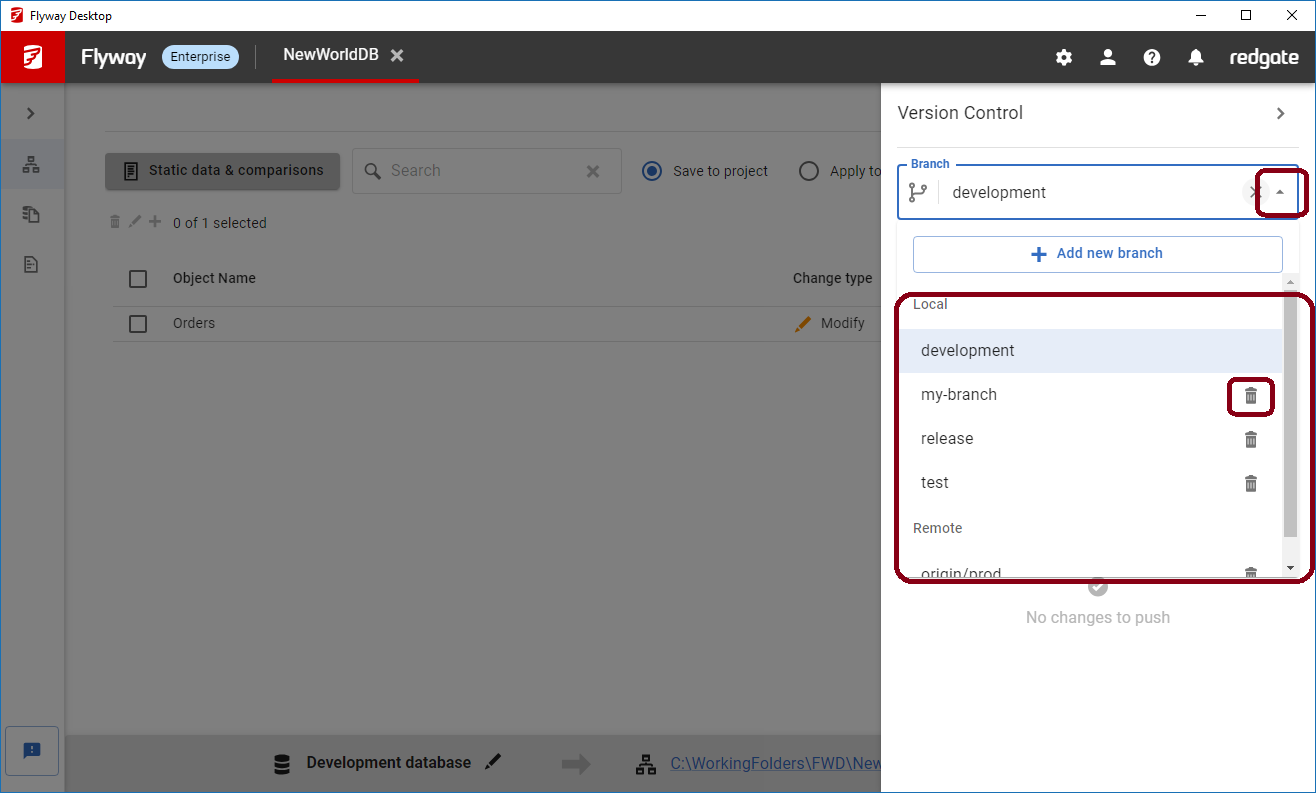
Creating new branches
If you are working on a new feature and wish to isolate your changes from the default or main branch, you can start working on a new branch by clicking the drop down next to the current branch name and then clicking Add new branch.
 →
→ 
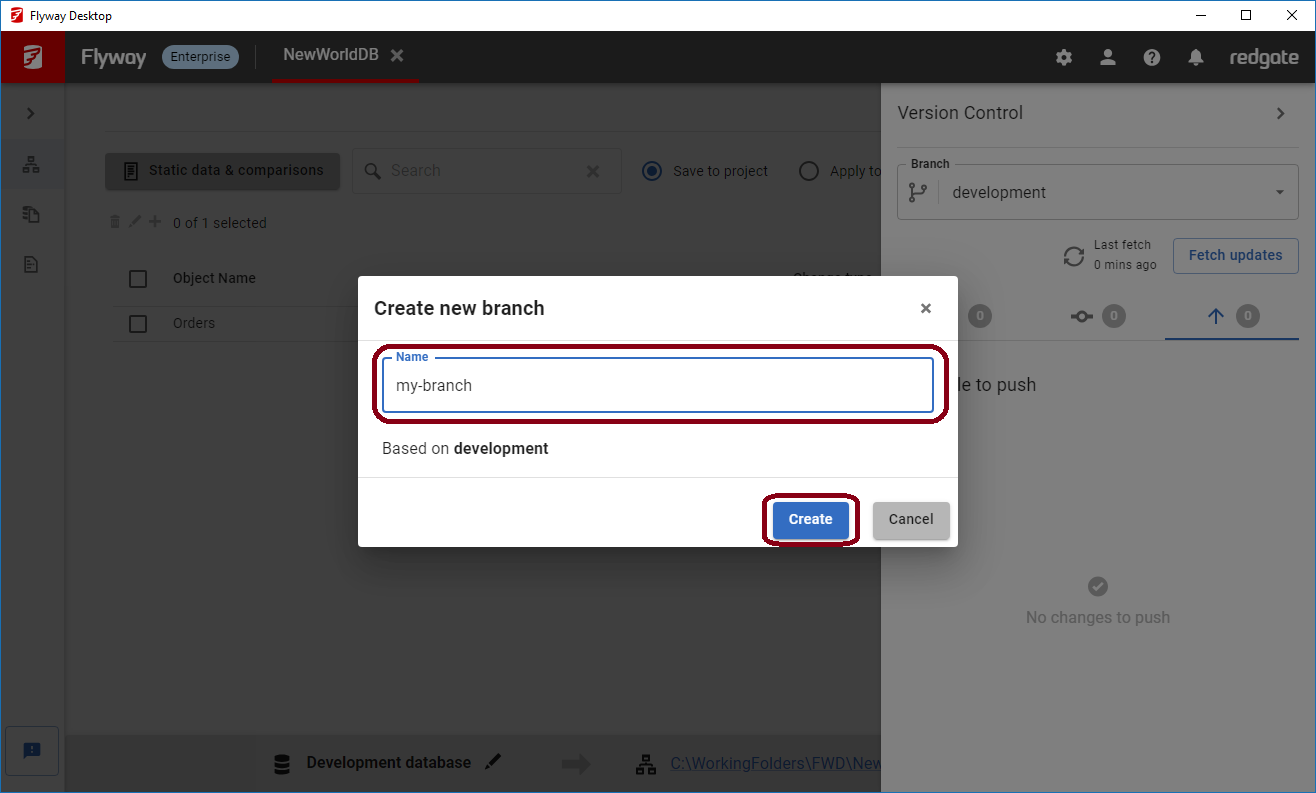
In the opened modal, enter the name of your new branch and click Create.
You can use the branch drop down to switch between different branches and delete a branch if needed.
Resolving merge conflicts - 1
In the example below, you and a teammate have both edited the project file. Flyway Desktop gives you the option at this point to either:
- Resolve the conflicted file
- Abort the pull
If you choose to abort the pull, then your local checkout of the repository will be rolled back to the state of the commit before you attempted to pull. If you choose to resolve the conflict in the file, Flyway Desktop will attempt to open your configured merge tool and let you choose how to resolve the conflict.
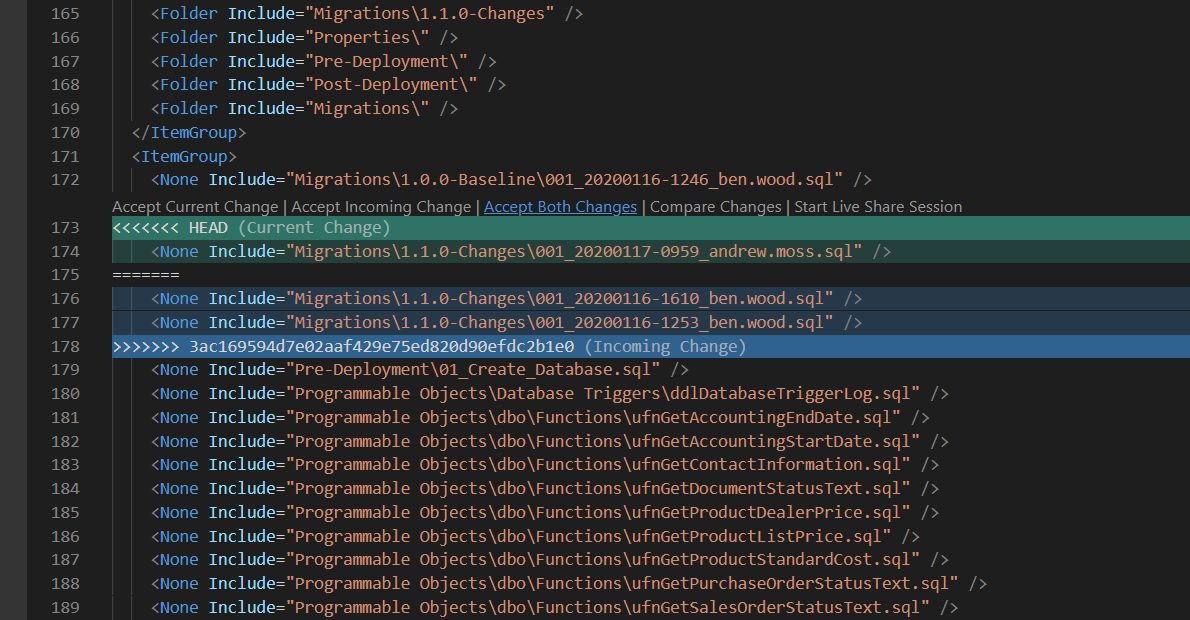
In this example we chose to resolve the conflict using Visual Studio Code. You can see that our teammate has also made a change to the project file. We will need to choose how to merge these lines. For this scenario we want to Accept both changes, but for other scenarios you may need to manually combine your changes with the changes made by the rest of your team.
After all conflicts are resolved it is recommended that you Verify your changes to check that the project still builds successfully. You can do this by going back to the Generate Migrations tab, which will clean and rebuild your shadow database if changes were made to Versioned migration scripts. In some scenarios, you may still need to make additional changes in order for the project to build (e.g. a merged migration may have modified an object used in a later migration). When you are happy with all the changes, you can commit your resolution to the conflicts. Git will create a merge commit for the changes and the merge operation will be completed.
Resolving merge conflicts - 2
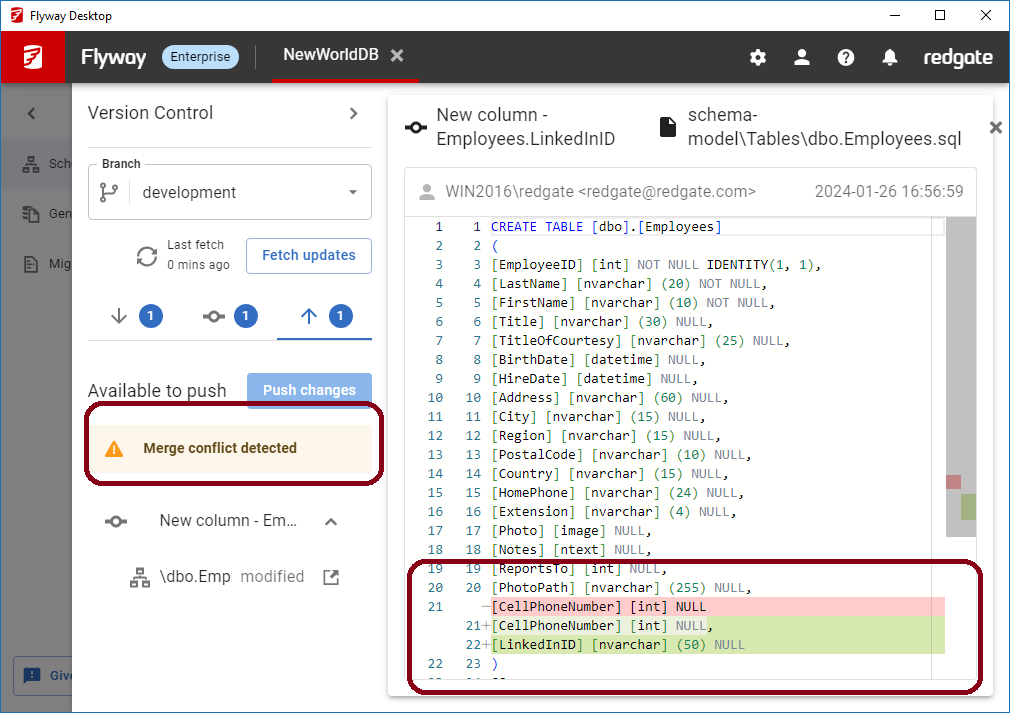
In this example, you and your teammate have both changed the same table. Flyway Desktop will show you if merge conflicts are detected. Let's see what happens:
- Conflicting changes made
- You made a change to your development database. You added a new column - dbo.Employees.LinkedInID. You used Flyway Desktop to save this to disk and commit it locally.
- Your teammate made a change to their development database. They added a new column - dbo.Employees.TwitterID. They used Flyway Desktop to save to disk, commit, and then pushed it to the remote repository.
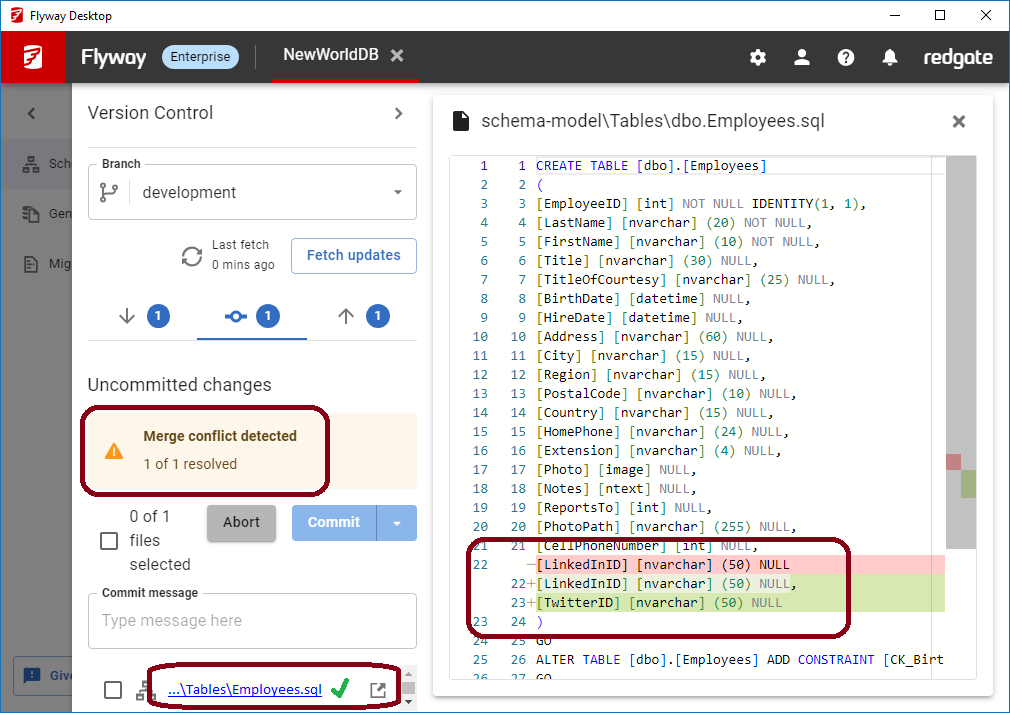
- In Flyway Desktop, when you try to push your changes, you will get a Merge conflict and you will not be able to Push/Pull any changes until the conflict is resolved. You can click on the object in the Pull/Push list to see the differences.
- Go to the Uncommitted changes in the center. Click on the blue linked filename next to the merge conflict indicator in the list
 to open this file in your editor.
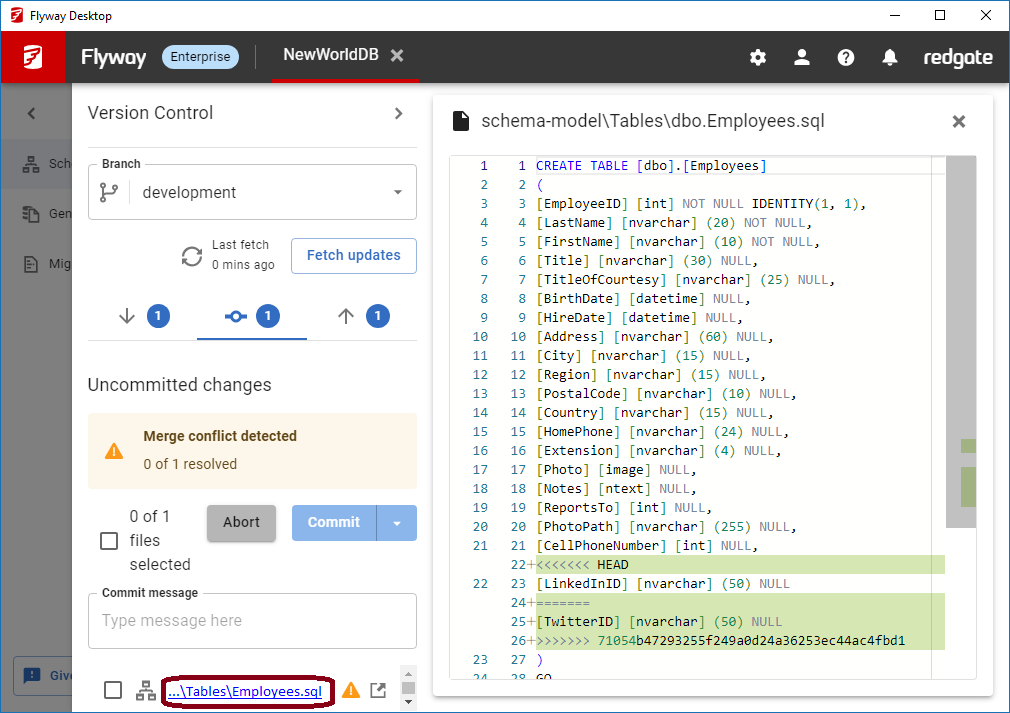
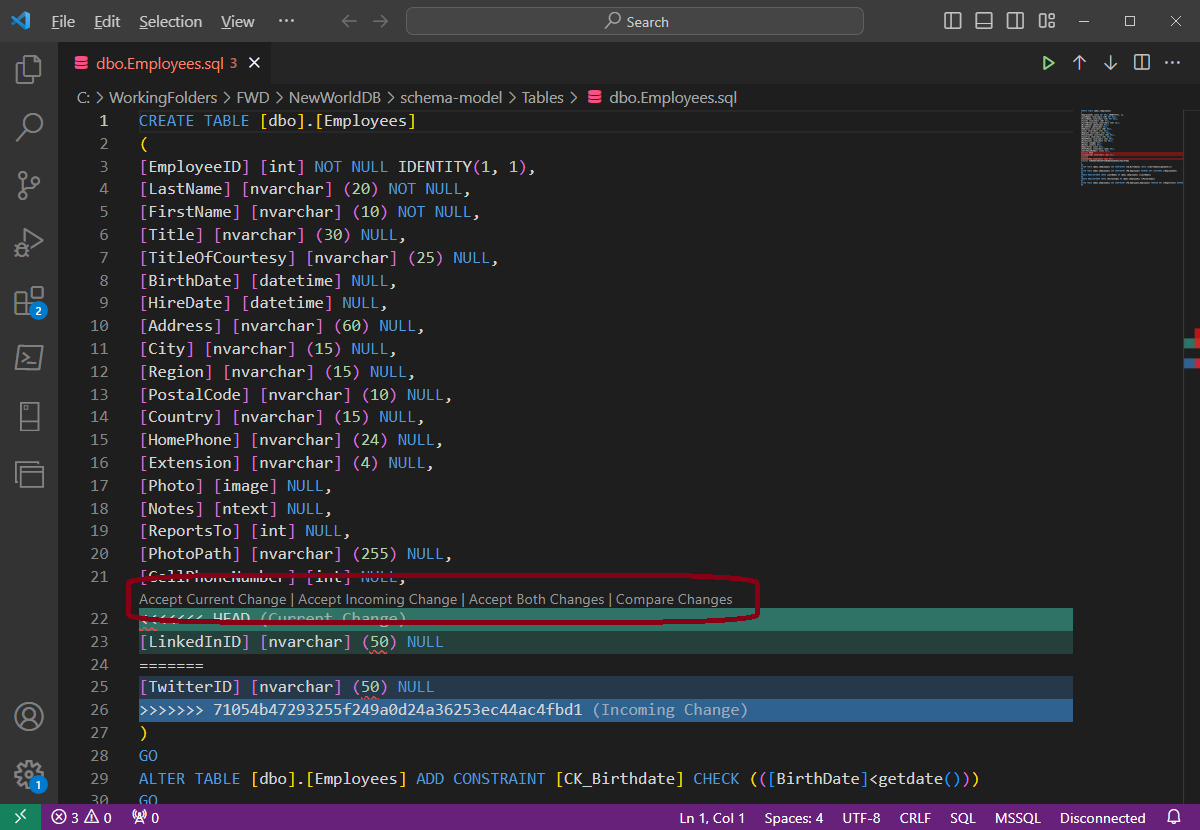
- In this example, we're using VS Code. Your editor should know this file is in a conflicted state and give you options to resolve the conflict. In this case, you "Accept Both Changes." You may also need to edit the file to fix any SQL syntax, as needed. In this case, you would also need to add a comma after the second to the last column to make the syntax correct. You can then Save your file and close this editor.
 →
→ 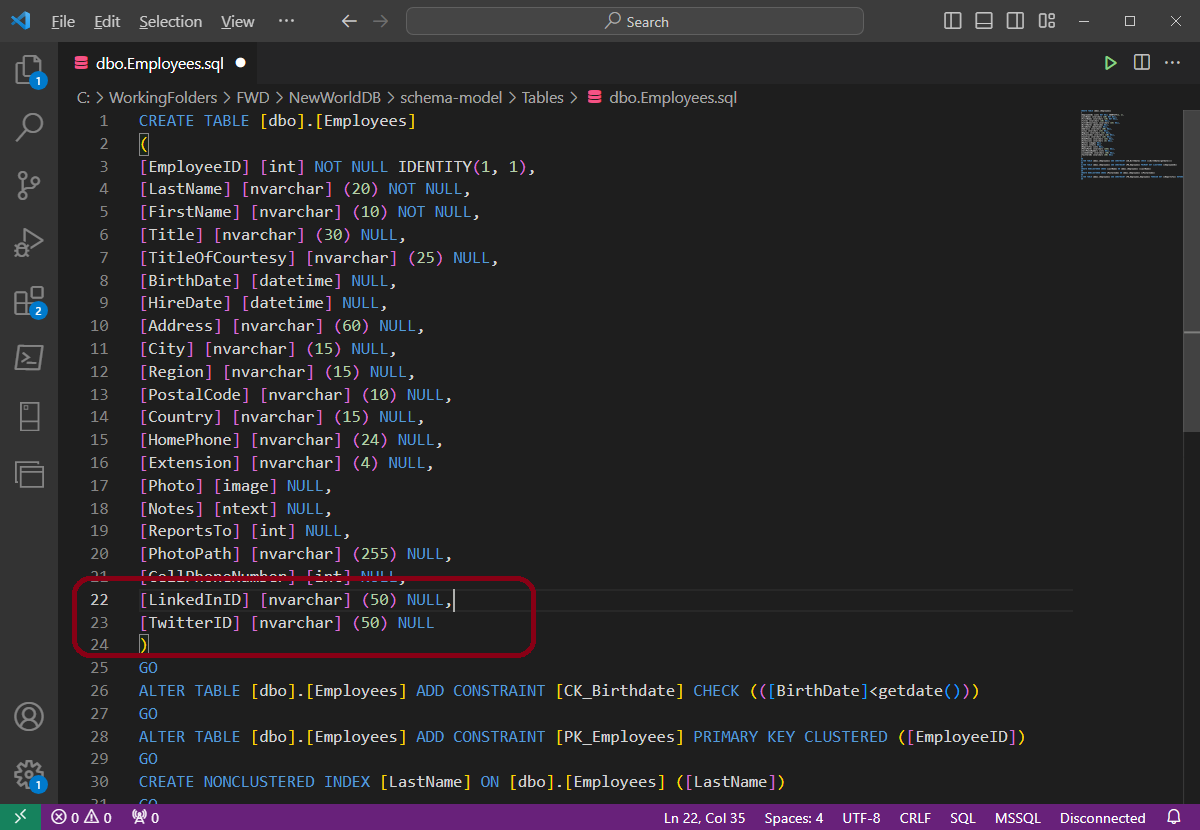
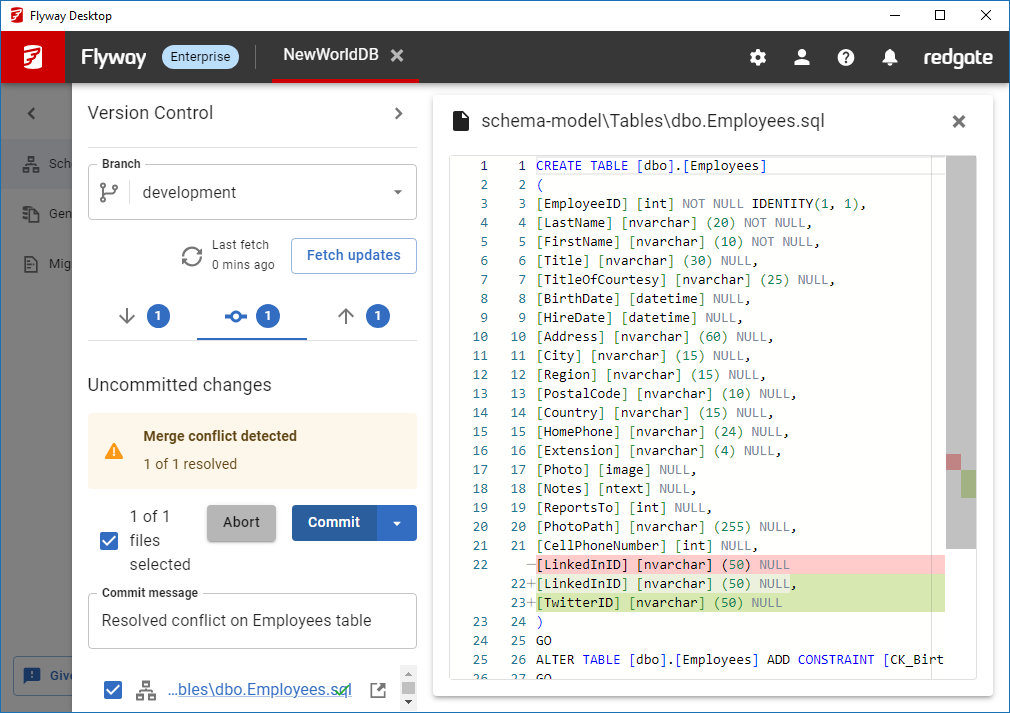
- Back in Flyway Desktop, the conflict is resolved with a green tick. Note - You may need to close and re-open the differences view to reflect the latest changes in the script.
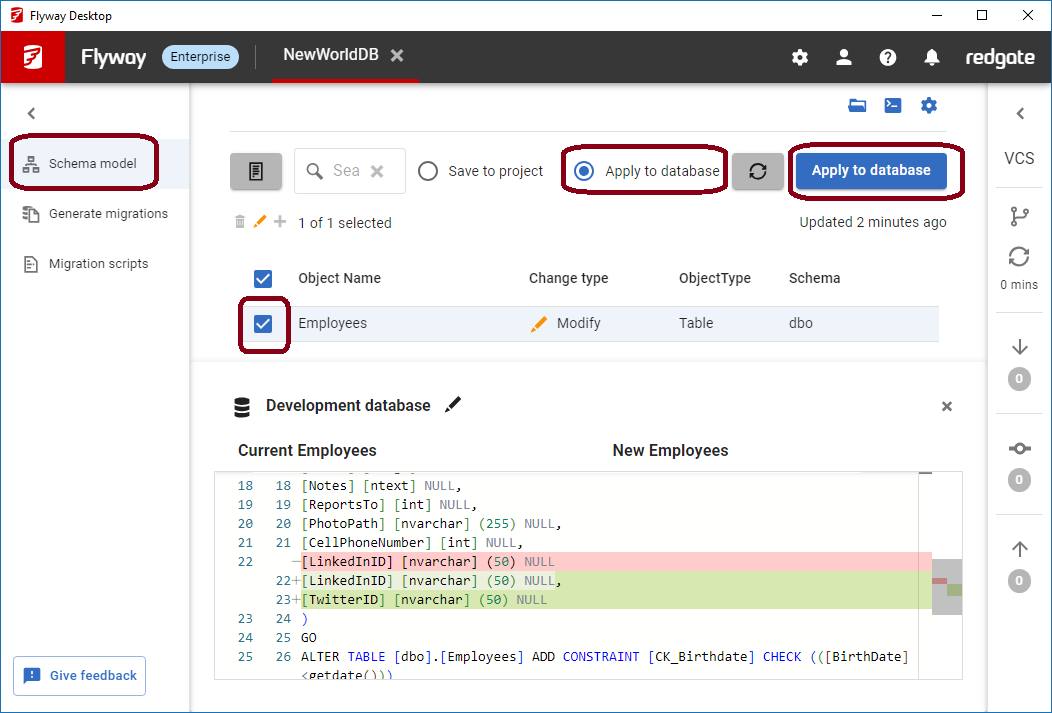
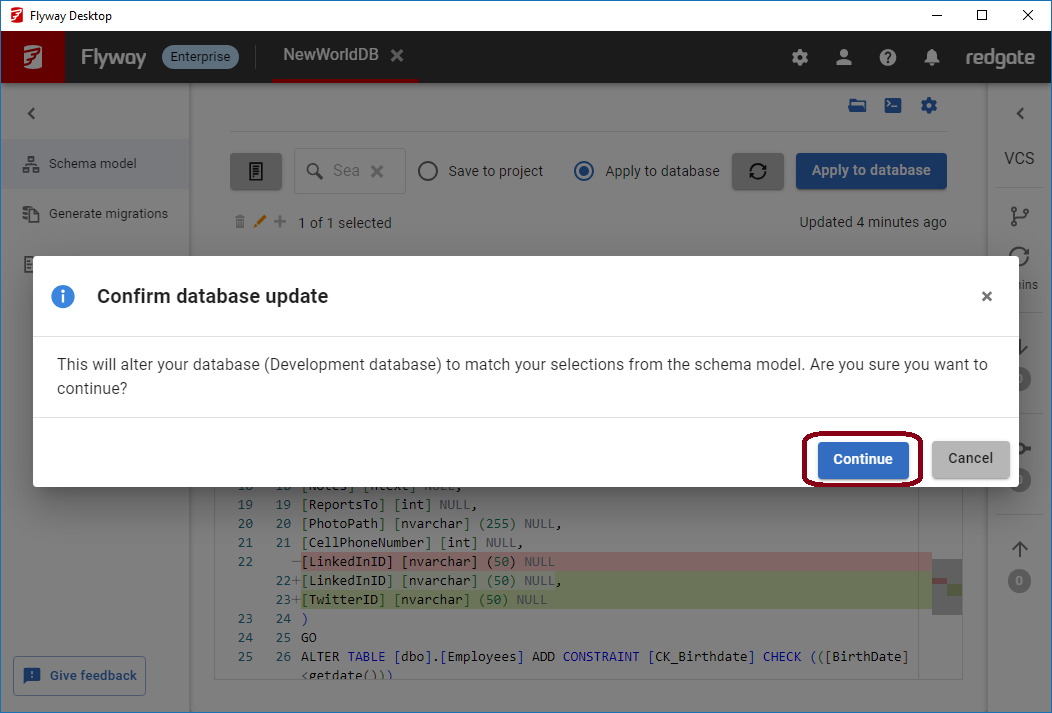
- If you resolved a conflict on an object in the Schema model, you'll want to go back to the Schema model view and apply these changes to your database. On the Schema model view, click Refresh and select the Apply to database option. Select the object in the list and click Apply to database. Click Continue to confirm you're happy to apply these changes to your development database.
 →
→ 
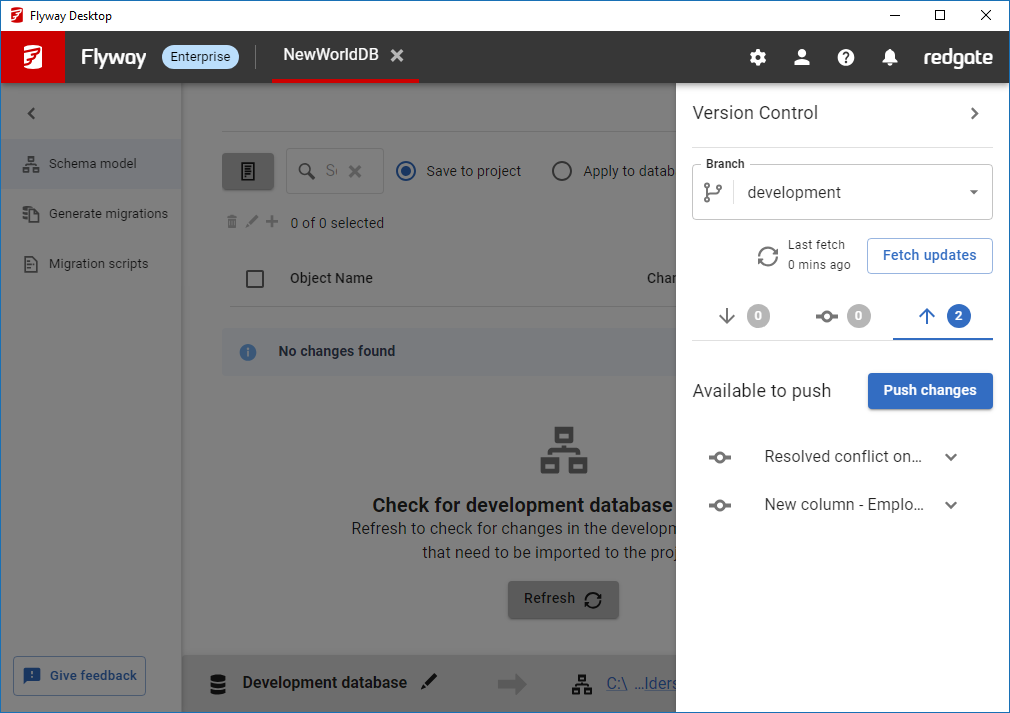
- Click back on the Version Control side panel to commit these changes. Select the files, enter a Commit message, and click Commit. You can now Push your change to the remote repository to share with the rest of your team.
 →
→ 
Advanced features
Learn more about Associating commits with issues, work items, bug ids.
Isolated databases for branches - Read more about Dedicated databases when switching branches.
Troubleshooting and Errors
Check the Git requirements for Flyway Desktop. If Git encounters any errors when attempting to perform an action triggered in Flyway Desktop, the error will be caught and displayed to the user with additional information to help resolve the problem. If you encounter a Git error that is unexpected or if the message does not help resolve the issue, then please let the development team know so we can improve our error handling and make it easier for you to get going again. Common errors that you may hit include:
- Failed to checkout branch or unable to pull changes - this is usually because you have uncommitted changes and have attempted to switch to a new branch or pull from the remote branch.
- Branch already exists or invalid branch name - this probably indicates that you are trying to create a new branch, but that name already exists or that you are using invalid characters in the name (e.g. spaces).
If you want to push your changes, you'll need to setup a remote. You can learn more about this at https://git-scm.com/docs/git-remote.
 This means the branch doesn't exist on your remote repository. We will attempt to create it for you when you push the changes.
Seeing differences because of newline characters


