Azure Flexible Server using Service Principal credentials
Published 14 November 2024
We recommend using Service Principal credentials to monitor Azure Flexible Servers if the Base Monitor you're using is running on infrastructure outside of Azure.
Use this page if both:
- You are going to monitor an Azure Flexible Server and
- The Base Monitor you are going to add that server to is not hosted on an Azure virtual machine.
(If your Base Monitor is hosted in Azure then you may prefer to use system-assigned managed identity credentials instead).
Azure API usage might incur charges, check Azure API charges for more information.
The credentials need to be set up in two parts. Firstly creating and assigning them in Azure and secondly entering them in to Redgate Monitor.
Setting up your permissions in Azure
In order to use service principal credentials, you will need to create an app registration in Azure if you do not already have one, and then give the app registration the "Monitoring Reader" role on your Azure Flexible Server instance.
Redgate Monitor needs three values to connect with the Service Principal
- Client ID
- Tenant ID
- Client Secret
The following instructions show how to note these values and assign the role, via both the Azure CLI or the Azure Portal depending on your preference.
Steps
Find Client ID and Tenant ID for the app registration
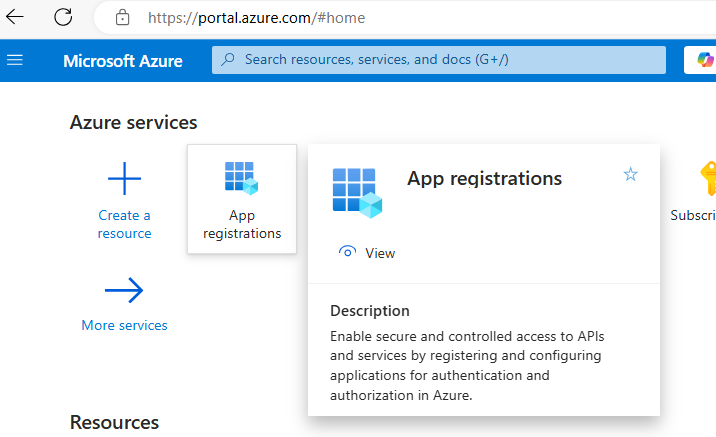
- First, go to the "App registrations" section under "Azure Services".
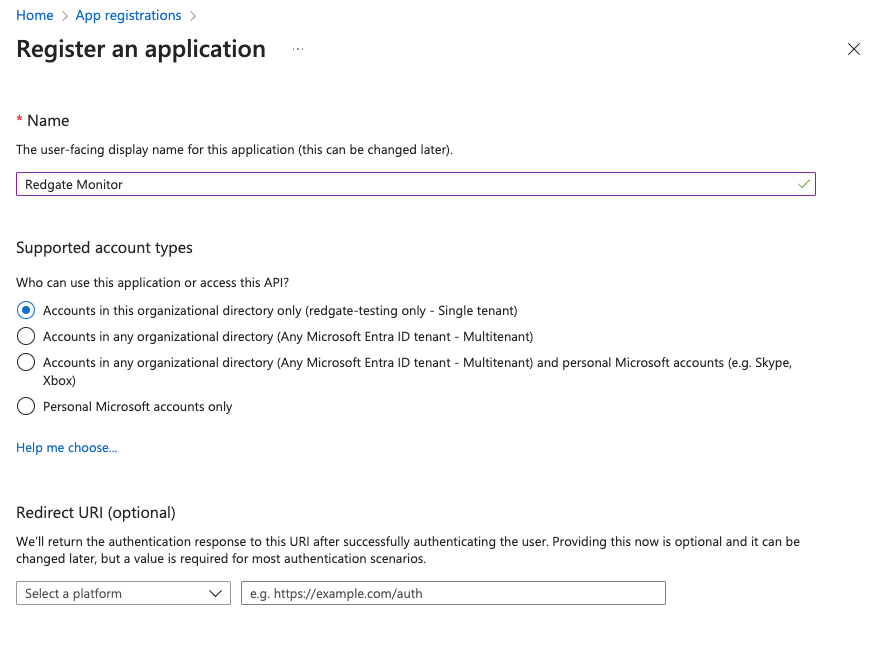
- If you do not already have an app registration that you wish to use, create a new one. For this guide, we will create one named "Redgate Monitor":
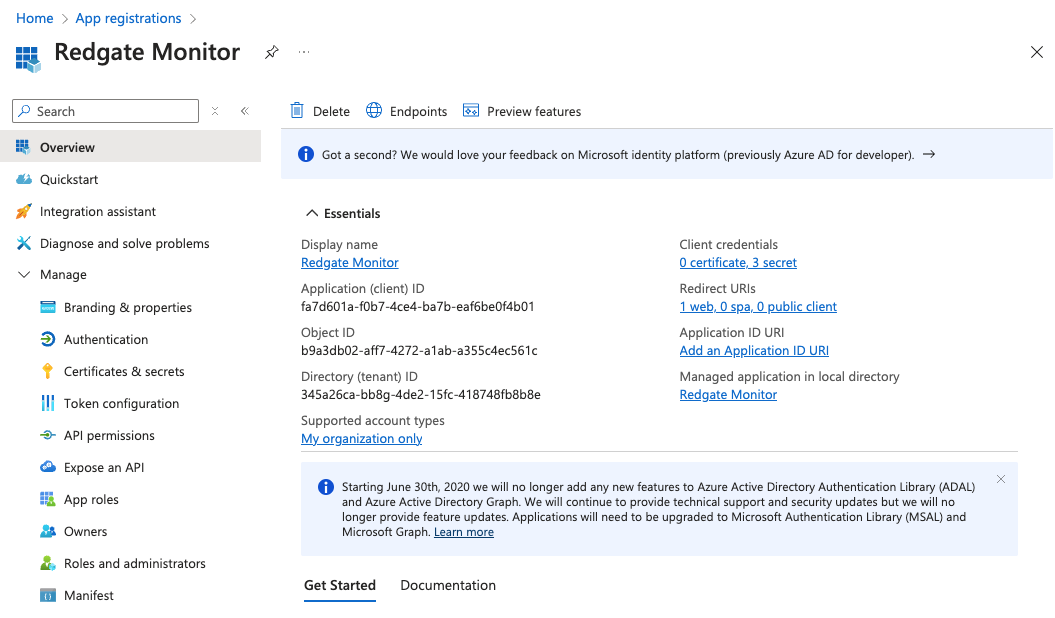
- Note the Application ID and Directory ID of the App registration
After creation, you should take note of the "Application (client) ID" as well as the "Directory (tenant) ID" as shown in the "Overview" page under "Essentials", as these will be needed in Monitor:
- First, go to the "App registrations" section under "Azure Services".
Create a new Client Secret and note its value
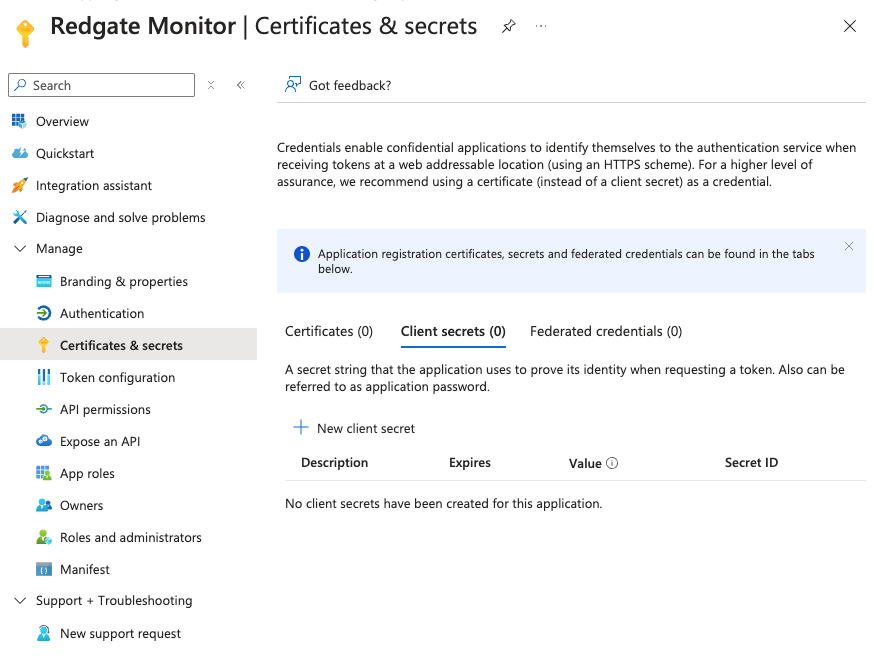
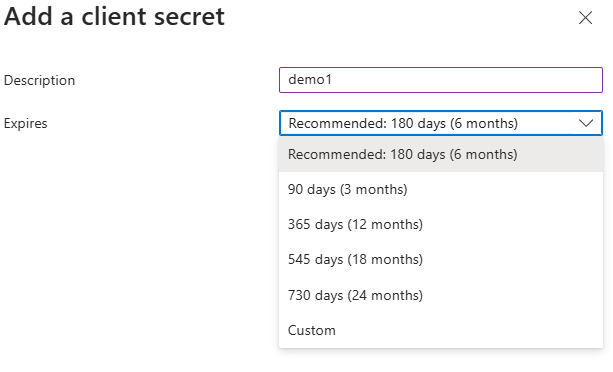
Under "Certificates & secrets" click "New client secret" to generate a secret:Click on "New client secret" Choose expiry time
Copy the Value for the newly created secret.
After the client secret has been created, the UI will show a new entry in the table. You should copy theValuefrom here. This secret value is shown only once on creation, so do not forget to copy it before leaving the screen.The following step will have to be repeated if you move your Azure Flexible Server to a different resource group or subscription.
Grant the app registration permission to monitor the Flexible Server
- First, find the server you wish to monitor by visiting the list of Azure Flexible Servers and choosing the relevant instance:
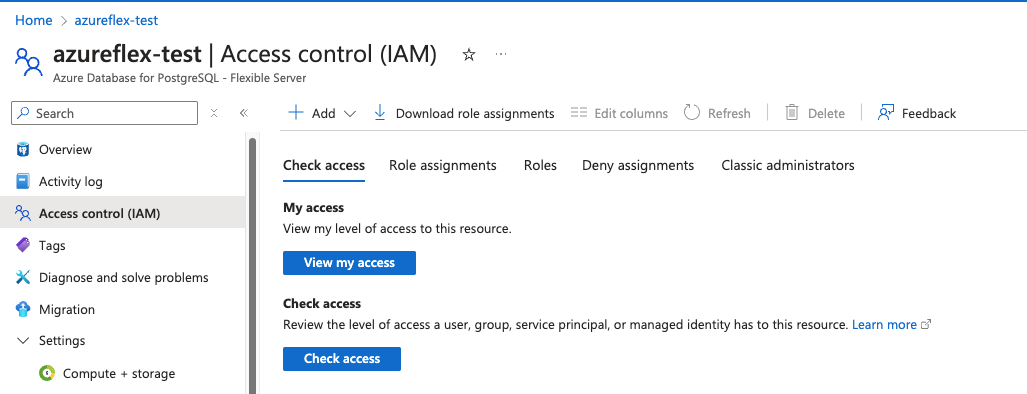
- Select the "Access control (IAM)" sub section on the overview page for the instance:
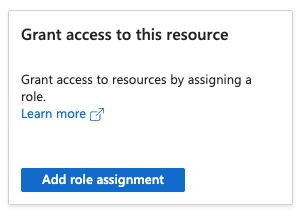
» - On the same page, click "Add role assignment" under "Grant access to this resource":
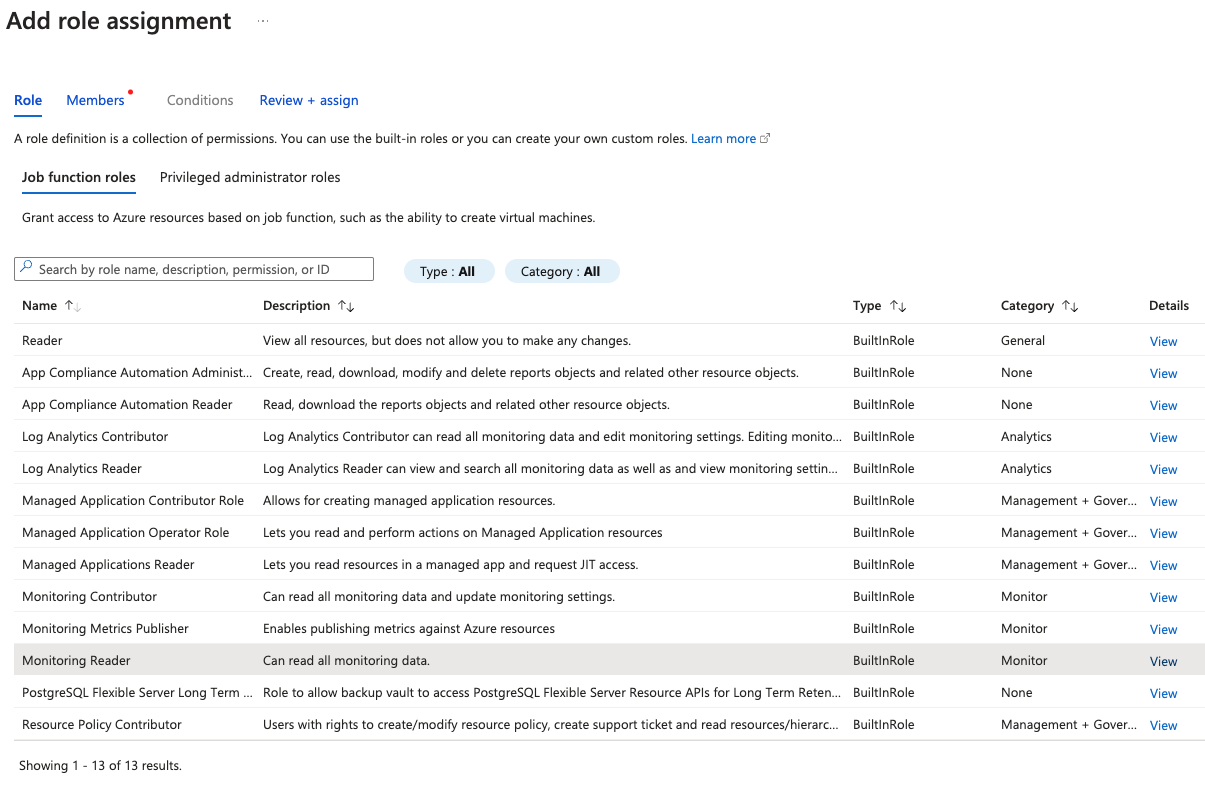
- In the "Role" tab of the "Add role assignment" page, first click the "Monitoring Reader" role. This will allow Monitor to access the necessary metrics via the Azure API:
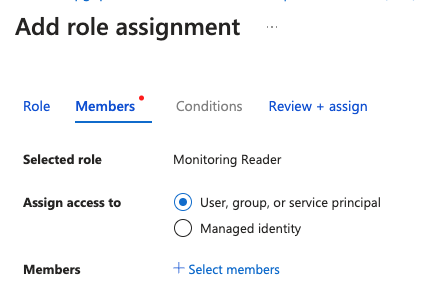
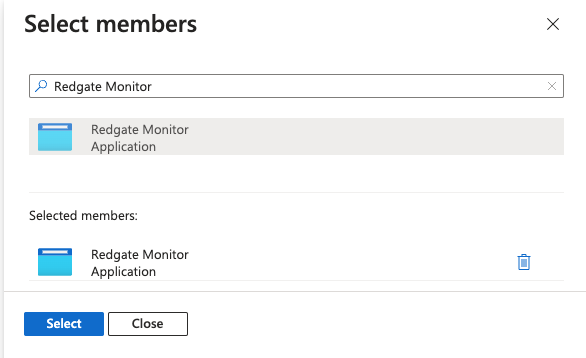
- In the "Members" tab of the "Add role assignment" page, select "User, group, or service principal" for "Assign access to" and then click "Select members", and select the app registration from step 3:
» - In the "Review + assign" tab of the "Add role assignment page", verify that the scope refers to the Azure Flexible Server instance you intend to add to Redgate Monitor, and the app registration is the same as the one from step 3:
- First, find the server you wish to monitor by visiting the list of Azure Flexible Servers and choosing the relevant instance:
- Click the "Review + assign" button again to create the role assignment. You should now be able to use host monitoring for your Azure Flex instance in Monitor.
Steps:
- In a terminal such as bash or PowerShell, login to Azure with the
az logincommand and choose the appropriate subscription that contains the Azure Flexible Server as a resource.Login to the Azure CLI
az login
- If you already have an app registration that you wish to use with Redgate Monitor, you can search for it by its display name to retrieve its application ID, which will be used later:
Retrieve app registration ID
# Change 'Redgate Monitor' in the command below to your own app registration name

az ad app list --filter "startswith(displayName, 'Redgate Monitor')" --query "[].{displayName:displayName, appId:appId}"

# Example command output:
[
  {
    "appId": "446gf34d-3da8-5a57-9gfc-6962f16ed896",
    "displayName": "Redgate Monitor"
  }
]
If you do not have an existing registration, you can create one first using the following command:Create app registration
az ad app create --display-name "Redgate Monitor"
- With the application ID retrieved from above, use the following command to create a new client secret (called
passwordin the output) within that application. You should save the output for creating cloud service credentials in Monitor.Create Secret App Registration
# Change 'appId' below to your own application ID as retrieved from step 1. az ad app credential reset --append --id "<appId>" --display-name "flex-monitor" # Example command output: { "appId": "446gf34d-3da8-5a57-9gfc-6962f16ed896", "password": "*****", "tenant": "124b26cd-db3f-4dc2-85ec-408758fb8b8e" } - Now, retrieve the object ID for the app registration using the following command. This will be used to assign it the "Monitoring Reader" role on the Azure flex instance:
Retrieve object ID
# Replace 'Redgate Monitor' with the name of the app registration from step 2. az ad sp list --all --query "[].{displayName:displayName, appObjectId:id}" --display-name "Redgate Monitor" # Example command output [ { "displayName": "Redgate Monitor", "appObjectId": "e49bddbd-e1e6-445f-9ef2-4b3f69d690d2" } ] - It also necessary to retrieve the resource ID for the Azure Flexible Server instance, which will act as the scope for our role. You can do that with the following command, which will list the Flexible Server instances and their resource IDs:
Retrieve the resource ID
az postgres flexible-server list --query "[].{name:name,flexResourceId:id}"

# Example command output
[
  {
    "flexResourceId": "/subscriptions/f71d87ce-fa7f-405b-bb77-d7b375fcff34/resourceGroups/redgate/providers/Microsoft.DBforPostgreSQL/flexibleServers/azureflex",
    "name": "azureflex"
  }
]
The following step will have to be repeated if you move your Azure Flexible Server to a different resource group or subscription, unless the role is scoped to a higher level than the movement. For example, if your role is scoped to the subscription level you will not have to do anything if you move the server to a different resource group on that subscription.
- Using the object ID from step 4, as well as the resource ID for your Azure flexible server instance from step 5, we can assign the built-in "Monitoring Reader" role to your app registration, which will give it access to the metrics of the database instance.
Assign a role
# Replace 'appObjectId' in the command below with the app registration's object ID, and 'flexResourceId' with the resource ID for the Flexible Server retrieved in the previous steps.

az role assignment create --assignee "appObjectId" --role "Monitoring Reader" --scope "flexResourceId"
Optionally, if you wish to monitor a number of instances on the same resource group or subscription, you can increase the scope by only including the relevant sections. For example:Assign a role with a greater scope
# To give permission to monitor all instances in a resource group:
az role assignment create --assignee "appObjectId" --role "Monitoring Reader" --scope "/subscriptions/f71d87ce-fa7f-405b-bb77-d7b375fcff34/resourceGroups/redgate"

# To give permission to monitor all instances in a subscription:
az role assignment create --assignee "appObjectId" --role "Monitoring Reader" --scope "/subscriptions/f71d87ce-fa7f-405b-bb77-d7b375fcff34"
- You should now be able to use host monitoring for your Azure Flex instance in Monitor.
Setting up your permissions in Redgate Monitor
In order to use the service principal that was set up in the previous section of the guide, you will first have to add a cloud service within your Monitor instance as described in the following steps.
- Browse to the Configuration page within Redgate Monitor and select Cloud service credentials within the Estate section:
- In the cloud service page, click the New cloud service button:
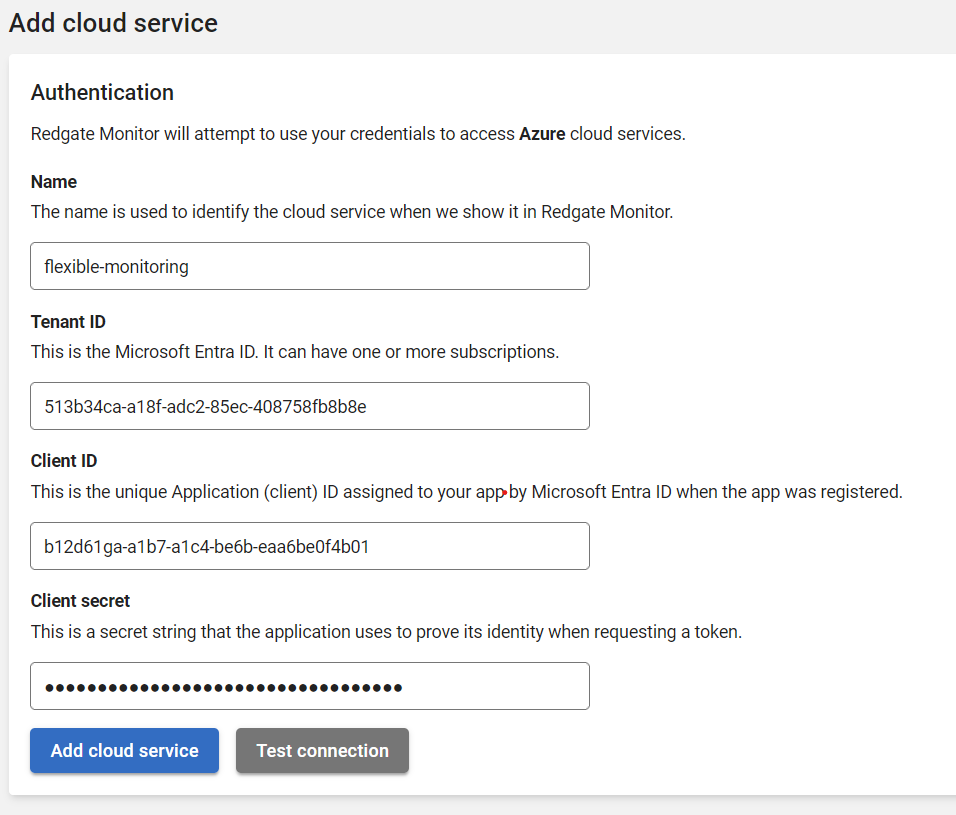
- Choose a meaningful name for the service, and fill in the rest of the details using the information you retrieved in steps 3 and 4 of the Setting up your permissions in Azure guide above:
- Test your connection and verify that it works, then press the Add cloud service button.
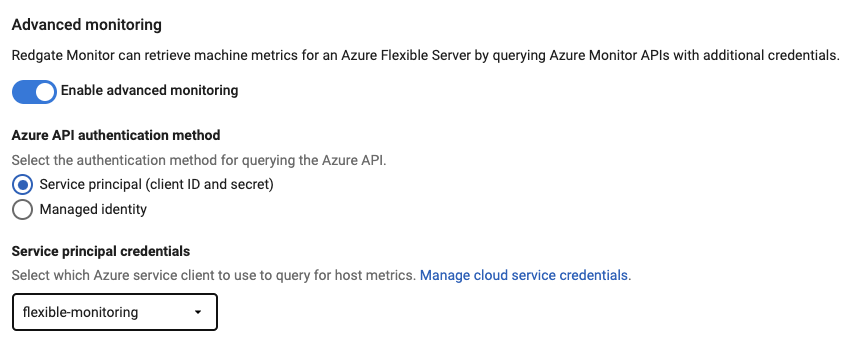
- When adding a new Azure Flexible Server instance to your list of monitored servers, or editing the credentials of an existing instance, you should now be able to select the cloud service credentials after enabling Host monitoring and selecting Service principal for the authentication mode:
