Setting up Automated Installs
Published 28 March 2024
A working example of how-to setup automated Redgate Monitor installations and upgrades, using PowerShell.
Section 1 - Introduction
To make the most of Redgate Monitor, upgrading both the Web and Base monitors on a frequent cadence is best practice. By doing this, you'll ensure that the latest features and bug fixes will always be present in your environment.
Updates to Redgate Monitor can be done in either a manual or automated fashion, the latter often being the desired approach.
This article has been designed to provide a working example around how you may setup and configure an automated installation process using PowerShell scripting.
Section 2 - Redgate Documentation
Before we get started, it's valuable to note that a lot of the content discussed in this article can also be found in the parent article linked HERE. References to this article will be made throughout, therefore having it open in a separate window may be valuable, especially when thinking about tailoring any examples provided to meet your specific needs.
Section 3 - Getting Started
Please find the example PowerShell scripts referenced in this article below.
- RedgateMonitor_Automation.ps1
- RedgateMonitor_Automation_DownloadLatestVersion.ps1
- RedgateMonitor_Automation_InstallWebService.ps1
- RedgateMonitor_Automation_InstallBaseMonitor.ps1
Section 4 - Considerations
Before we take a look within the PowerShell scripts themselves, consider as you go the following questions:
- What upgrade cadence am you looking to put in place?
- What Redgate Monitor architecture do you have?
- Is the Base Monitor and Web Service installed on the same machine? Or are they separate?
- If separate, will the Base Monitor server be able to access files present on the Web Service machine?
Section 5 - PowerShell Scripts
** Before we get started, it's presumed that you have some understanding of PowerShell and the value it can provide. The scripts have been designed to be simple in nature, but will require some level of customization to be carried out in order for them to be functional in your environment. **
RedgateMonitor_Automation
This script was designed primarily as a means for consolidating the number of locations where Script Variables are input. In addition to calling the individual scripts that would be carrying out the actual process logic (For example, downloading the latest version of Redgate Monitor). This script makes the assumption that all the provided scripts are accessible in the same folder location. If this is not the case in your environment, simply change the pathing.
# Setting up the Variables List for use with the Scripts #

$RedgateMonitorDownloadLocation = "C:\Program Files\Red Gate\Redgate Monitor\Automation\Downloads"
$RedgateMonitorWebMSILocation = "C:\Program Files\Red Gate\Redgate Monitor\Automation\Downloads\Web"
$RedgateMonitorBaseMSILocation = "C:\Program Files\Red Gate\Redgate Monitor\Automation\Downloads\Base"
$RedgateMonitorWebHost = "WIN2016"

# Download Latest Redgate Monitor Version #

& "$PSScriptroot\RedgateMonitor_Automation_DownloadLatestVersion.ps1" -rgmDownloadLocation $RedgateMonitorDownloadLocation
At the top of the script, in my instance loaded in the Windows PowerShell ISE, you will find 4 variables. These variables provide the following information to the scripts:
Variable | Usage |
RedgateMonitorDownloadLocation | The location where the latest Redgate Monitor version will be downloaded to. *Ensure that this location is accessible to the Web service, as it will need to access it. |
RedgateMonitorWebInstallerLocation | The location where the Web Service MSI will be extracted to. |
RedgateMonitorBaseMSILocation | The location where the Base Monitor MSI will be extracted to. |
RedgateMonitorWebHost | Host address for the Redgate Monitor website *If your base monitor service/s can't access the Redgate Monitor website, you will need to implement a different method for accessing the Base Monitor executable. Information on this can be found HERE. |
The values of the above are passed into the corresponding scripts, using named arguments, to reduce the number of hardcoded variables in the other scripts. Changes to these variables will only need to be done once and from this script.
RedgateMonitor_Automation_DownloadLatestVersion
This script has been designed to download the latest stable version of Redgate Monitor from the Redgate website.
# Assigned Named Parameters if Provided - Ensure these are configured in the RedgateMonitor_Automation.ps1 file before use #

Param(
[string]$rgmDownloadLocation
)

# Change location to Redgate Monitor download folder #

Set-Location $rgmDownloadLocation

# Download the latest stable release from the Redgate website and set it as the Response variable #
$Response = Invoke-WebRequest https://download.red-gate.com/RedgateMonitor.exe -OutFile RedgateMonitor.exe
It achieves this by carrying out the following steps:
- Obtain passed name parameter variable
- Change the current folder location to the desired Download location
- Download the latest STABLE Redgate Monitor release
Tip – If you require the latest possible release, then this script can be updated to this location or if you need a specific version one of the other folders mentioned below:
| Version | Location | Notes |
|---|---|---|
| Latest Stable | https://download.red-gate.com/RedgateMonitor.exe | |
| Historic Stable | https://download.red-gate.com/installers/RedgateMonitor/ for versions prior to v14, see: | Dated Sub-folders |
| Latest CFU | https://download.red-gate.com/checkforupdates/RedgateMonitorWebService.exe | |
| All Releases | https://download.red-gate.com/checkforupdates/RedgateMonitorWebService for versions prior to v14, see: | Versioned Exe Files |
RedgateMonitor_Automation_InstallWebService
Once the latest Redgate Monitor version has been downloaded, it is necessary to extract the MSI from within the exe. Followed by carrying out the install itself. To achieve this, the following steps are attempted:
- Extract ‘RedgateMonitor_Web_Installer.msi’ from RedgateMonitor.exe
- It is CRITICAL that the /IAgreeToTheEULA argument is utilized here. Therefore, please ensure you have read and agree to the EULA before continuing.
- Ensure a Logs folder exists in the Web Installer Location, otherwise create it
- Run the MSI in the background, i.e quiet mode, with hardcoded variables
- Note – It is fundamental that the arguments specified in this section have been updated to match your environment. If not, the process will fail.
# Step 1 - Create arguments List - See documentation page for possible values #

$MSIArguments = @(
"/i",
"RedgateMonitor_Web_Installer.msi",
"I_AGREE_TO_THE_EULA=yes",
"SERVICETYPE=local",
"SERVICEPORTNUM=501",
"PRESERVECONFIG=yes",
"/quiet",
"/norestart",
"/l*v .\Logs\RedgateMonitor-Web-$DateStamp-log.txt"
)

# Step 2 - Change Directory to Web.msi Directory #

Set-Location $smWebMSILocation

Start-Process "msiexec.exe" -ArgumentList $MSIArguments -Wait -NoNewWindow
The example arguments above will install the Web Service, using the Local System user. If you require changes to this, or any other parameter, review the parent article found HERE.
RedgateMonitor_Automation_InstallBaseMonitor
Similarly to the previous script, once the Web Service has been installed, the same steps need to be carried out for the Base Monitor.
- Download the latest RedgateMonitorBaseMonitorInstaller.exe from the newly upgraded Redgate Monitor website
- This requires the RedgateMonitorWebHost to be set correctly, otherwise the download will fail.
- This is valuable for architectures where the Web Server and Base Monitor are in separate locations. Where the Redgate Monitor website is accessible, but the underlying Web Server file system is not to the Base Monitor server/s.
- Extract 'RedgateMonitor_BaseMonitor.msi’ from the RedgateMonitorBaseMonitorInstaller.exe
- It is FUNDAMENTAL that the /IAgreeToTheEULA argument is utilized here. Therefore, please ensure you have read and agree to the EULA before continuing.
- There are three methods for extracting the BaseMonitor.msi, please review these from the Redgate Documentation link in ‘Section 2’.
- The example script presumes you are installing the Base Monitor service on the same machine as the Web Service. With direct access to the Web Service’s installation directory. If this is not the case in your environment, changes will need to be made to this script.
- Ensure a Logs folder exists in the Web Installer Location, otherwise create it
- Run the MSI in the background, i.e quiet mode, with hardcoded variables
- Note – It is fundamental that the arguments specified in this section have been updated to match your environment. If not, the process will fail.
# Step 1 - Create arguments list - See documentation page for possible values to configure #

$MSIArguments = @(
"/i",
"RedgateMonitor_BaseMonitor.msi",
"I_AGREE_TO_THE_EULA=yes",
"SERVICETYPE=user",
"SERVICEUSERNAME=Redgate",
"SERVICEPASSWORD=InsertSecurePasswordHere",
"SERVICEDOMAIN=WIN2016",
"SERVICERPCPORTNUM=7399",
'DATACONNECTION="Server=.\TOOLS;Database=RedGateMonitor;Trusted_Connection=True"',
"/quiet",
"/norestart",
"/l*v .\Logs\RedgateMonitor-Base-$DateStamp-log.txt"
)

# Step 2 - Change directory to Web.msi directory #

Set-Location $rgmBaseMSILocation

Write-Host "Installing Base Monitor Service"

Start-Process "msiexec.exe" -ArgumentList $MSIArguments -Wait -NoNewWindow
The example arguments from above will install the Base Monitor, using a service user called ‘Redgate’. These arguments will require changes to match your environment, so ensure you review the Redgate Documentation page provided in ‘Section 2’ in this document.
Tip – If you run the RedgateMonitor.exe and configure all your preferred parameters up until the final Summary screen, you will have the ability to select ‘Help me automate this’ from a screen similar to below:
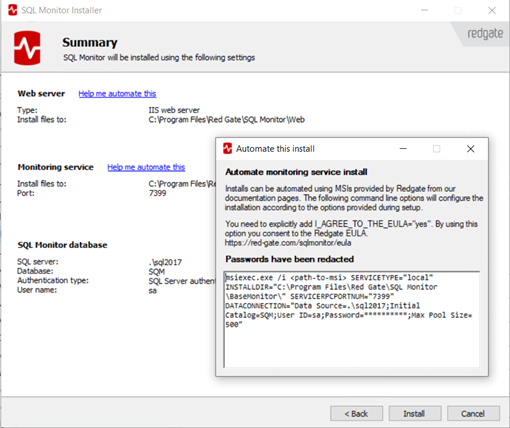
By doing this, the installer will inform you around parameters you may wish to use and the required syntax. However, be mindful around any spaces that may be present in either the key or value as you will need to script around this in PowerShell to ensure the parameter is correctly passed into the MSI.
Section 6 – Scheduling
Once all of the scripts have been updated and tested accordingly, you will want to schedule the running of the upgrade process in your preferred tool. This example shows Task Scheduler.
1) Create a New Task
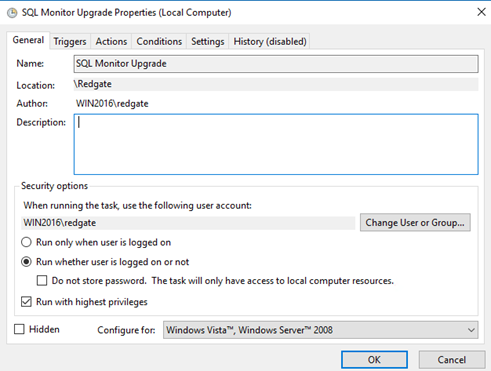
a) It is advised that ‘Run whether user is logged on or not’ and ‘Run with highest privileges’ is enabled to avoid issues
2) Create a Trigger
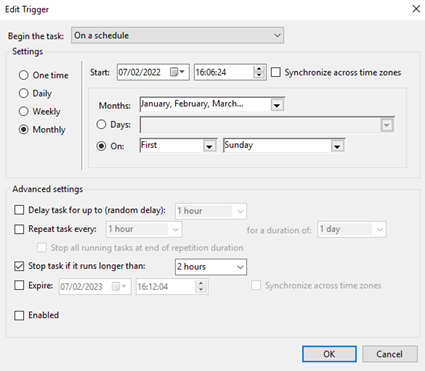
a) Setup the cadence of your choice. In the above case, the upgrade process runs on the first Sunday of every month.
3) Create an action to run the PowerShell Script
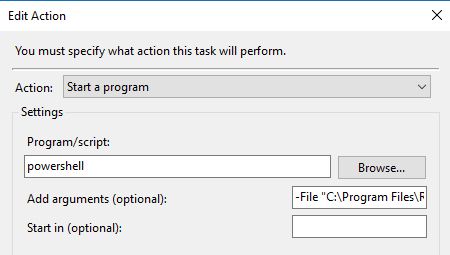
a) The argument should point to the 'RedgateMonitor_Automation.ps1' script location
Section 7 – Conclusion
Automating the Redgate Monitor upgrade process can reap significant benefits, especially for large estates, that require multiple base monitor installations. Therefore, taking the time to test and iterate on the PowerShell example scripts provided with this article may prove significantly valuable long term.
This documentation contains proprietary information and is protected by copyright law.
Copyright © 2026 Red Gate Software Limited. All rights reserved


