Tutorial: Configuration data
Published 10 February 2016
This tutorial is taken from a blog post by Daniel Nolan which originally appeared on the Octopus Deploy blog.
We've re-posted it here to make the content a little easier for ReadyRoll customers to access.
Deploying Configuration Tables With Octopus & ReadyRoll
Download this project (.sqlproj, 8KB)
I recently learned of a development team that is using a combination of ReadyRoll and Octopus Deploy to drive the deployment of configuration data in each of their lifecycle environments.
This is actually very straightforward to implement with configuration data stored in a file; after all, Octopus has had built-in support for application configuration (Web.config/App.config) variable substitution since version 1.0. This feature allows key/value pairs of configuration data to be managed across multiple environments, and was later extended to allow multiple projects to consume variables from reusable library sets as well.
The benefits of this are obvious: rather than having to update configurations in multiple places whenever you need to change a server name or update a timeout setting, you simply update a single variable in Octopus and the change is made across all relevant system components during the next deployment. This means, for example, you don’t need to worry about setting the correct environment-specific connection string after deployment and you can avoid hard-coding server names into your project sources.
So far, so good.
What about configuration stored in the database?
That works really well for configuration data stored in a file, but what about if your configurations are stored in a database table? Keeping source controlled data in-sync with a relational database table is a difficult enough task. When you add in the complexity of transforming the data into environment specific key-value pairs, it’s little wonder that very few teams ever get around to automating this task.
In the case of this customer, they needed to drive the deployment of the environment-sensitive [SSIS Configurations] table - a key-value pair store that is used by a number of SQL Server Integration Services packages in their organization.
Octopus+ReadyRoll provide the solution
The good news is that ReadyRoll supports Octopus variables out-of-the-box: for each Octopus variable that you’d like to use in your script, simply add a SQLCMD variable to your ReadyRoll database project. At deployment time, ReadyRoll will pass the value stored in Octopus to your deployment scripts.
In the case of our configuration data deployment, we’re going to use a Post-Deployment script for this purpose, which will be executed after the main part of the deployment is completed. As the script will be executed with every deployment, it is essential that it is written in an idempotent way, allowing it to be run many times with the same result.
First, we need to set a baseline for our database. After creating a new ReadyRoll database project, add the following to a new migration script to generate the schema:
CREATE TABLE [dbo].[SSIS Configurations]
(
[ConfigurationId] [int] NOT NULL IDENTITY(1, 1),
[ConfigurationFilter] [nvarchar] (255) NOT NULL,
[ConfiguredValue] [nvarchar] (255) NULL,
[PackagePath] [nvarchar] (255) NOT NULL,
[ConfiguredValueType] [nvarchar] (20) NOT NULL,
CONSTRAINT [PK_SSIS Configurations] PRIMARY KEY CLUSTERED ([ConfigurationId])
);
GO
Adding the idempotent data-sync script
To populate a data table, typically you’d use a set of INSERT statements containing the values you want to add to the table. However this won’t give us the “re-runnability” that we need to perform incremental data synchronizations.
What we want is a reusable script that is intelligent enough to figure out what changes need to be applied to the table data. The key to achieving this is the T-SQL MERGE statement, which offers a desired state approach to table population.
The great thing about MERGE is in its ability to UPDATE, INSERT or DELETE the data in the target table as needed. This basically means that we don't have to worry about that the current state of the data when deciding to change the configurations in the table.
SET IDENTITY_INSERT [dbo].[SSIS Configurations] ON;

MERGE INTO [dbo].[SSIS Configurations] AS Target
USING (VALUES
  (1,'Sales','Server=(local);Database=Customers;Trusted_Connection=True;','\Package.Properties[CustomerConnectionString]','Boolean')
 ,(2,'Sales','False','\Package.Properties[SuppressConfigurationWarnings]','Boolean')
 ,(3,'Sales','0','\Package.Properties[LoggingMode]','Object')
 ,(4,'Sales','False','\Package.Properties[FailPackageOnFailure]','Boolean')
 ,(5,'Sales','False','\Package.Properties[Disable]','Boolean')
) AS Source
([ConfigurationId],[ConfigurationFilter],[ConfiguredValue],[PackagePath],[ConfiguredValueType])
ON (Target.[ConfigurationId] = Source.[ConfigurationId])
WHEN MATCHED THEN
 UPDATE SET
  [ConfigurationFilter] = Source.[ConfigurationFilter],
  [ConfiguredValue] = Source.[ConfiguredValue],
  [PackagePath] = Source.[PackagePath],
  [ConfiguredValueType] = Source.[ConfiguredValueType]
WHEN NOT MATCHED BY TARGET THEN
 INSERT
 ([ConfigurationId],[ConfigurationFilter],[ConfiguredValue],[PackagePath],[ConfiguredValueType])
 VALUES
 (Source.[ConfigurationId],Source.[ConfigurationFilter],Source.[ConfiguredValue]
 ,Source.[PackagePath],Source.[ConfiguredValueType])
WHEN NOT MATCHED BY SOURCE THEN
 DELETE;

SET IDENTITY_INSERT [dbo].[SSIS Configurations] OFF;
GO
How to generate the MERGE statement
Unfortunately, SQL Server doesn't provide a built-in way to script out table data into MERGE statements. So instead we'll use the Open Source wonder tool, sp_generate_merge, to do all the heavy lifting. The tool works by installing itself into the [master] database as a global stored procedure and, when executed, reads the data from a given table and outputs a T-SQL statement (visit the project's Github page to learn more about the tool).
After installing the procedure into your local SQL Server instance, execute the procedure within the context of the config database:
EXEC sp_generate_merge 'SSIS Configurations', @schema='dbo';
This will generate your MERGE statement and output the results to the query window. As the results are enclosed within an Xml fragment, just remove the leading <?x and trailing ?> characters to create valid a T-SQL script. Paste this script into a new Post-Deployment script within your ReadyRoll database project (e.g. Post-Deployment\01_Deploy_SSIS_Config_Data.sql). Download an example of the output.

How to add variables to the T-SQL script
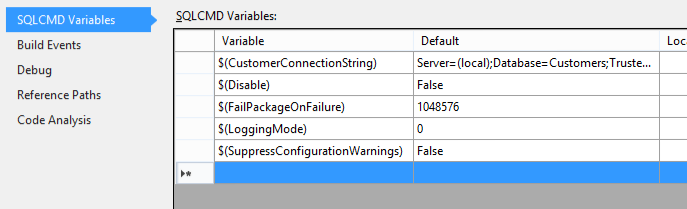
You may have noticed that the MERGE statement we generated currently contains static values for each of the key-value pairs (the [ConfigurationValue] column). We're going to replace these with SQLCMD variables later in the post, which will map one-to-one with variables defined in Octopus. First, we need to add some variables to the database project. To keep things simple, we'll add a SQLCMD Variable for each of the SSIS Configuration key/value pair rows, which will be in turn map to matching variables in our Octopus Deploy project.
Within the ReadyRoll database project designer, switch to the SQLCMD Variables tab and add a variable for each key/value pair, specifying the literals mentioned above as the default values:
Next, edit the Post-Deployment script, replacing each of the [ConfigurationValue] literal values with SQLCMD variables, in the $(VariableName) format:
SET IDENTITY_INSERT [dbo].[SSIS Configurations] ON;

MERGE INTO [dbo].[SSIS Configurations] AS Target
USING (VALUES
  (1,'Sales','$(CustomerConnectionString)', '\Package.Properties[CustomerConnectionString]','Boolean')
 ,(2,'Sales','$(SuppressConfigurationWarnings)','\Package.Properties[SuppressConfigurationWarnings]','Boolean')
 ,(3,'Sales','$(LoggingMode)','\Package.Properties[LoggingMode]','Object')
 ,(4,'Sales','$(FailPackageOnFailure)','\Package.Properties[FailPackageOnFailure]','Boolean')
 ,(5,'Sales','$(Disable)','\Package.Properties[Disable]','Boolean')
) AS Source
([ConfigurationId],[ConfigurationFilter],[ConfiguredValue],[PackagePath],[ConfiguredValueType])
ON (Target.[ConfigurationId] = Source.[ConfigurationId])
WHEN MATCHED THEN
 UPDATE SET
  [ConfigurationFilter] = Source.[ConfigurationFilter],
  [ConfiguredValue] = Source.[ConfiguredValue],
  [PackagePath] = Source.[PackagePath],
  [ConfiguredValueType] = Source.[ConfiguredValueType]
WHEN NOT MATCHED BY TARGET THEN
 INSERT
 ([ConfigurationId],[ConfigurationFilter],[ConfiguredValue],[PackagePath],[ConfiguredValueType])
 VALUES
 (Source.[ConfigurationId],Source.[ConfigurationFilter],Source.[ConfiguredValue]
 ,Source.[PackagePath],Source.[ConfiguredValueType])
WHEN NOT MATCHED BY SOURCE THEN
 DELETE;

SET IDENTITY_INSERT [dbo].[SSIS Configurations] OFF;
GO
Before going any further, it's a good idea to test the script by running Build... Deploy Solution.
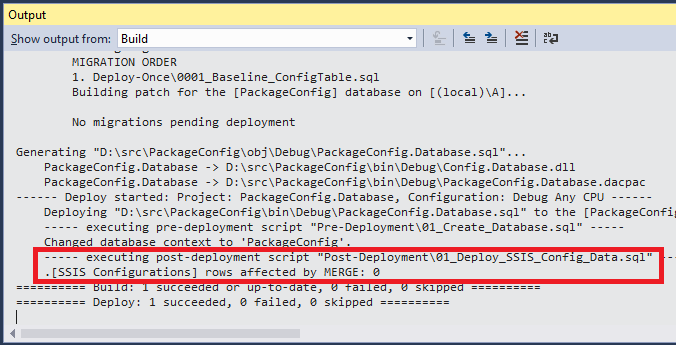
The output window should show zero rows affected, if the default values match the current values in the table.
Setting it up in Octopus
Presuming you've already set up your database for deployment through Octopus, the last step is to set the variables up in the Octopus project, or related variable library. Simply add variables to Octopus with the same name as the SQLCMD variables (defined in the previous step) and ReadyRoll will map the values to your SQL scripts at deployment time.
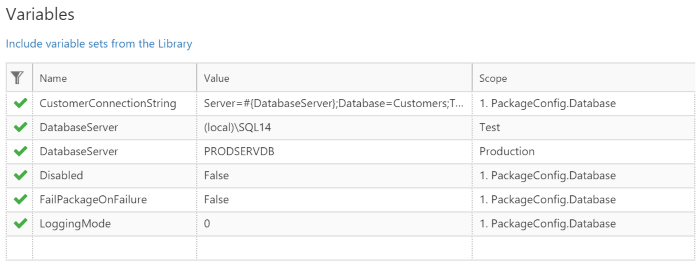
It's worth noting that it's up to you which variables you decide to override in Octopus. If you're happy with the default values set in the database project file, you can choose to simply omit those from your Octopus configuration and the default will continue to be used in your deployments.
To see it all in action, create a release and deploy to a Test environment.
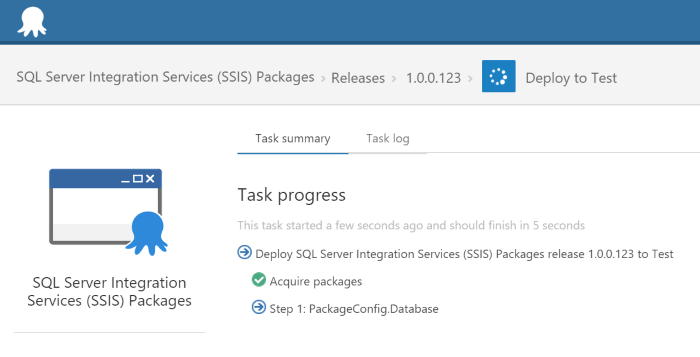
Note that, as this is the first release for this project, the new table is being created and the rows are being inserted.
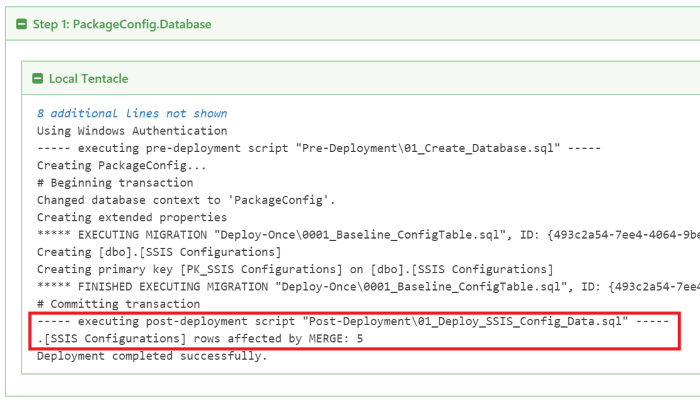
A quick check of the table data shows that it matches our current variable configuration in Octopus:

To test that incremental changes will be successfully propagated to the table, open the variable list in your Octopus project and adjust the value of the FailPackageOnFailure variable to True. After updating the release and re-deploying it to the test environment, confirm that the value of the [SSIS Configurations] record reflects the new variable value:

Conclusion
By consuming the Octopus variables in the T-SQL script, rather than using literal values, the configuration data can be deployed by simply updating a variable in Octopus and re-deploying a given release. No code changes are required, and no horrible hard-coding or environment sniffing is needed (IF @@SERVERNAME = 'foo' THEN...) to determine which settings apply to a given target environment.
It also means that if a backup of a Production database is ever restored onto a test SQL Server instance, all you need to do is run a deployment in Octopus to purge the table of any live configuration data.
By storing all your configurations in Octopus, you can move a step closer to creating a single point of reference for all your configuration data. ReadyRoll’s straightforward integration with Octopus’ variable store opens up opportunities to simplify your database deployment processes, allowing your team to deliver faster and more often.
If nothing else, think of how much happier your DBA will be once you’ve freed them from the thankless task of having to maintain all that data in each of your environments!
This documentation contains proprietary information and is protected by copyright law.
Copyright © 2026 Red Gate Software Limited. All rights reserved


