Seed Data
Published 10 February 2016
Data population strategies
If you're interested in tracking data changes in your SQL Change Automation compatible projects see Static Data.
Although SQL Change Automation has native support for synchronizing table data, which in theory could be used to seed a transactional table with data, this only suits smaller data sets (i.e. fewer than 10,000 rows). This is because the data synchronization functionality in SQL Change Automation uses INSERT statements with a literal VALUES clause, which isn't always the fastest way to populate a table in SQL Server with larger amounts of data.
If you're looking to insert a vast amount of data into a table, one of the most efficient ways is to save the data to a flat file and use the BULK INSERT T-SQL statement to upload the data. However, including a BULK INSERT as part of a systematic process is not without its difficulties, given that the SQL Server instance must be able to access the file via a local path at deployment time.
To make automating this process easier, SQL Change Automation allows you to package seed files along with your T-SQL scripts and includes a system SQLCMD variable called DeployPath that allows you to fully qualify the path to a flat file.
Co-location of deployment agent and SQL Server instance
Note that, in order for the deployment script to be able to access the bulk data file, the client's file system must be accessible from the SQL Server instance. The simplest way to achieve this when deploying within Visual Studio is to connect to a local instance of SQL Server so that the path contained in the DeployPath variable is accessible from your migrations. When deploying in an automated fashion, for example using Octopus Deploy, the same can be achieved by installing a Tentacle on the SQL Server machine itself. Similarly with TFS Build, a build agent needs to be installed on the SQL Server machine.
If co-locating the agent and the instance is not feasible, then an alternative is to use a UNC path for the BULK INSERT data_file argument to access the client/agent machine remotely from the SQL Server instance (see BULK INSERT Arguments). Note that the network share on the client/agent must grant the SQL Server instance read access. In order to form the sub-path to the agent's working folder, the content of the DeployPath variable can be manipulated to prefix it with the agent name instead of the local drive letter, e.g. change C:\Working\<AutoGeneratedFolder>\ProjectFolder\ to \\MyBuildAgent\C\Working\<AutoGeneratedFolder>\ProjectFolder\
How it works
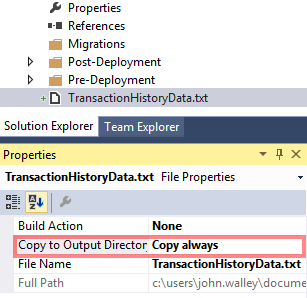
Add a flat file to the root of your SQL Change Automation project, and set the Copy to Output Directory property to Copy always. This ensures that the file is included in your Octopus-compatible NuGet .nupkg file when your project is packaged for deployment.
Add a blank new migration script to the project and specify the $(DeployPath) variable as part of the input filename in a BULK INSERT statement, e.g.
BULK INSERT [Production].[TransactionHistory]
FROM '$(DeployPath)TransactionHistoryData.csv'
WITH (FIELDTERMINATOR = ',', FIRSTROW = 2);
DeployPath variable
When you deploy the project in Visual Studio, you’ll notice that the value of the $(DeployPath) variable will resolve to the root folder of your SQL Change Automation project:
C:\source\samples\AdventureWorks\
However when you package the project and subsequently deploy the database (e.g. using a release management tool such as Octopus Deploy or TFS), note that the $(DeployPath) variable will instead resolve to the folder where the package was extracted to:
C:\Octopus\Applications\MyProject\AdventureWorks.Database\1.0.2.106\
Storing seed data files in a sub-folder
Instead of storing the data file in the root of the project, you can also elect to store your files in a sub-folder of your SQL Change Automation project. Just be sure to include the relative path to your data file in the BULK INSERT statement, e.g. $(DeployPath)Seed-Data\TransactionHistoryData.csv


