Use tSQLt with SQL Change Automation projects
Published 24 February 2017
Intro
This tutorial helps you get started with running tSQLt tests in Visual Studio. It uses AdventureWorks.Database as a sample SQL Change Automation project, but the steps are applicable to any SQL Change Automation project.
As this tutorial requires the use of Programmable Objects, it will not work with SQL Change Automation Core edition.
Set up test project
Create a new project
In Visual Studio in your AdventureWorks.Database solution, select New Project from the File menu and create a new SQL Change Automation Project named AdventureWorks.Database.Tests. Do not connect this project to any database at this point.
Add a build dependency
Right-click the AdventureWorks.Database.Tests project in the Solution Explorer. Open Project Dependencies using Build Dependencies > Project Dependencies... and select AdventureWorks.Database to add the dependency.
Right-click the References node for the AdventureWorks.Database.Tests project and select Add Database Reference. Select the AdventureWorks.Database project as the Database Reference. Select Same database as the Database location. Click OK to add the reference.
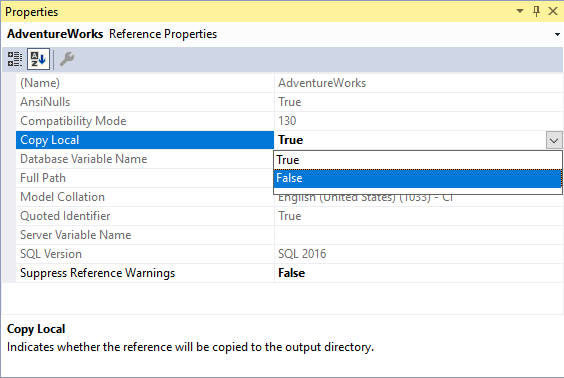
Edit the database reference properties to set Copy Local to False
Set the target database
In the Solution Explorer, right-click the AdventureWorks.Database.Tests project and select Properties. Select Debug tab from the panel on the left and in the Target Connection String section click on the Edit... button. This will open a connection dialog. In this dialog, select the database that the AdventureWorks.Database project is connected to.
The test project has to point at the AdventureWorks.Database target database, as there is no database in AdventureWorks.Database.Test.
Ignore tSQLt in the SQL Change Automation project.
Unload the AdventureWorks.Database project by going to the Project menu and click Unload Project. In Solution Explorer, right-click the unloaded project and click Edit AdventureWorks.Database.sqlproj. In AdventureWorks.Database.sqlproj, edit the SyncOptionIgnoretSQLt property to:
<SyncOptionIgnoretSQLt>True</SyncOptionIgnoretSQLt>
Save the file and reload the project using Project > Reload Project.
Change the migration log schema name for the test project.
Unload the AdventureWorks.Database.Tests project by going to the Project menu and click Unload Project. In Solution Explorer, right-click the unloaded project and click Edit AdventureWorks.Database.Tests.sqlproj. In AdventureWorks.Database.Tests.sqlproj, add a custom migration log schema name that is different to the schema name in AdventureWorks.Database (default is dbo):
<MigrationLogSchemaName>test</MigrationLogSchemaName>
Save the file and reload the project using Project > Reload Project.
Setup filters
To ensure each project picks up the correct database objects, you need to add filters to each project.
- Create a filter file (following Filtering Database Objects) or use main-filter.scpf that will exclude all test objects from your main project.
- Save this file to AdventureWorks.Database\Filter.scpf
- The example filter removes all objects with names beginning with "test", or in a schema starting with the word "test"
- Create a filter file (following Filtering Database Objects) or use test-filter.scpf that will only include all test objects.
- Save this file to AdventureWorks.Database.Tests\Filter.scpf
- The example filter includes only objects with names beginning with "test", or in a schema starting with the word "test"
- Close and re-open Visual Studio to ensure the filters are added.
Filters must be set up so each database object is included in at most one project.
Write your first tSQLt test
Install the framework
In your AdventureWorks.Database.Tests, in the Migrations folder add a new script and rename it to 0001_Install_tSQLt.sql. Download tSQLt and copy the contents of tSQLt.class.sql into 0001_Install_tSQLt.sql, making sure you leave the Migration ID on the first line.
Use tSQLt Visual Studio Test Adapter
Download and install the test adapter.
Create an AdventureWorks.runsettings file in the solution root with the following content:
<?xml version="1.0" encoding="utf-8"?>
<RunSettings>
  <TestRunParameters>
    <Parameter name="TestDatabaseConnectionString" value="Data Source=(localdb)\ProjectsV13;Initial Catalog=AdventureWorks.Database;Integrated Security=True;" />
    <Parameter name="IncludePath" value="Tests" />
  </TestRunParameters>
</RunSettings>
The value of TestDatabaseConnectionString needs to match Properties > Debug > Target Connection String in AdventureWorks.Database.
Select the file by going to Test > Test Settings > Select Settings File (This option is sometimes disabled. Go to Test > Run > All Tests, to enable it.)
Write a sample test
Right-click the AdventureWorks.Database.Test project and select Add > Inline function... This will create a new function in the Programmable Objects folder, where you can write your test e.g.
-- <Migration ID="565a2147-9a0d-4e91-8494-1306ca209e6f" />
EXEC tSQLt.NewTestClass 'ufnGetAccountingEndDateTests';
GO

CREATE PROCEDURE ufnGetAccountingEndDateTests.[test that correct accounting end date is returned]
AS
BEGIN
    DECLARE @actual DATETIME;
    SELECT @actual = [dbo].ufnGetAccountingEndDate();

    DECLARE @expected DATETIME;
    SET @expected = '2004-06-30 23:59:59:998';
    EXEC tSQLt.AssertEquals @expected, @actual;
END;
GO
Run the tests
In the Test menu, select Run > All tests.
The test results are displayed:
Find out more about writing tSQLt tests.


