3. Provisioning Your Databases
Published 03 September 2024
Provisioning Your Environments
In this step, you’ll provision the databases that Flyway Autopilot will use across environments like Dev, Test, and Prod. This is done using a schema-only backup of your database—either one you’ve provided or one generated with our help.
Whether you're restoring your own schema backup multiple times to simulate different environments, or leaning on Autopilot’s built-in provisioning logic to do it for you, we’ve got you covered. This process ensures your Flyway project starts from a known baseline, tailored to your environment and ready for consistent, reliable deployments.
1. Creating a Schema-Only Backup
To get started, you’ll need a schema-only backup—a copy of your database structure without any data. This serves as the foundation for your development and test environments in Flyway Autopilot.
The exact method depends on your database platform. Below are the recommended approaches and dedicated guides for each supported system:
- SQL Server: Use DBCC CLONEDATABASE or a custom export script
👉 How to use a SQL Server backup to baseline a database Oracle: Use Data Pump to export schema-only backups
👉 How to create a schema-only backup in OraclePostgreSQL: Use pg_dump with the
--schema-onlyoption
👉 How to create a schema-only backup in PostgreSQLMySQL: Use mysqldump with the
--no-dataflag
(No current guide available, but we recommend:mysqldump -u <user> -p --no-data your_database > schema_backup.sql)
For convenience during initial setup, your schema-only backup can be placed in the backups sub-folder of the Flyway Autopilot repository. However, we recommend transitioning to a secure central location for long-term use. This ensures the backup is accessible to both CI/CD pipelines and development teams—especially when performing build validation, drift detection, or reporting. In many environments, it’s also common to maintain multiple secure backup locations, allowing agents in gated networks or restricted zones to access the backup without exposure risks.
Need extra help for SQL Server?
We’ve prepared some pre-made scripts that can automate schema-only exports and provisioning—perfect if you're not sure where to start. Just expand the section below for more details.
If you've already created your schema only backup, simply skip to step 2.
Creating a Schema Only Backup in SQL Server
Begin by opening the 1.CreateSchemaBackup.sql script (Found in the repositories 'Scripts' folder) in your preferred IDE (SSMS, VS Code, etc.). This script is designed to create a schema-only backup of a selected database and save it directly into your Flyway Autopilot project.
Edit the script to make sure the highlighted parameters are correct, like below:
Key Script Parameters:
@SourceDB(Highlighted as1): Set this parameter to the name of the database you wish to use as the foundation for your project. For example, if you want to use the "AdventureWorks" database, this parameter should be set accordingly.@BackupPath(Highlighted as2): This parameter should point to the backup file's location within your Flyway Autopilot project. Ensure that the path is correct for your directory, but the backup file nameAutoBackup.bakshould remain unchanged.

Note:
If you already have a schema-only backup of your database, you can skip this script. Simply place your backup file in the appropriate directory within your Flyway project, ensuring the file is named AutoBackup.bak. The desired end state, is your Backups folder looking like this:
2. Determining Logical and Data File Paths
Next, open the 2.FindLogicalPaths.sql script (Found in the repositories 'Scripts' folder) in your preferred IDE. This script helps identify the logical data and log file names required for restoring databases from the backup.
When restoring a database, it's crucial to know the logical data and log file names of the original database that you created the backups off of. These are typically the same as the database name but can vary. This script will extract these names, which you will need in the following step.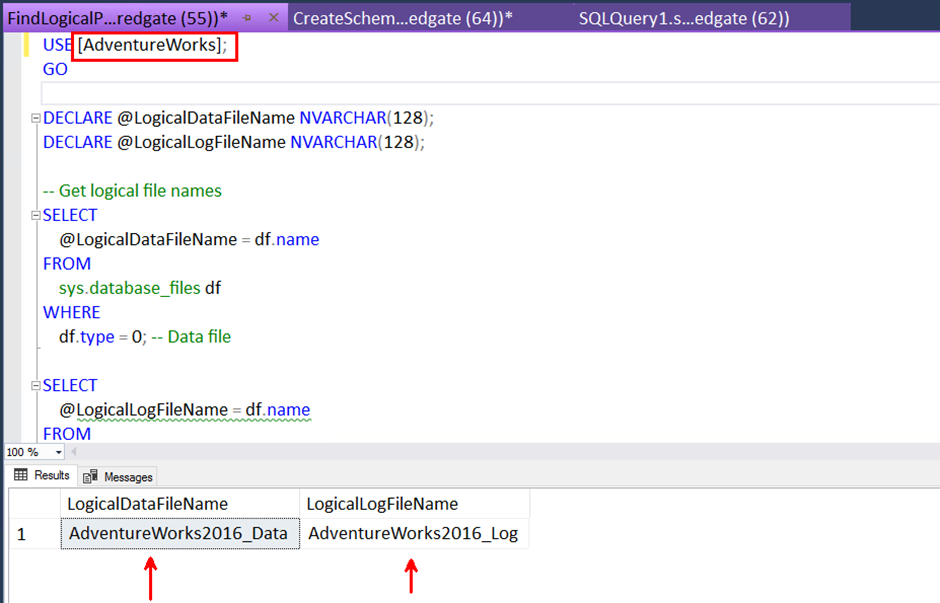
Note:
If you already know the logical data and log file paths, you can skip running this script.
These values are being references in two locations of the Flyway Project, and both need to be updated just once:
Inside the next Script, 3.CreateAllFromBackup.sql, we will show you where to add these values in the next step!
Creating the Databases
Based on the values we received from the above step, we want to update CreateAllFromBackup.sql
First, update and execute the 3.CreateAllFromBackup.sql script to create the necessary databases, such as AutoPilotDev, AutoPilotTest, AutoPilotQA, and AutoPilotProd, based on the schema-only backup.
Key Script Parameters to Verify and Update:
- Backup Path: Ensure the script points to the correct location of your schema-only backup (
AutoBackup_Customer.bak) created earlier or sourced manually, this should always be located in the Flyway Project folder, unless specific needs require it to be stored somewhere else. - Logical File Names: These should match the logical names identified in the previous step or be manually set if already known.

Once this script has been updated and runs successfully, it will create all the necessary databases, simulating a full environment based on your chosen database schema.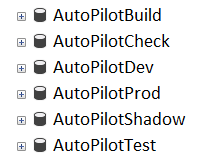
2. Database Provisioning
Now that you have your schema-only backup, the next step is to create the databases Flyway Autopilot will use throughout the deployment process. These databases should be created on your preferred database instance(s), and can be hosted on a single server or split across multiple instances to simulate real-world infrastructure.
You'll need to create the following six databases:
| Database Name | Purpose |
|---|---|
AutopilotDev | Developer sandbox – restore the schema-only backup here |
AutopilotTest | Test environment – restore the schema-only backup here |
AutopilotProd | Production simulation – either restore schema-only or use a real full copy |
AutopilotCheck | Used by Flyway for script validation (leave empty) |
AutopilotShadow | Used by Flyway to generate and validate migrations (leave empty) |
AutopilotBuild | Used to generate drift reports and build comparisons (leave empty) |
💡 Note: These database names are our defaults, but you're welcome to rename them to match your organization’s conventions. Just make sure the names are consistently reflected in your configuration files and project settings.
3. Configuring Connection S
With your schema-only backup ready and environments created, it’s time to configure Flyway Desktop to recognize and work with them. In this step, you’ll connect your backup and validate the target databases—laying the foundation for schema tracking, script generation, and environment-aware deployments.
When you first open Flyway Desktop, the project will attempt to connect to the development database—but since no connection details have been set yet, you’ll see an initial connection error.
⚠️ Don’t worry—this is expected!
1. Open up Flyway Desktop and click Edit Connection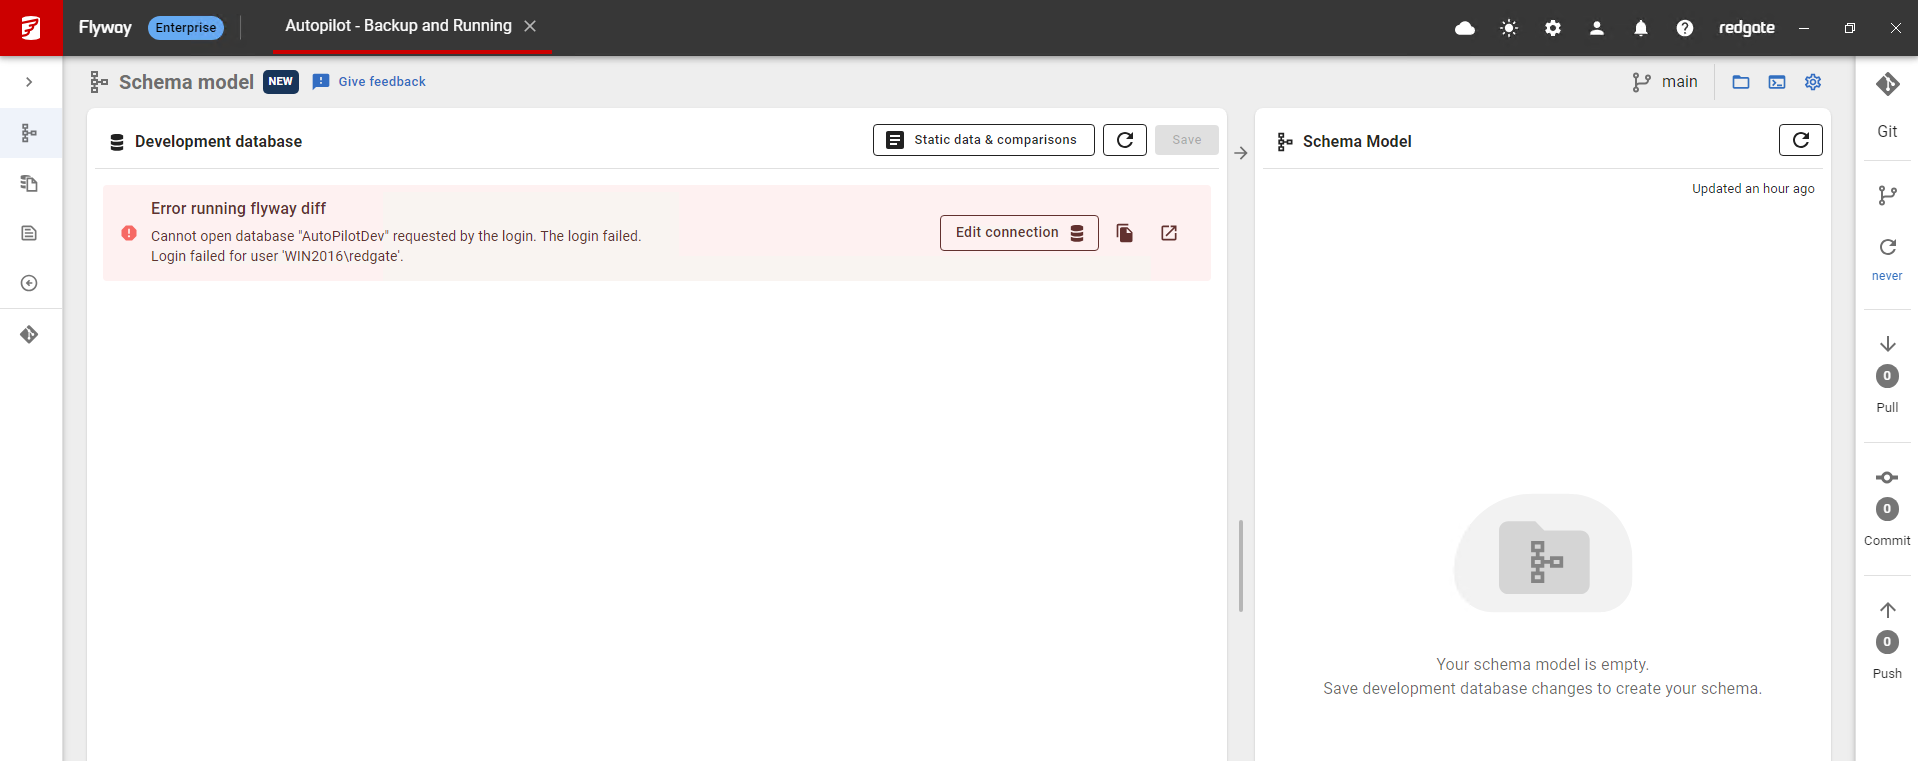
2. Enter the correct connection details for your AutopilotDev database (or whatever you’ve chosen to name your dev environment). Then click Test and Save to validate and save your changes.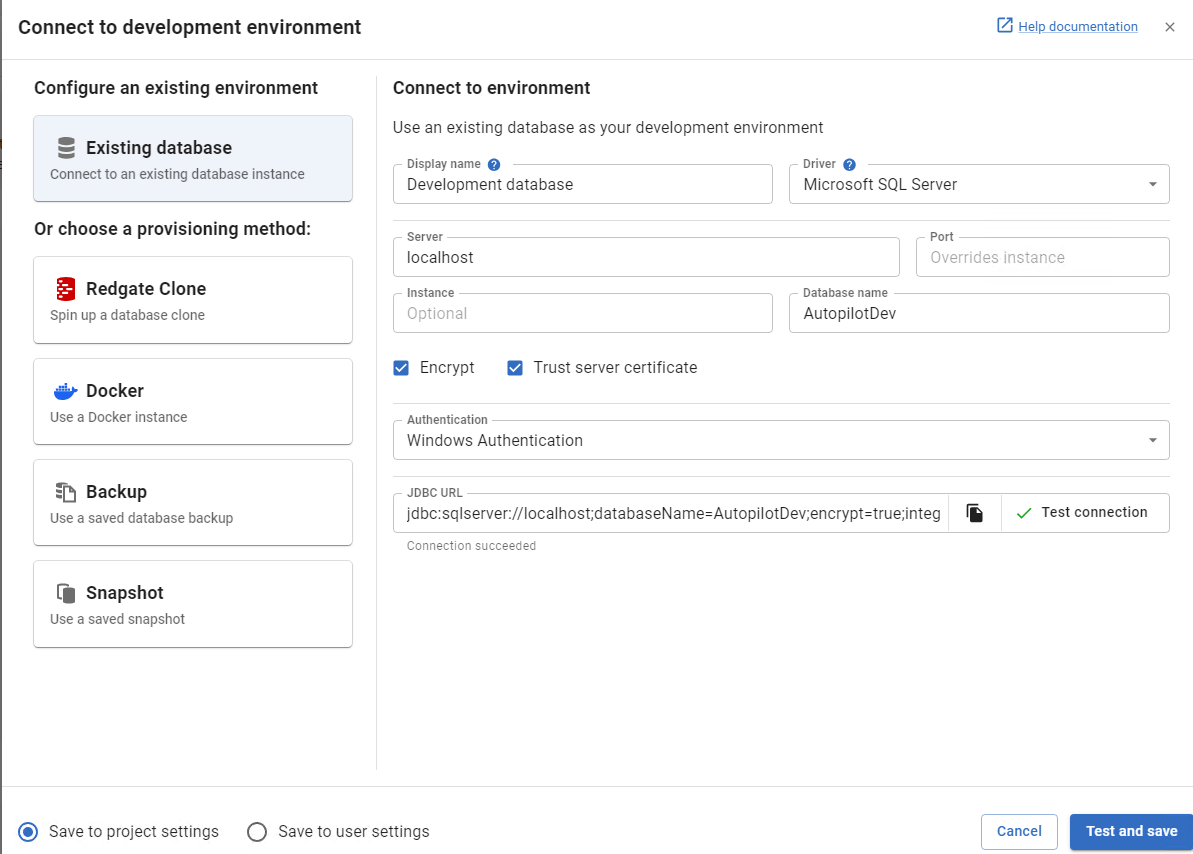
⚠️ Note: The connection details you need to enter will vary depending on your selected RDBMS.
For Oracle, PostgreSQL, and MySQL, you’ll also need to specify the schemas you want to track.
For SQL Server, this is not required, as the database-scoped model is used automatically.
Be sure to provide credentials with appropriate access to the database and schema objects.
3. Once you've successfully saved the connection details for your Dev environment, Flyway Desktop will automatically begin scanning the connected database to detect all in-scope schema objects.
✅ You'll capture these objects in the next step of the guide.
For now, let’s move on to setting up the rest of your environments.
To continue:
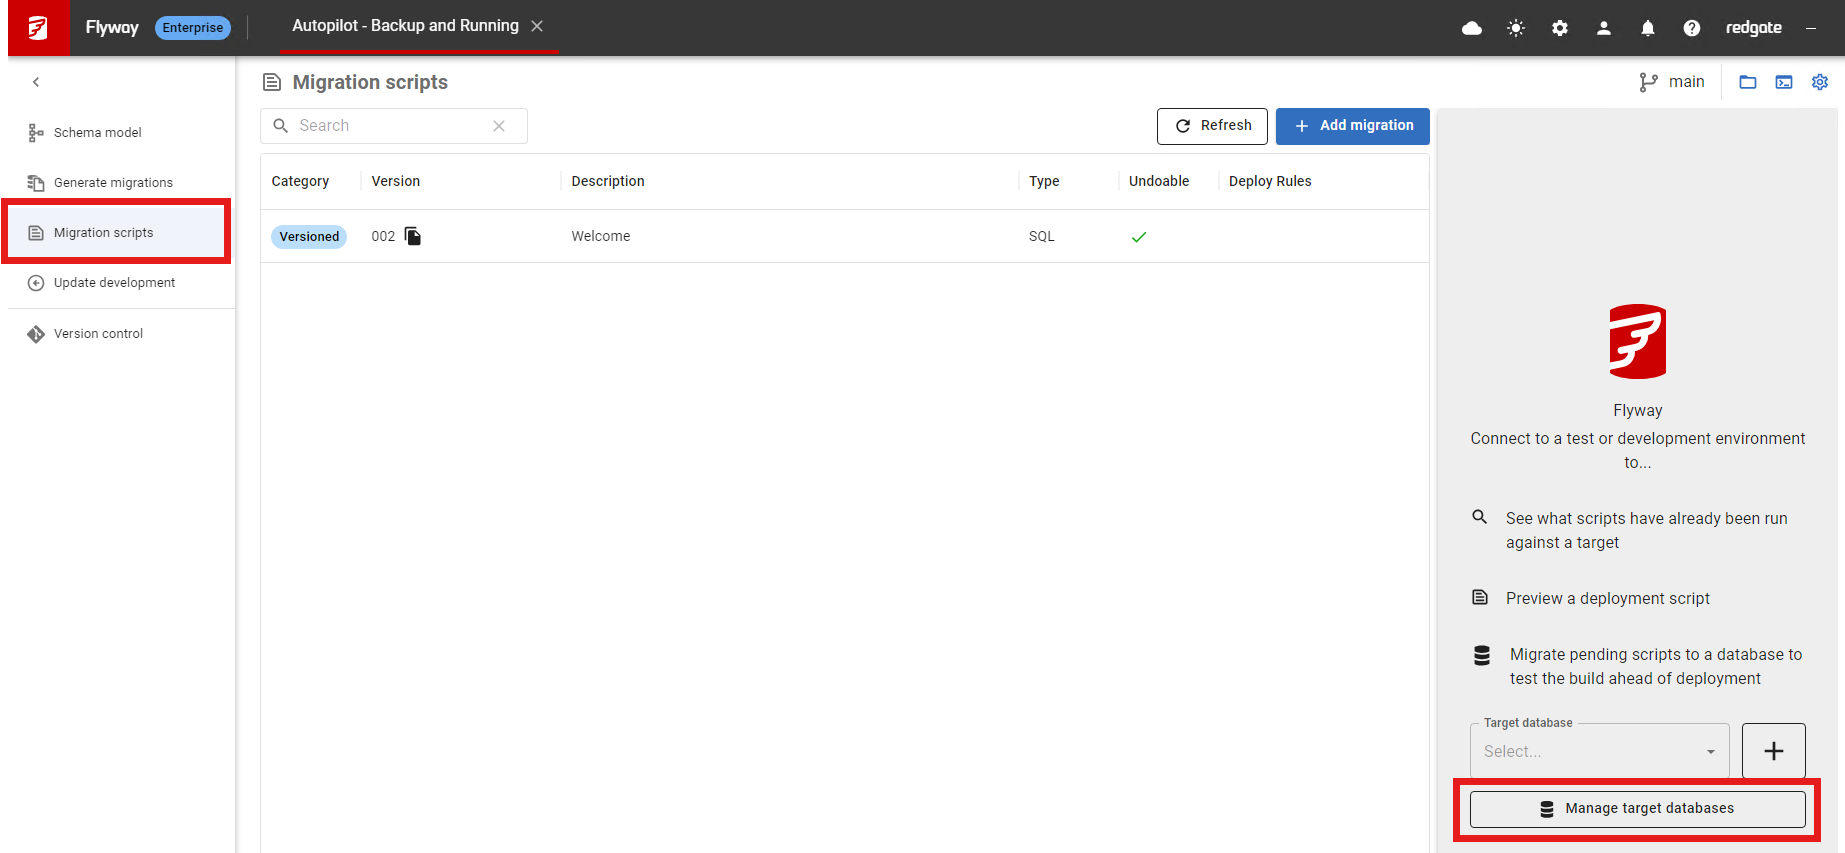
Click the Migration Scripts tab on the left-hand side of the screen.
In the top area of this view, you’ll see a dropdown or tabs for managing environments.
From here, you can begin configuring Test, Prod by selecting each and entering the appropriate connection details.
- Ignore Shadow/Check/Build until the next step
4. Now that Dev, Test, and Prod are configured, it’s time to set up the Check and Build environments. These play a vital role in validating scripts and performing automated build checks using your schema-only backup.
Return to the Migration Scripts tab and select either Check or Build from the environment dropdown.
Click Edit Connection to begin setup.
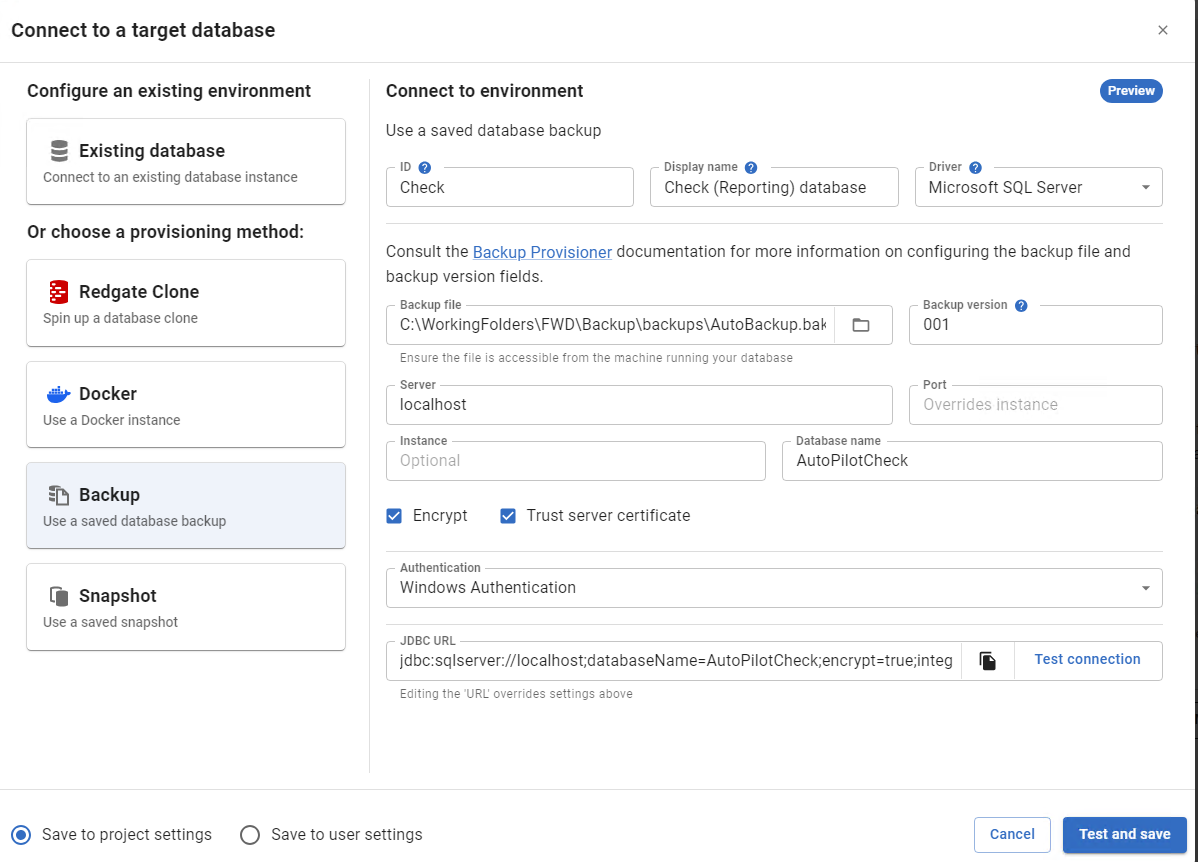
You'll notice the connection dialog here looks slightly different—in addition to standard connection info, it also asks for the location of your schema-only backup file.
Provide the path to your schema-only backup.
Link this environment to one of the empty databases you created earlier (e.g.,
AutopilotCheckorAutopilotBuild).Once configured, click Test Connection to ensure the database instance has access to the backup location and can successfully validate the setup.
💡 Tip: Your chosen RDBMS must have read access to the file location housing the backup. Ensure that path permissions are correctly set—especially when working across network drives or gated infrastructure.
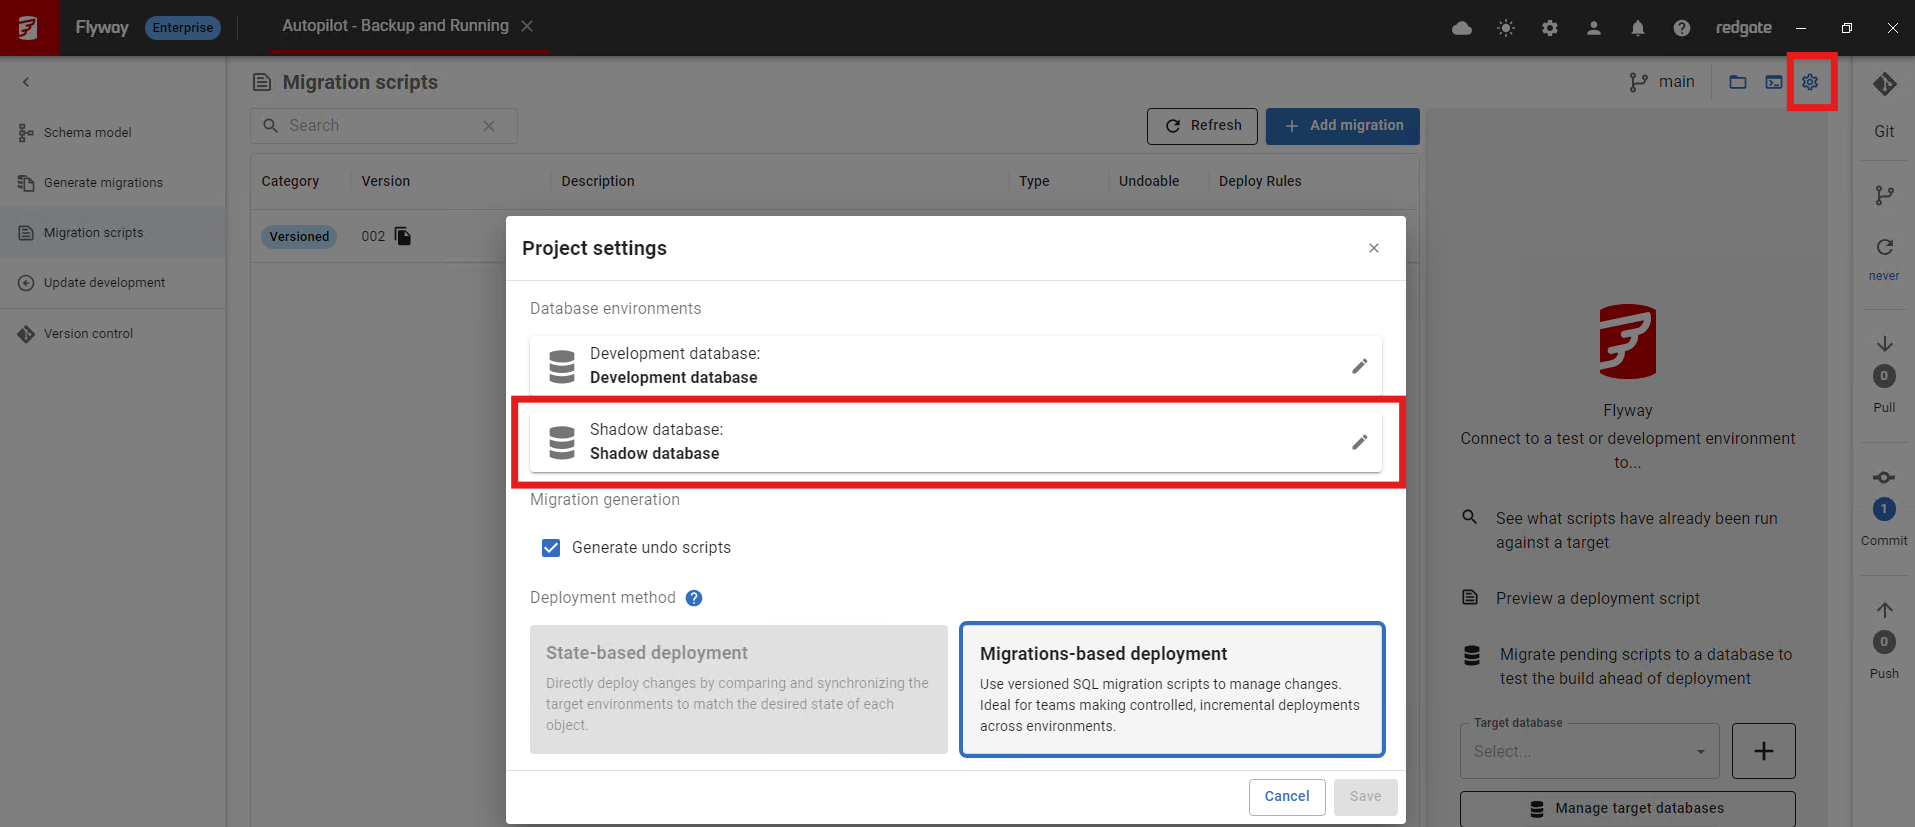
5. The last environment to configure is the Shadow database
In Flyway Desktop, click the blue cogwheel ⚙️ in the top-right corner of the screen.
From the dropdown menu, click Edit Shadow Database.
In the connection dialog that appears, follow the same steps as with Check and Build:
Enter the connection details for your
AutopilotShadowdatabase.Provide the path to your schema-only backup file.
Click Test Connection to verify that Flyway can access the backup and connect to the target database.
If all checks out, click Save to complete your configuration.
Once this is done, all six environments are now ready for use in your Flyway Autopilot project!
🎓 Tip: Want a deeper dive into how backup-based provisioning works?
Watch our Redgate University course on Backup as Baseline, where we walk through the full setup process, highlight key considerations, and help you get the most out of your schema-only backups.
👉 Watch the course here
About the Databases
After provisioning, you will have the following databases:
AutopilotDev, AutopilotTest, AutopilotProd: These represent a linear pipeline of databases where changes flow from development to testing, staging, and finally production.
AutopilotBuild, AutopilotCheck, AutopilotShadow: These databases support the CI/CD process but are generally not interacted with directly by users.
Next step > Capturing Schema
This documentation contains proprietary information and is protected by copyright law.
Copyright © 2026 Red Gate Software Limited. All rights reserved


