Creating backups - file settings
Published 22 November 2018
Creating backups > Specify SQL Server > Select backup type and database > File settings > Processing and encryption settings > Verification options > Review summary
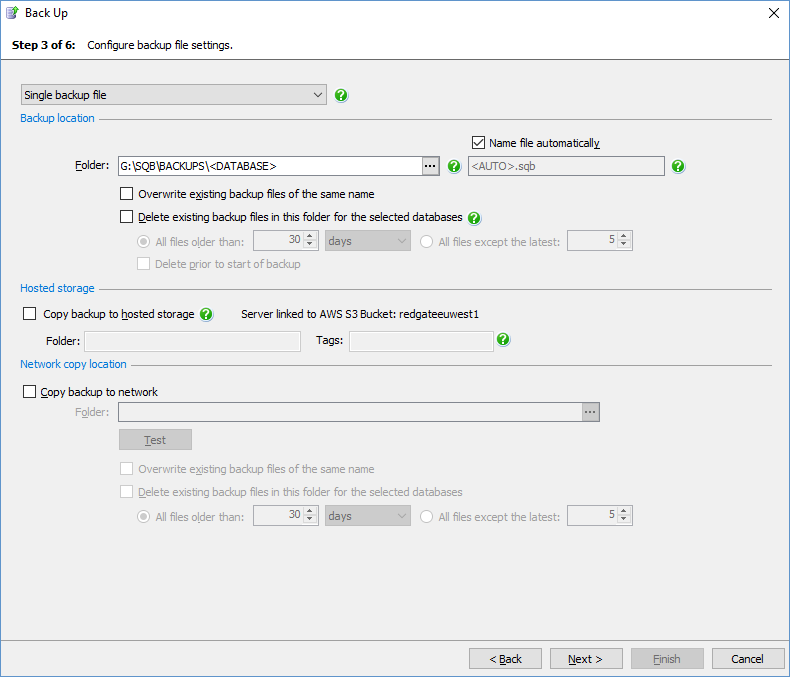
On step 3 of the wizard, specify the locations and file names for your backups, including any copies to hosted storage (SQL Backup Pro 9.0 and later) or a network location, and configure settings to manage existing backup files.
Choose:
- Single backup file to create each backup as a single file.
- Single backup file, mirrored to second location to create the backup as a single file and simultaneously make a duplicate of the backup during the backup process. The second backup is written in parallel to the first, so they will finish at the same time.This option is only available when you have selected a single database to back up. During the backup process, a warning is raised if any of the files cannot be written. However, the backup process continues as long as at least one specified backup file can be written. If none of the files can be written, an error is raised and the backup process is stopped.
- Split backup into multiple files to store each backup across a number of files.
Splitting the backup can speed up the backup process if backing up to a single file does not fully use the Input/Output capacity of your disks. For a single database backup, you can split (or 'stripe') your backup files across a number of disks. For multiple database backups, you can specify the number of files to split each database backup into (on the same disk). All backup files must be available when you restore the backup.
Backup location
For a Single backup file, if you have selected only one database to back up, a default folder and file name is displayed.
To change the file name, clear the Name file automatically check box, and type the new file name. To change the folder, type the new path or click and specify the path using the folder browser. You can use tags in both the folder and file name. For more information, see File location tags.
The file path is relative to the selected SQL Server. For example, if you back up a database on a remote SQL Server instance called ServerA and you specify a local path such as C:\Backups, the backup files will be created on the C: drive on ServerA, not on the local machine.
If you specify a network share as the backup file location, the SQL Backup Agent service 'log on' user must have Full permissions to access the location. Backing up directly to a network share can be slower than backing up locally and occasionally problematic. You are recommended to back up locally and use the Copy backup to network option instead. For more information, see Backing up and restoring on a network share.
If you have selected multiple databases, the backup for each database is created in a separate file. The file names will be generated automatically using the <AUTO> tag, which uses the default file name format specified in your File management options. If you have not set up a default file name format, SQL Backup Pro uses the SQL Server instance's default format for file names. A default folder for these files is displayed; to change the folder, type the new path or click and specify the folder using the folder browser. If you want the backup file to be created in a different folder for each database, in the folder browser select Create subfolder for each database.
For a Single backup file, mirrored to second location, specify the backup file as described above, and additionally specify the folder and file name for the mirrored backups.
For Split backup into multiple files, if you have selected a single database, you must specify at least two destination files. Type or select each folder and file name as described above, and click Add to add it to the list.
If you have selected multiple databases, you can specify only one folder for the split backup files; the files will be named automatically.
In Files per backup, type or select the number of files into which you want each backup to be split (maximum 32).
Hosted Storage
Copying backups to AWS storage is only available in SQL Backup Pro 9.0 and later. Copying backups to custom S3 or Azure hosted storage is only available in SQL Backup Pro 10.0 and later.
If you want a copy of the backup files to be uploaded to hosted storage when the backup has completed, select Copy to hosted storage. In order to upload to hosted storage, the SQL Server must be linked to a Cloud Storage Bucket. You can link an account/bucket from within the wizard:
For more information about setting up cloud storage, see Backing up to Cloud Storage Settings.
If you are uploading to AWS of custom S3 storage you can upload the backup to a different folder on the cloud. In order to do this, enter the folder name into the folder edit box. (invalid characters will be turned into _)
Specify tags with a "*" as separator in the tags edit box. Nb. S3 have an array of restriction on tags, for more information check out Tagging EC2 Resources , S3 Pricing and tag restrictions. For Azure tag restrictions, check out Azure tag restrictions.
So for example entering the following text into the Tags: edit box database=<DATABASE>*TYPE=<TYPE> will create two tags one with the name of the database and the second with the type (see File location tags for more details on SQL Backup tags)
These tags are additionally stored in the metadata.
Network copy location
If you want a copy of the backup files to be created on a network share when the backup has completed, select Copy backup to network. Type the network share details in the Folder box or click to use the folder browser.
The folder browser displays the local file system for the SQL Server you are backing up. Select the server you want to copy the backup to from the drop-down list, or click Add Server and type the server name or IP address. Other servers will only be visible to the local server if it has the appropriate permissions to write to or read from them. The name of the local server you are connected to and your user name are displayed above the Server list. This information may explain why some servers cannot be browsed.
If you typed the network share details, click Test to check that the "log on" user for the SQL Backup Agent service on the source SQL Server has permission to create files on the network share. If it does not have the appropriate permissions, an error message is displayed next to the button; if you choose to keep the network share details, a warning is displayed in the Activity History when the backup has completed. If you browsed to the network share, this check is performed automatically.
For more information about using network shares with SQL Backup Pro, see Backing up and restoring on a network share. For details about setting up permissions to use a network share, see Permissions.
You may experience problems when you back up to network shares if your SQL Server is unable to write large data blocks (over 2 MB) to the network share. You can use the MAXDATABLOCK keyword with the BACKUP command to limit the data block size.
Managing backup files
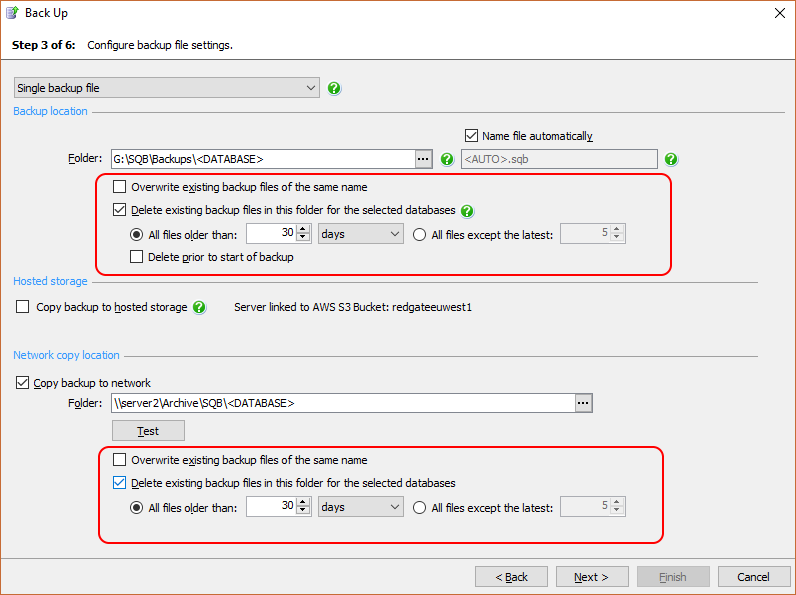
SQL Backup Pro provides a number of settings to automate the management of your existing backup files. You can specify these settings separately for the initial backup location, and the network copy location. (This does not include AWS, please manage these backups using retention policy in your S3 Console.)
Select Overwrite existing backup files of the same name if you want to overwrite any existing files with the share/path name.
Select the Delete existing backup files in this folder for the selected databases check box if you want SQL Backup Pro to delete backups of the same type for the selected databases from the initial backup or network copy destination folders. You can restrict deletion of existing backup files by age (All files older than) or number (All files except the latest). By default, files are deleted when the backup process or network copy has completed. If the backup fails, the files are not deleted.
To delete the files before the backup is created, select the Delete files prior to start of backup check box. For example, you may want to do this to create space for the new backup files. However, note that if the backup fails, the old files will have been deleted; therefore, you are recommended to select this check box only if you have a copy of the existing backups. This option is available for the initial backup location only; existing network copies of files are always deleted after the copying process has completed.


