Setting up the documentation
Published 03 May 2019
To set up the documentation:
- Click
 New Project to create a new project, then enter the SQL Server Connection details.
 - Edit the cover page. This includes settings for the header and footer that will appear throughout the generated documentation.
- Customize the documentation by changing the sections and properties that are documented for each object (optional).
- Select the databases and objects to document.
- Edit the object descriptions (optional).
- Click
 Generate Documentation to start generating the documentation.
Editing the cover page
A project's cover page includes values for the header, footer, project title, logo, and project description used in the generated documentation. You can also choose whether to include breadcrumb navigation.
Information on a project's cover page is used even if you exclude the cover page from the generated documentation. For example, any header text and footer information (author, copyright text, and timestamp format) is always applied to all pages in the generated documentation.
To edit a project's cover page:
- If the project is not currently open, click
 Open Project.
 In the left-hand pane, select Cover page to preview the cover page.
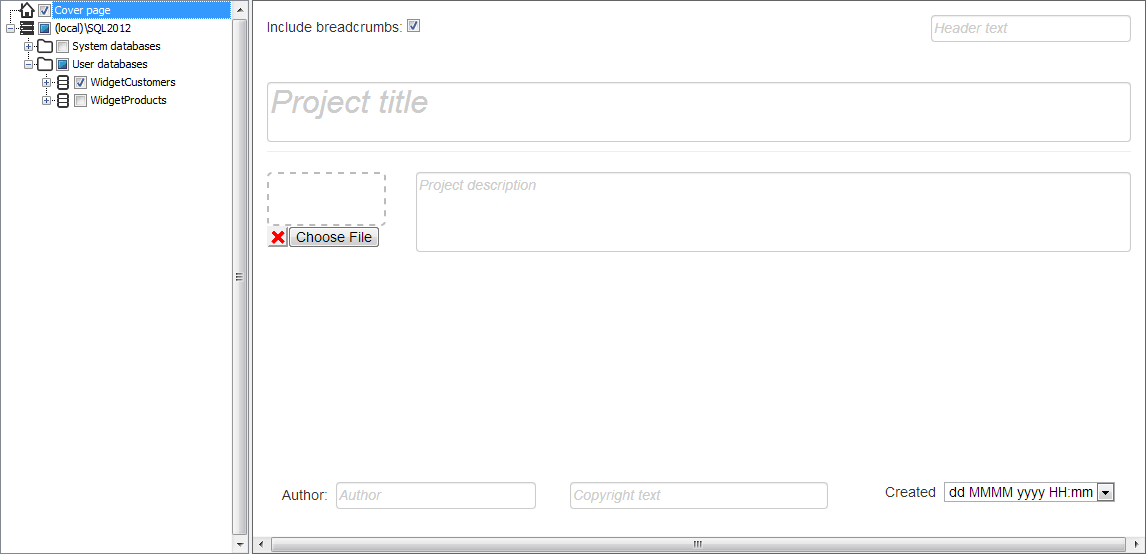
The information on the project's cover page is presented on the Home page of the generated documentation for HTML, and on the first page of the DOC and PDF formats.
- Edit the cover page settings:
- If you don't want breadcrumb navigation hyperlinks added to the generated documentation, clear the Include breadcrumbs check box.
- To include text on the header of each page in the generated documentation, type in the Header text box, then click
 to confirm your changes.
 - To include a title on the cover page in the generated documentation, type in the Project title box, then click to confirm your changes.
To include a logo on the cover page in the generated documentation, click Choose File beneath the Project logo box, and browse for the image file you want to use.
- To include a description on the cover page in the generated documentation, type in the Project description box, then click to confirm your changes.
To include author information on the footer of each page in the generated documentation, type in the Author box, then click
to confirm your changes.By default, the author information is set to the value of the principal login or role you use to access the SQL Server instance. Otherwise, the SQL Server user name is used for the author information.
If you don't want to display the author in the generated documentation, delete any text in the Author box, then click
to confirm your changes.- To include copyright information on the footer of each page in the generated documentation, type in the Copyright text box, then click to confirm your changes.
To include a timestamp on the footer of each page in the generated documentation, select a format from the Created box, or select Custom to enter your own timestamp format; then click
to confirm your changes.The Created box offers a choice of timestamp formats:
Format Example dd MMMM yyyy HH:mm 24 October 2013 13:30 dd MMMM yyyy 24 October 2013 dd MMMM 24 October yyyy/MM/dd 2013/10/24 dd/MM/yyyy 24/10/2013 MM/dd/yyyy 10/24/2013 Timestamp formats use standard Windows format strings, such as dd and yyyy. Custom Date and Time Format Strings (Microsoft documentation) lists all possible format strings that you can use with SQL Doc. For example, hh presents the hour using the twelve-hour clock format (from 01 to 12), and K presents time zone information.
When you have edited the settings as required, click
 Save Project to save all your changes.
When you save the project, SQL Doc remembers the cover page settings, and will use these as the default settings for the next new project you create.
Customizing the documentation
The documentation preview for a single object (such as a table  , view
  , or stored procedure
  ) shows the individual sections that will appear in the documentation. Examples of sections include Properties, Columns, and SQL Script.
The documentation preview for a group of objects  , database
  , or SQL Server instance
  , also shows a Sections to include section. This isn't shown in the generated documentation.
You can customize the documentation by excluding specific sections (such as Columns, or Indexes), and by excluding specific properties (such as Collation, or Edition). To exclude a section or property from the generated documentation, clear the Include check box for the relevant section or property:
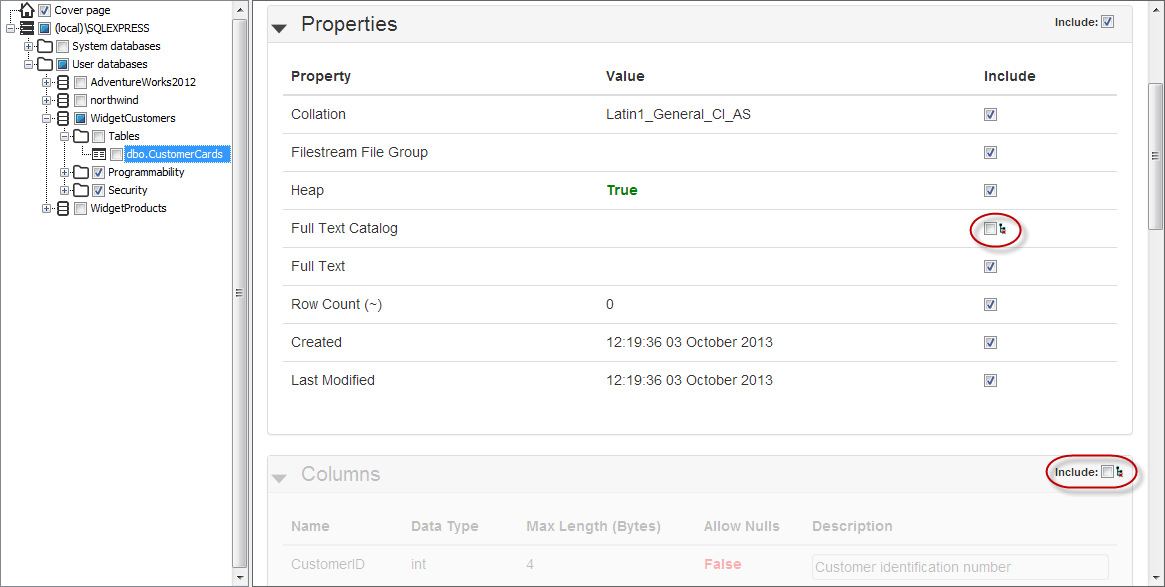
You can fine-tune the documentation to suit your needs by excluding sections and properties from the documentation at different levels (for example, for individual objects, groups of objects, a database, or an entire SQL Server instance). Exclusions made at a higher level are inherited by child objects. For example, a section excluded at database level will also be excluded for all table objects in the database. You can break this inheritance for individual child objects by re-including any sections or properties that were excluded by a parent object.
To customize the documentation:
In the left-hand pane, select the object, group of objects, database, or SQL Server instance that you want to customize.
The documentation preview for the item is displayed.At this stage, it doesn't matter whether you also select the check box for the folder or object.
In the documentation preview, choose which sections and properties will appear in the generated documentation by clearing or selecting the appropriate Include check boxes. By default, all sections and properties are included.
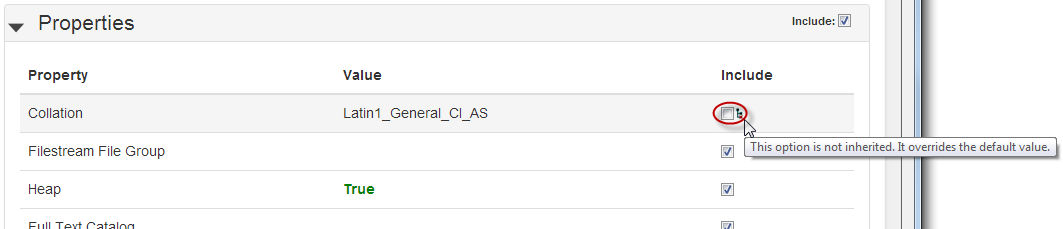
A "not inherited" icon
 is shown whenever you override the Include value that would otherwise have been inherited from a parent folder, database, or SQL Server instance. More information is provided by the icon's tooltip.
Selecting the databases and objects to document
You specify the objects you want to document by selecting the appropriate check boxes in the left-hand pane.
In the following example, the generated documentation will include a cover page, all objects from the WidgetProducts database, and selected Stored Procedure objects from the WidgetCustomers database:
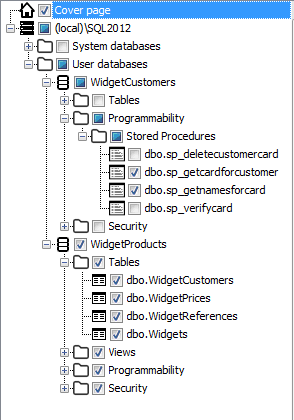
SQL Doc displays only the databases and objects for which you have the appropriate permissions.
If the database structure has been modified while you are working on a documentation project, click ![]() Refresh to update the list. SQL Doc retains your object selection when it refreshes the list of databases and objects.
Refresh to update the list. SQL Doc retains your object selection when it refreshes the list of databases and objects.
You must select at least one database object to include in the generated documentation. If you don't, the ![]() Generate documentation action is disabled.
Generate documentation action is disabled.
Editing object descriptions
For each object, SQL Doc displays the text that is stored in the MS_Description extended property in your SQL Server database. For tables, you can edit descriptions for columns, indexes, triggers, and constraints; for views, you can edit descriptions for columns, indexes, and triggers. Object lists and database summaries also include editable description data.
To edit an MS_Description extended property, you must have the appropriate permissions.
When you edit MS_Description data, any changes you save are written directly to the SQL Server database.
SQL Azure does not support MS_Description extended properties.
To edit object descriptions:
- In the left-hand pane, select the object to display its documentation preview.
- In the preview, click the relevant description box, and type to edit the description.
- Click
 to save your change.
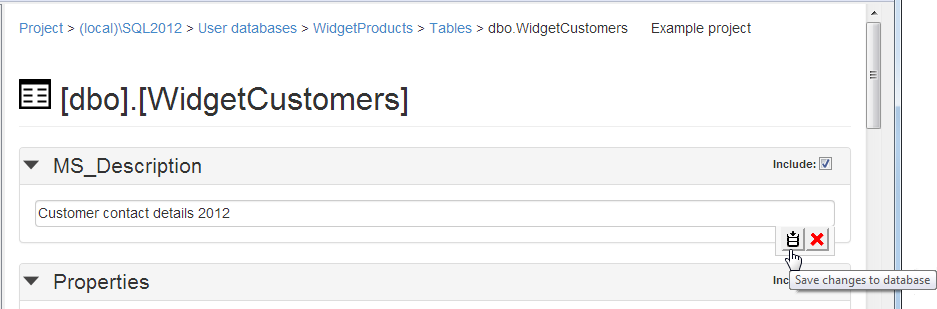
SQL Doc updates the extended properties in your SQL Server database.
This documentation contains proprietary information and is protected by copyright law.
Copyright © 2026 Red Gate Software Limited. All rights reserved


