Redgate Test Data Manager

Redgate Test Data Manager Implementation Checklist

Overview

This checklist guides new users through setting up and deploying Redgate Test Data Manager for a successful Proof of Concept (PoC).

Our product includes a user-friendly GUI along with powerful CLI tools including anonymize, subsetting, and cloning.

Important – In all cases, we recommend you use a separate, non-essential environment for the Proof of Concept. We cannot accept responsibility for any issues resulting from setting up the Proof of Concept. Any activities carried out on production or otherwise important systems are not advised and at your own risk.

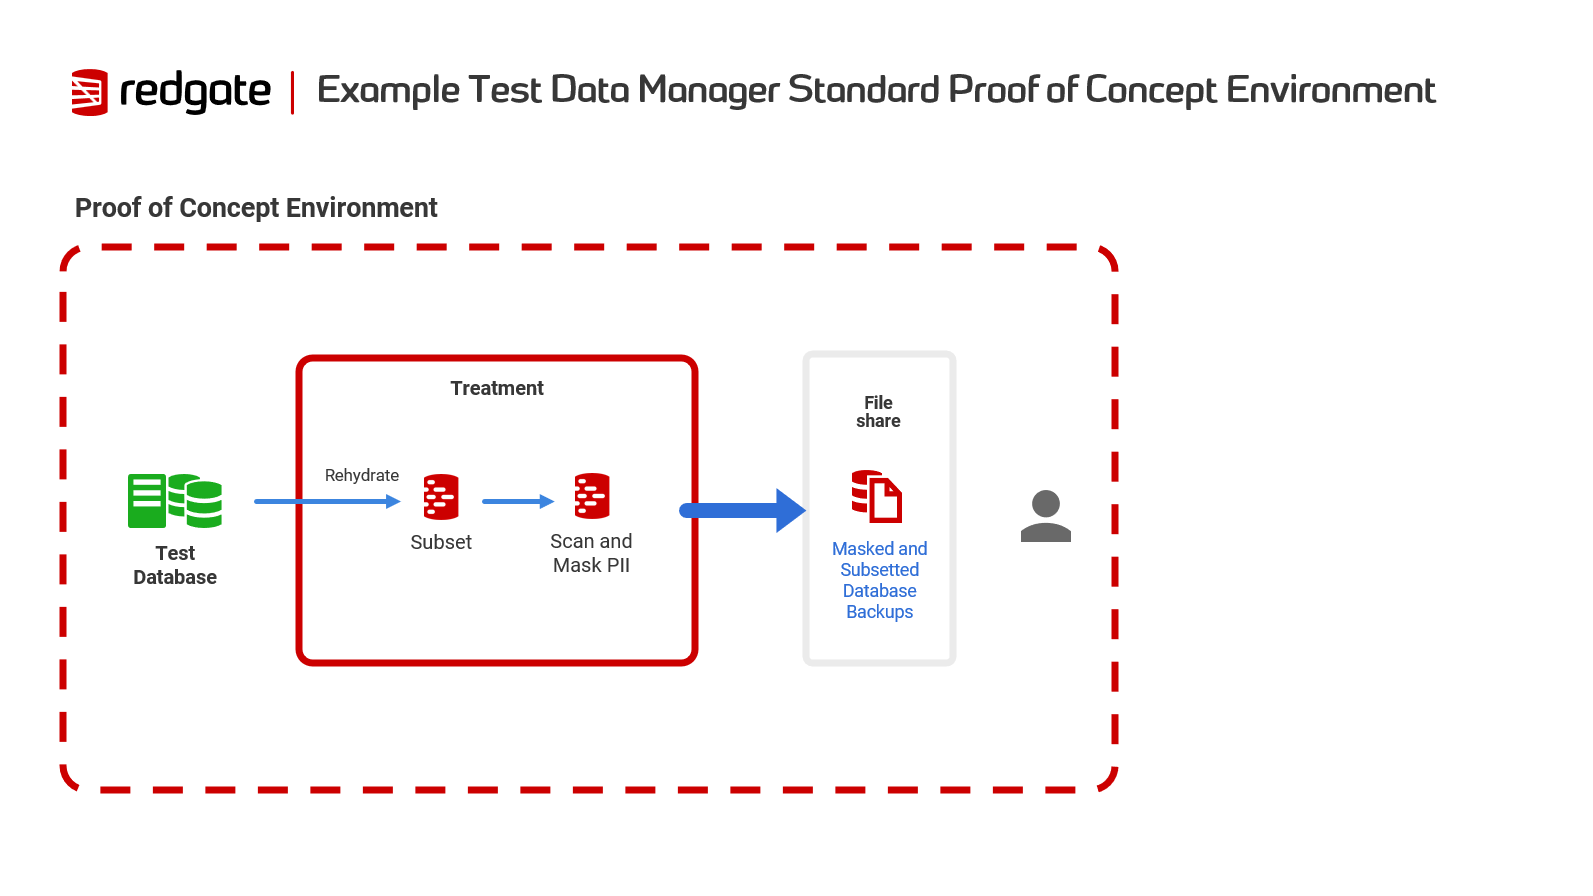
Before You Start: What you need to know 

  • Test Environment: Use a dedicated test environment to keep live data safe similar to the proof of concept environment below.
  • System Requirements: Make sure your system meets our minimum requirements in the installation guides here for a smooth setup. And check out some suggested set up tips in our architecture diagrams.
  • Skills needed:  Linux skills and SysAdmin skills are needed. Some Kubernetes knowledge is recommended.
  • Licensing: Check out our licensing page to understand how to start your trial
  • Check Foreign Key Relationships: Subset requires Foreign Key relationships. We've created some scripts to help you identify FK links across your database.
  • Redgate University Courses: For videos and top tips from the experts, take a look at our Test Data Manager courses on Redgate University.


Installation Overview

GUI Installation

For users who prefer a graphical interface, Test Data Manager includes a GUI that provides an intuitive way to manage your test data operations.

Key Benefits of the GUI:

  • Visual interface for configuration and monitoring
  • Streamlined workflow management
  • Built-in validation and error checking
  • Progress tracking for long-running operations

Complete GUI Installation Guide - Follow our step-by-step guide that covers:

  • Hardware and software requirements
  • Database setup and configuration
  • License activation
  • Installation procedure with screenshots
  • Initial configuration and testing

Anonymize and Subsetting Command Line Installation

  • Download links
  • Anonymize: For installation and initial setup of the Anonymize tool, refer to this link.
  • Subsetting: Installation instructions for the Subsetting tool and requirements.
    • Subsetting requires both a source database, usually a rehydrated copy of production, and a target database. More detail below.

For some suggested workflows for Test Data Manager, and visual explanations of the subset and anonymize command lines take a look at our architecture pages.

Getting Started with Subsetting

Database Prerequisites Check for Subset

Why Foreign Keys Matter:

  • Subsetting maintains referential integrity by following foreign key relationships
  • Without FKs, the tool cannot determine which related records to include
  • Missing FKs may result in orphaned records or incomplete data sets

🔍 Quick Check: Run the FK discovery queries below first to ensure your database is ready for subsetting

Use these queries to verify your database structure:

SQL Server Relationships

-- Check foreign key count by table
SELECT 
    t.name AS TableName, 
    COUNT(fk.object_id) AS ForeignKeyCount 
FROM sys.tables t 
LEFT JOIN sys.foreign_keys fk ON t.object_id = fk.parent_object_id 
GROUP BY t.name 
ORDER BY ForeignKeyCount DESC, TableName ASC;

PostgreSQL Relationships

-- Check foreign key count by table
SELECT 
    tc.table_name AS TableName,
    COUNT(ccu.constraint_name) AS ForeignKeyCount
FROM information_schema.table_constraints tc
LEFT JOIN information_schema.constraint_column_usage ccu 
    ON tc.constraint_name = ccu.constraint_name
WHERE tc.constraint_type = 'FOREIGN KEY'
GROUP BY tc.table_name
ORDER BY ForeignKeyCount DESC, TableName ASC;

1. Prepare your environment:

Source Database

  • Use a representative or test database for your subsetting source in a proof of concept.
    • This could be a development or test environment with data patterns similar to production.
  • Ensure you have sufficient access privileges (e.g., db_owner for SQL Server, schema owner for Oracle).
  • For safety, never subset directly from production databases.


Target Database

  • You need an empty database with the same schema structure as your source.
  • You can create this by:
    • Restoring a backup of your source database and then truncating all tables
    • Using your database's schema export/import tools
    • Running database creation scripts that include only the schema objects


Pro Tip: For SQL Server, you can quickly create a schema-only copy using the "Generate Scripts" wizard with the "Schema only" option selected, or by restoring a database with the RESTORE DATABASE command using the WITH REPLACE option and then truncating all tables.

2. Authenticate:

rgsubset auth login --i-agree-to-the-eula

Or start a trial if you don't have a license:

rgsubset auth login --i-agree-to-the-eula --start-trial

3. Run a basic subset using the command line:

rgsubset run
--database-engine SqlServer
--source-connection-string "Server=sourceServer;Database=sourceDB;User Id=username;Password=password;"
--target-connection-string "Server=targetServer;Database=targetDB;User Id=username;Password=password;"

4. Review the results in your target database

Note: When running without specifying a target size or starting tables, the subsetter defaults to creating a subset that is 10% of the original database size (up to a maximum of 1GB).

Using Options File for Advanced Subsetting

For more control, create an options file to define your subsetting parameters.

Create and edit an options file to specify:

  • Starting tables to define which tables to begin subsetting from and optionally filter specific rows (e.g., only customers from a certain region)
  • Static data tables
  • Manual relationships, if your tables aren't liked by Foreign Keys
  • Desired size

For more details check out the options file page

Getting Started with Anonymize

Prepare Your Environment:

  • Create a backup copy of the latest version of your chosen database.

For a step by step guide to Anonymize, check out our Worked Example.

For more details and advanced configuration options, refer to the Anonymize command line reference.

Getting started with Clone

  1. We'd recommend then moving on to the installation of Clone as this will provide your environment for delivering test data.
  2. See our guide on how to get set up.

Next Steps

  1. Learn More:
    • Dive deeper into Test Data Manager by exploring our Redgate University videos for comprehensive tutorials and demonstrations.
  2. Explore Individual Capabilities:
    Discover the full potential of Test Data Manager by visiting our dedicated pages for each key feature:
    • Clone: Create lightweight copies of your databases for testing and development.
    • Subset: Intelligently build small subsets of data from large databases.
    • Anonymize: Protect sensitive information by replacing it with realistic, anonymized data.


Didn't find what you were looking for?