Proof of Concept Checklist
Published 26 March 2019
This page is no longer maintained. Please find the latest POC Checklists for Redgate Deploy at https://documentation.red-gate.com/rgd/database-devops-resources/proof-of-concept-checklist.
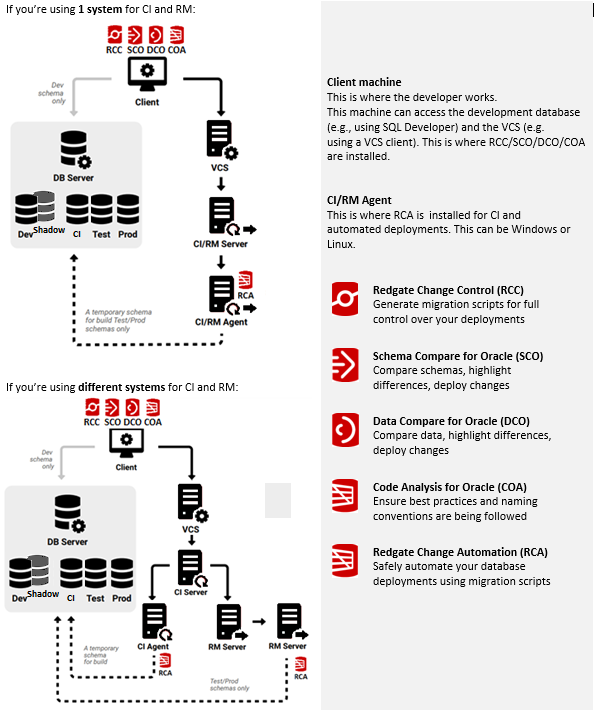
Redgate's solution integrates with existing version control, Continuous Integration (CI) and Continuous Delivery (CD) systems. This Proof of Concept checklist explains what needs to be in place and what needs to be installed where for a successful proof of concept.
If you have any questions about getting started with our Database DevOps for Oracle solution, please reach out to Sales.
Click here for the State-based Proof of Concept Checklist
Click here if you're using Source Control for Oracle and automating your deployments with a state-based approach.
Use the following example if you are using Redgate Change Control and Redgate Change Automation in a migrations-based or hybrid approach.
Migrations-based Proof of Concept (POC) Checklist
Version Control – Client Machine
Before installing and setting up Redgate Change Control for database version control, you need to:
- Install or get access to a version control system (VCS) (e.g., Git, Azure DevOps Repos, Subversion, etc.) or get access to a hosted system like GitHub or Azure DevOps Repos, which both have free versions. Make sure you have admin access and known credentials for a user.
- Pick a development database that you have full access to for use in the POC.
- For POCs on Oracle 12c+, it may be easier to have one Oracle instance with a container database (CDB) containing multiple pluggable databases (PDBs) to represent different environments (DB_NAME_DEV, DB_NAME_SHADOW, DB_NAME_TEST, DB_NAME_PROD).
- To simplify the POC, choose a schema that doesn't rely on any database links.
- Ensure the client’s machine can connect to the given Oracle database (e.g., using SQL Developer).
- Ensure the client machine can connect to the VCS (e.g., using your VCS client).
- Arrange admin access for all developer machines involved in the POC for installation purposes.
- Download and install the Redgate Deploy from redgate.com/oracle on all client machines. For the POC, please install:
- Redgate Change Control
- Schema Compare for Oracle
- Data Compare for Oracle
- Code Analysis for Oracle
Continuous Integration (CI) – Build Agent
Before installing and setting up Redgate Change Automation for database Continuous Integration (CI), you need to:
- Install or get access to a CI system (e.g., Jenkins). Make sure you have admin access for a known user.
- Identify an Oracle instance that can be used as part of the build process to build and test the database code. (For POCs on Oracle 12c+, we recommend a separate PDB on the same instance used above.)
- Install your CI agent (or equivalent) and set up a path of communication to the CI tool. This agent should also have access to the Oracle instance identified for build purposes
- Ensure the CI installation has a clear path of communication to your VCS.
- Arrange admin access on all machines involved in the POC for installation purposes.
- Install SQL*Plus on the CI agent.
- Download and install the Windows or Linux versions of Redgate Change Automation and Code Analysis for Oracle from https://documentation.red-gate.com/dso on your CI agents. This allows you to:
- Quickly validate the scripts in your repository
- Execute any utPLSQL tests
- Run code analysis to ensure best practices and naming conventions are being followed
Automated Deployments – Release Agent
Note: If you are using one system for CI and automated releases (e.g., Jenkins), then you can skip these steps.
Before installing and setting up Redgate Change Automation for automated database deployments, you need to:
- Install or get access to a release management (RM) system (e.g., Jenkins). Make sure you have admin access for a known user.
- Install your RM agent (or equivalent), and ensure it has a path of communication to the RM server. This agent should also have access to the target Oracle instance for deployment (e.g., maybe a Test or QA DB).
- Arrange admin access on all machines involved in the POC for installation purposes.
- Install SQL*Plus on the RM agent.
- Download and install the Windows or Linux versions of Redgate Change Automation from https://documentation.red-gate.com/dso on your RM agent. This allows you to:
- Generate reports to easily review schema changes
- Create Schema Compare for Oracle snapshots for an easy starting point for rollbacks
- Check for drift to ensure repeatable deployments
- Review and execute the necessary migration scripts against your target database(s)
For the POC, we recommend Oracle 12+ and using an Oracle instance with a CDB and separate PDBs for the different environments. If you want a completely isolated Oracle instance for the POC, think about Oracle Database XE, which is free for development purposes.
Please note – In all cases we recommend you use a separate, non-essential environment for the POC. We cannot accept responsibility for any issues resulting from setting up the POC. Any activities carried out on production or otherwise important systems are against our advice and at your own risk.


