Using SmartAssembly with ReadyToRun images (.NET Core 3)
Published 27 March 2020
.NET Core 3.0 introduced the ability to create ReadyToRun (R2R) binaries, aimed at improving the startup performance of applications.
Usually, a regular .NET assembly only contains managed code (Intermediate Language Code, or IL) which is compiled to native code by the just-in-time compiler (JIT) after the application starts. Assembly built as ReadyToRun not only contains managed code, but also parts of it already precompiled to its native form – this greatly reduces the work required by the JIT to load your application, because it was done ahead-of-time.
ReadyToRun is only available when publishing a self-contained .NET Core application, targeting a specific environment and bitness.
You can download a working example of protecting a ReadyToRun .NET Core application with SmartAssembly.
See our GitHub repository: https://github.com/red-gate/SmartAssembly-demos/tree/master/msbuild-integration-demos/netcore3-ready-to-run
Getting started
First, let's see how a regular process of publishing a .NET Core application looks like.
Suppose we have a .NET Core 3.1 application called ConsoleApp, defined by the following project file:
<Project Sdk="Microsoft.NET.Sdk">
  <PropertyGroup>
    <OutputType>Exe</OutputType>
    <TargetFramework>netcoreapp3.1</TargetFramework>
  </PropertyGroup>
</Project>
To publish this application we would use the following command:
dotnet publish .\ConsoleApp.csproj -c Release -r win-x64
The command above will build the application in "Release" mode, and then publish as 64-bit Windows application. Because we used a runtime identifier (win-x64), the application will be published as self-contained, meaning all the assemblies required to run it (including .NET Core framework's assemblies) will be copied to the published directory. Providing a runtime identifier is crucial to use "ReadyToRun" later.
After the publishing is done, go to the output directory (this would be \ConsoleApp\bin\Release\netcoreapp3.1\win-x64\publish\ for the app above). Take notice of a ConsoleApp.dll file and it's size.
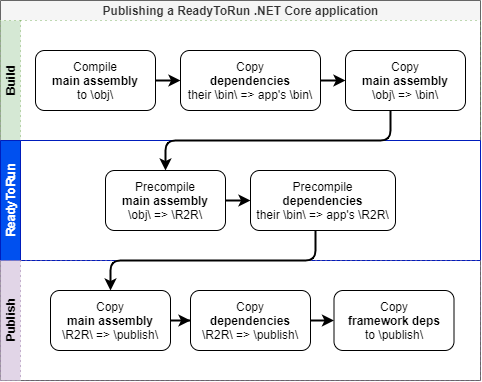
The process of publishing the self-contained .NET Core application can be visualized as follows:

Using ReadyToRun
Now let's publish our application as ReadyToRun. All we need to do is add a PublishReadyToRun property with value set to true.
<Project Sdk="Microsoft.NET.Sdk">
  <PropertyGroup>
    <OutputType>Exe</OutputType>
    <TargetFramework>netcoreapp3.1</TargetFramework>
    <PublishReadyToRun>true</PublishReadyToRun>       <!-- add this line -->
  </PropertyGroup>
</Project>
Let's issue the publish command again:
dotnet publish .\ConsoleApp.csproj -c Release -r win-x64
After the process is done, navigate to the published directory (\ConsoleApp\bin\Release\netcoreapp3.1\win-x64\publish\ for the app above) and look at the ConsoleApp.dll file. You should see that its size has increased when compared to publishing without ReadyToRun earlier.
Let's see how the publishing process has changed after enabling ReadyToRun:
Integrating SmartAssembly
For the final step let's protect our assembly before it's compiled into ReadyToRun format.
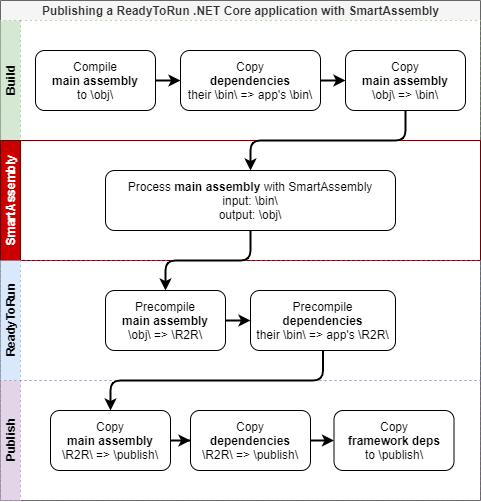
SmartAssembly will be executed after your application is built, but before pre-compiling it to ReadyToRun format. This is shown on the diagram below:
Step 1: Creating a SmartAssembly project
- Open SmartAssembly.
- Click New Project.
- Click Browse Assembly.
- Navigate to your application's output directory, choose the appropriate assembly (for the app above it'd be: \ConsoleApp\bin\Release\netcoreapp3.1\win-x64\ConsoleApp.dll) and Open.
- Click Set Destination.
- Navigate to your application's \obj\ directory (for the app above it'd be: \ConsoleApp\obj\Release\netcoreapp3.1\win-x64\ConsoleApp.dll) and Save. If the file already exists click Yes to overwrite.
- Configure the project as needed. Enable any protections your application may need.
- Click Save to save the project. It's recommended to save the project in the same location as Visual Studio's project file, under the same name (for the app above it'd be: \ConsoleApp\ConsoleApp.saproj).
"Dependencies Merging" and "Dependencies Embedding" should not be used when protecting a ReadyToRun assembly. Merging or embedding assemblies can result in unexpected behavior and isn't recommended for this type of applications.
Step 2: Integrating SmartAssembly into the publish process
- Open your application's project in Visual Studio.
- Right-click the project name and select Manage NuGet packages...
- Switch to the Browse tab.
- Type RedGate.SmartAssembly.MSBuild and click Install next to it.
That's it! After performing the steps above, your project file should look like the following:
<Project Sdk="Microsoft.NET.Sdk">
  <PropertyGroup>
    <OutputType>Exe</OutputType>
    <TargetFramework>netcoreapp3.1</TargetFramework>
    <PublishReadyToRun>true</PublishReadyToRun>
  </PropertyGroup>

  <ItemGroup>
    <PackageReference Include="RedGate.SmartAssembly.MSBuild" Version="7.4.0.3402">
      <PrivateAssets>all</PrivateAssets>
      <IncludeAssets>runtime; build; native; contentfiles; analyzers; buildtransitive</IncludeAssets>
    </PackageReference>
  </ItemGroup>
</Project>
Now let's issue the publish command once again:
dotnet publish .\ConsoleApp.csproj -c Release -r win-x64
If you're running multiple consecutive builds of the same project you should clean the project before or after each build. Because SmartAssembly obfuscates the assembly into \obj\ directory, the obfuscated version might be picked up by the build command next time leading to double-obfuscation and other unexpected results.
To clean the project either manually remove the \obj\ directory or issue the following command (using the same configuration and runtime identifier used for publish):
dotnet clean .\ConsoleApp.csproj -c Release -r win-x64
If everything went well, you should see additional output messages in the command line confirming that SmartAssembly has successfully protected your application (paths were shortened for clarity):
Microsoft (R) Build Engine version 16.5.0+d4cbfca49 for .NET CoreCopyright (C) Microsoft Corporation. All rights reserved.Restore completed in 206.38 ms for C:\[..]\ConsoleApp\ConsoleApp.csproj.ConsoleApp -> C:\[..]\ConsoleApp\bin\Release\netcoreapp3.1\win-x64\ConsoleApp.dllExecuting SmartAssembly from: C:\PROGRA~1\Red Gate\SmartAssembly 7\SmartAssembly.comUsing project: C:\[..]\ConsoleApp\ConsoleApp.saprojSmartAssembly v7.4.0.3402 PersonalCopyright c Red Gate Software Ltd 2005-2020Loading project C:\[..]\ConsoleApp\ConsoleApp.saprojInput=C:\[..]\ConsoleApp\bin\Release\netcoreapp3.1\win-x64\ConsoleApp.dllLoading...Starting...Analyzing...Preparing...Creating assembly...Copying additional files...OKConsoleApp -> C:\[..]\ConsoleApp\bin\Release\netcoreapp3.1\win-x64\publish\
This documentation contains proprietary information and is protected by copyright law.
Copyright © 2026 Red Gate Software Limited. All rights reserved


