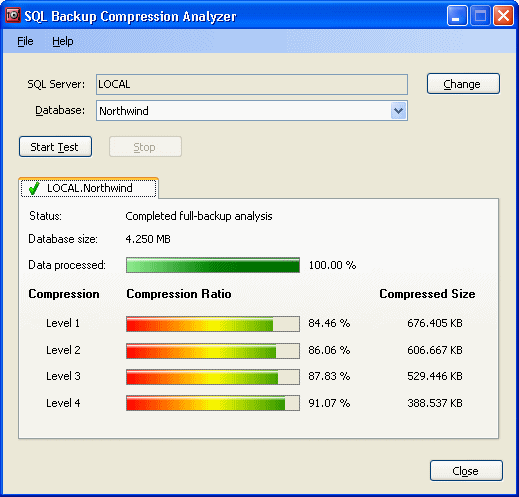
Compression analyzer
Published 22 November 2018
You can use the SQL Backup Compression Analyzer to compare the effectiveness of different compression levels for full database backups on a selected database.
From within the SQL Backup Pro graphical user interface (GUI), you can launch the Compression Analyzer:
- from Step 4 of the Back Up wizard
- from Step 5 of the Schedule Backup Jobs wizard
- from the Tools > Utilities menu
SQL Backup Pro automatically selects the SQL Server that you have already chosen in the Registered SQL Servers pane or in the wizard.
In the Connect to SQL Server dialog box, type or select the name of the SQL Server. Then select the authentication method, and for SQL Server authentication enter the User name and Password. For Windows authentication, the credentials of the current user are used.
The Compression Analyzer is displayed. Select the database for which you want to compare compression levels, and click Start Test.
If you want stop the analysis, for example because the database you have chosen is large and the analysis is taking too long, click Stop. However, note that results are based only on the data that has been sampled so far; for a fully accurate result you must allow the analysis to finish.
The results of the analysis are displayed in a tab.
If you stopped the analysis before its completion, the Data processed bar indicates the proportion of data that was analyzed.
For each compression level, the percentage of compression is shown under Compression Ratio. In the above example, Level 4 produced the best compression. For more information about compression levels and compression ratios, see Compression levels.
You can then select another database to analyze, if required. The results for the second database are shown in a separate tab, so that you can compare the results. To delete a tab, right-click the tab header and click Delete.
To analyze a database from a different SQL Server, click Change and specify the details of the SQL Server.


